Translate

Saturday, September 25, 2021

Halloween Treat Cards with Graphic 45 Midnight Tales

Welcome back and Nancy, here.  Get ready to dish out some fun surprises this Halloween with these simple treat card holders with a pocket to fit favorites like mini candy bars, lollipops, gift cards, and even cash. No matter who you gift your treat holder to, each one says “Trick or Treat” in its own unique way.   I will be showing other cards and projects each week showcasing the Graphic 45 Midnight Tales collection.  


This collection is filled with vivid fall colors of gorgeous fairies, witches, pumpkins and black cats along with these little beautiful flowers.  You will have fun playing with the Graphic 45 Midnight Tales for your photo albums, projects and cards.  


The card measures 5 1/2 x 7" and it is a tri-fold meaning three pages.  I always use heavy weight white poster board to prevent any warping since my cards have layers and weight from the embellishments.  I wrap the cards with saran wrap before sliding the card in a bubble envelope so that some of the embellishments don't stick through the envelope and get ruined in the mailing.  

I cut out two 10 3/4" x 7" frame and scored at the 5 1/2" and 6" for each panel.  I glued each side together on the panels to form the three sides.  

Now the fun begins of the layers and embellishments.  I am using the Graphic 45 Midnight Tales Ephemera and Journal cards for most of the pages along with four sides of the Graphic 45 Midnight Tales cardstocks.  I found some solid orange, purple and black cardstock to frame the journal cards.  

Also, I made earlier the moon using epoxy resin in the  Prima Marketing mould-Nocturnal Elements and colored it with Prima Marketing Redesign Brass wax.  

I handmade the purple flower using the Graphic 45 Tags and Flower Die set and sponged on Distress purple ink.  The leaves were cut out using the Heartfelt Creation Classic Rose Vine die set.  I used the Dress My Craft Pink Celebration Sequins and 28 Lilac Lane Shaker Mix - Safari Sunrise.   along with the gorgeous glass looking Stamperia Glamour Green Sparkles around the cut out Enchanting Banner from the collection and adhering it with Beacon 3-in-1 Advanced glue.  I fussy cut a pumpkin from a journal card and used my fingers behind the pumpkin to form a 3D and just glued behind the edges of the pumpkin to the card to emphasize the pumpkin.

I made the inside pocket using solid black cardstock and cut a 6 1/2" x 6" and scored the length on each side on the score line at 1/4" and  1/2" and for the height, score at 3" and 3 1/2".  The front measures 5 1/2" length and 3" height.  Fold the score lines and glue to form the box.  Glue to the card.

I covered four sides since the right side folds inside the card and there wasn't anything on it so it looks more complete have to do this side when it is taken out of the envelope and opening it up.

So get crafting for Halloween for your little spooks and goblins and hope this will inspire you with ideas and supplies all available at The Rubber Buggy.

My cards and projects are always posted on Saturday.  Keep watching and thank you so much for those wonderful comments as well as suggestions. 

Enjoy and Happy Crafting!


Saturday, September 18, 2021

Baby Girl Easel Card with Moulds

Welcome back and Nancy, here to share a fun shabby chic little girlie card for our special great daughter's 1st birthday.  As grandparents, we can't have enough grand kiddos and so excited to celebrate this big birthday with her. 

 Let me guide you through how to make your very first easel card with my step by step photo and written guide that walks you through the process. Once you learn how to make easel cards, you won't want to stop and the easel frame adds some pizzazz and dimension to your finished handmade card

Easel cards stand up and look fabulous on display and offer something very different from the normal greeting card and can be folded flat for mailing. One thing to note with easel cards is when they are on display, part of the inside of the card is visible. 


Step 1:  Creating the Front of the Card
My top and bottom card measures 6" wide and 6 1/2" length. Therefore, I will be adding an extra length to the bottom of my easel base when I am ready to cover the bottom with pattern paper and attaching it to the easel.  

 I am using the Lemon Craft paper collection for this card.  There are so many gorgeous Lemon Craft paper with roses even though this one isn't in stock at this time.  I cut out the doily and We stamp and adhered together and added 5mm flat back pearl around the oval.  I made the Zuri Design Flower Festival rose mold using epoxy resin since it is very light weight and bends for mailing.  I colored the roses with Prima Marketing Butterfly Pink and Prima Marketing Mint Green acrylic paints.  I used Prima Marketing Rose Gold wax on the metal corner embellishments and used glue to adhere.  I added a purple cardstock to frame the patterned paper.

I added some NUVO White Blizzard Glitter drops to the cake and the bubbles for some added dimension and shine.

Step 2:  Easel Frame and Marking Where to Fold Your Easel Card
Score the center of the 6" x 12" which would be at 6" and then score again at the 3" line. (NOTE:  Modify the width of the easel to the width of the front of your card.) This will create the easel frame.  In the past when creating larger cards, I cut out a larger bottom and adhered to the easel card to match the size of the front of the card.) If you don't have a scoring tool or scoreboard, you can just fold the card by hand. You won't get such a good crease but it works. Use a scoring tool and ruler or don't press too hard in case you rip the card. Score 2 or 3 times with less pressure to make a good crease line.

Line up the bottom almost half of your card front with front of the easel fold and glue.  This will now face toward you and will fit on the lower part of the easel base. Below, you can see the shape of the fold in the photo. I have taken a sideways shot to emphasize the fold more.

Step 3:  Inside Card With Decorative Paper
I cut out a 6" x 6 1/2" purple cardstock for the inside of the easel card.  The pattern paper should be cut large enough to cover about 2/3rds of the bottom since only 1/3 or 1/2 will be shown.   Your easel card needs something that helps it to stay propped open when on display. Decorate the inside with decorative paper but also include an embellishment with 3D foam dots, 3D tape or mold for the front of the card to hold it in place for when the easel card is open and prevent it from sliding forward.  

To make the easel card stand up by itself, I added the Prima Marketing corner mold on each side the inside of your card. It is best to have that embellishment or mold at least 1/3" to 1/2" into the card from the bottom up.  In the past, I have even added flowers, a frame or label with 3D popups on the back for this height.  In the past, I didn't have it high enough and the front of my card would slip out of the easel base so I added extra weight of an embellishment on the bottom of the front of my card to hold it in place.  


I made some handmade flowers using the Lemon Craft paper that was used for this card. 

I created this molded frame with epoxy resin from the Prima Marketing Grungy frame mold and colored it with Prima Marketing White Pearl and then used my fingers to highlight parts of the frame and corner mold with Prima Marketing Rose Gold Metallique wax.  
  1. You've seen the tutorial and photo and now you need to try it!  Please share you experience and a photo of your easel card on The Rubber Buggy Brigade Group Facebook.  Enjoy making some wonderful cards.
  2. So get crafting and have a fabulous  day and thanks for visiting.

     The Rubber Buggy has the crafting supplies for your next project. So have fun crafting this weekend with these products.   My cards and projects are always posted on Saturday.  Keep watching and thank you so much for those wonderful comments as well as suggestions. 

    Enjoy and Happy Crafting!


Saturday, September 11, 2021

Shabby Chic Barn Shaped Card

  Welcome back and Nancy, here, to share another barn shape card but this time it is a shabby chic barn shape card.  I created a step-by-step with a printable template that I made for you to make your next barn shape card.  The Rubber Buggy has these supplies available and these cards were made with the Graphic 45 Farm House collection and Simple Story Vintage Garden and Farm cut out that are in packages .  


Here are two barn shaped cards with fun farm animals and good ole home grown vegetables inside each card. 

On the right, is a previous barn card that I made and for details with step-by-stem instructions, click HERE.

NOTE:  This template was also used for the previous barn card so just use the shape of this barn for the shabby chic barn-shaped card.

Supplies:  
Cream Cardstock
Burlap ribbon
Wild Orchid Craft flower Chrysanthemums


Instructions:

Front of Card

1.  Score in the center a 12" cream cardstock.  Lay out the template and put the bottom left side of the barn on the score line and cut out the barn.    Glue around the barn and lay the flowery paper on the glue and then cut out the barn.  It is easier to do this than measuring and trying to get a good fit.

2.  Cut out the Laugh, Love and Live border in the the Graphic 45 Farm House paper and adhere across the barn.
  
3. Brush the brass wax on the rustic wheel and wheat chipboard and adhere with clear glue to the card.  Also, I added the Prima Marketing pebble to a metal cog and adhered it in the center of the wheel with glue.

4.  Add a handmade burlap ribbon and use a hot glue gun and center the flower on the bow.

Inside:

1.  Adhere glue to the top half of the barn and lay the chicken paper on the glue and then cut out the sides.

2. Cut out strips of 1/4" wide strips and glue around the top of the barn with a little bit sticking out from each side.  Also glue the strip to the sides of the chicken paper.  Add a brown fence sponges a little with the brass wax to the front of the barn.  Add Simple Stories garden and farm pieces to the inside as well as the stickers from the Graphic 45 Farmhouse.

3.   On the right side, I copied a photo of a mule and used Adobe Photoshop and added in the sentiment.  

4.  Cut the Happy Place border from the Graphic 45 Farm House paper pad and use glue to go across the barn.  Add a sticker from the Graphic 45 Farm House collection.

Hope you have a fun time making your country farm cards for your family and friends.

So get crafting and have a fabulous day and thanks for visiting.

 The Rubber Buggy has the crafting supplies for your next project. So have fun crafting this weekend with these products.   My cards and projects are always posted on Saturday.  Keep watching and thank you so much for those wonderful comments as well as suggestions. 

Enjoy and Happy Crafting!


Saturday, September 4, 2021

Baby Boy Explosion Box Card

Welcome back and Nancy, here.  If you’re interested in taking your next greeting card over the top, an explosion box is worth creating. What a  perfect way to tell someone you love them, you’re thinking of them or you can’t wait to meet their new little bundle of joy. 

An explosion box is a greeting card in a handmade gift box made from sheets of cardstock.   When you remove the lid of the box, the card opens up to reveal personalized messages and other decorated elements crafted by you. Once you’ve finalized the finishing touches on the inside, fold all of the layers together and add your lid to the top. 

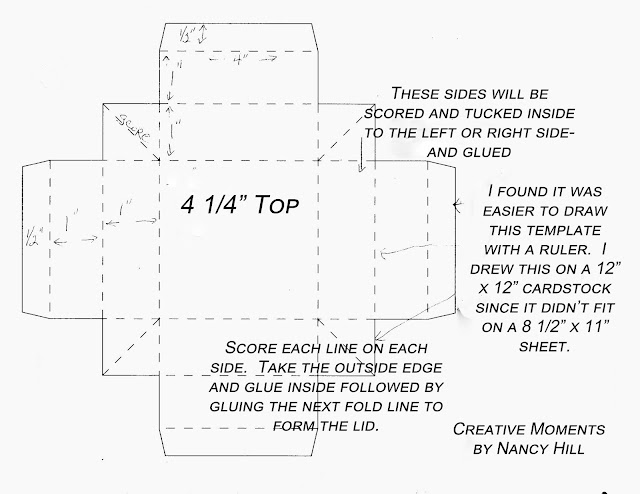
 I made the explosion boxes before but this time, I spent more time thinking about how embellish it than creating it so I hope my instructions, templates and list of supplies and products will save you lots of time to put your explosion box together for that special person. Even if you’ve never made an explosion box before, I have you covered with my detailed step-by-step and template for you to follow and this very adorable baby boy 4" square explosion box won't take you much time to create.  All of your wonderful craft supplies and products are available at The Rubber Buggy.com.  


Supplies:
Heavy White Cardstock - I like the 110lb weight for extra strength but 80lb weight will also be fine
Ruler
A1 Creative White Stone Resin or epoxy resin for the moulds


5mm flat back string of pearls
Baby mould or anything you want for the center
Prima Marketing Art Alchemy Magic Pond Blue acrylic paint for the baby's hat along with Prima Marketing White Pearl acrylic paint for the bunny's tail on the baby.
Copic Marker E00 and R20 to color the baby's body 
Wild Orchid Craft 10mm white roses and Wild Orchid Craft Mini Sweet Heart Blossom flowers
28 Lilac Lane Buttons or Attic Button Mix  Buttons were painted with white gesso and painted on light brown acrylic paint to coordinate with the plaid paper
Baby stickers and baby die cuts from my ole stash along with some floral dies and doily dies
Dress My Craft Pink Celebration Sequins which contains clear stars, hearts, etc.


Instructions and Templates


Each side of the white cardstock is covered with 4" square of Stamperia Little Boy papers along with the triangle corners that were cut corner to corner from a 4" square to fit each triangle.

I dotted certain areas with clear glue and slide with a pen the clear stars and golden hearts from Dress My Crafts Pink Soda jar of sequins, stars and hearts.  Then I glued the string of pearls across the hot air balloon and added these die cut sentiments from an old die set. 
I took these buttons and painted some white gesso and painted a light brown paint to blend in with the background.  The adorable gold hearts and clear sequins that have shine with light are from the Dress My Crafts Pink Soda jar of embellishments.  The baby bed was die cut with white metallic or shimmer cardstock.

I used Copic Marker to color the 5mm flat back pearls before gluing in center of flower.  I added the 10mm Wild Orchid Craft rose in the center of the saddle with a string of flat back pearls around the saddle.  I cut the sides of the string of flat back pearls to curl around the saddle.

Found an old sticker to and rhinestone string to embellish this 4" Stamperia Little Boy paper with the baby bear and bunny.  I added the Dress My Craft clear stars and gold hearts with dots of glue.  I punch out the flowers and added 5mm flat back pearls in the center after coloring the pearls with a bluish green Copic Marker.


My baby boy was made with epoxy resin from an old mould. I sprayed on primer and colored the baby's hat with Prima Marketing Magic Pond acrylic paint and the body with Copic Marker E00 and R20 for the cheeks. I colored the bunny tail on the baby with Prima Marketing White Pearl paint.   I cut out a 4" square with Stamperia Little Boy paper and die cut a small dolly for the baby to lay.  I dressed up the square with Dress My Craft clear stars and gold hearts with dots of glue as well as Wild Orchid Craft roses and Sweet Blossom flowers.  

LID


I set the Prima Marketing Gungy frame with epoxy resin.  I had it dry over night and sprayed with primer or white gesso will also work.  I painted the Prima Marketing Gungy frame with Prima Marketing White Pearl Metallic acrylic paint which gives it a shimmer and let dry and then sponged on with my fingers the Prima Marketing Gold Rose wax in areas of the mould to bring out the gorgeous details.  

I cut out the Stamperia Little Boy circle frame and added a 3" diameter doily behind it.  I used clear glue behind the resin frame and held it down for a few minutes with my fingers for the glue to really attach to the cardstock since it wants to pull away a little.  I used a hot glue gun to adhere the flowers and bow next to the frame.  

I used Scor-Tape around the lid and added the blue plaid ribbon.  I handmade the plaid ribbon and used Scor-tape to take it on.  Then I used a hot glue gun to adhere the rhinestone heart and Wild Orchid Craft Sweet Blossom flower in the center of the bow.

Now you have the steps, template and inspiration you need to create your own explosion box!

So get crafting and have a fabulous day and thanks for visiting.

 The Rubber Buggy has the crafting supplies for your next project. So have fun crafting this weekend with these products.   My cards and projects are always posted on Saturday.  Keep watching and thank you so much for those wonderful comments as well as suggestions. 

Enjoy and Happy Crafting!