Translate

Saturday, October 30, 2021

Blue Fern Studio Fairy Whisper Shabby Chic Birthday card

Welcome back and Nancy, here, to share my shabby chic birthday card with the gorgeous Blue Fern Studio Fairy Whisper collection . I just love the beautiful and elegant ladies in this collection of Fern Studio Fairy Whisper of fairies and gorgeous princesses with the unicorns of soft colors of lavender and purple of this gorgeous cardstock in the paper pad to build imaginative projects and cards and available at The Rubber Buggy.com while supplies last which won't be long so get your order in soon for this collection.

The card measures 6" x 6".  I found this gorgeous vintage lady and corners in the Blue Fern Studios Fairy Whispers Ephemera Pack #2 which also has the other gorgeous ladies in this collection as well as in the Fairy Whisper paper already die cut out for you.  I cut out a 5 1/2" square of Blue Fern Studio Fairy Whisper Bella cardstock and then a 6" square solid purple cardstock for the frame.  I found a Happy Birthday label.  I adhere with a hot glue gun a few Wild Orchid Craft flowers .  I added a strip of vintage lace using 1/2" wide Scor-Tape to adhere it across the card.  I use Scor-Tape to adhere my ribbons since I can easily take the ribbon off the scor-tape if I want to rearrange the ribbon it again but the tape remains sticky enough to stick to the ribbon again.

Blue Fern Studio Fairy Whisper Bella Single Cardstock


So get crafting and have a fabulous  day and thanks for visiting.

 The Rubber Buggy has the crafting supplies for your next project. So have fun crafting this weekend with these products.   My cards and projects are always posted on Saturday.  Keep watching and thank you so much for those wonderful comments as well as suggestions. 

Enjoy and Happy Crafting!


Saturday, October 23, 2021

Lawn Fawn Purrfectly Wicked Birthday Card


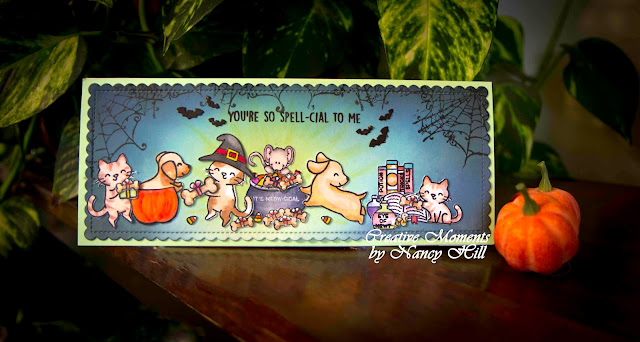
Welcome back and Nancy, here.  I have a nephew's whose birthday falls on Halloween and he loves his dog.  So I made this birthday card with these adorable dogs getting bone treats for Halloween.  So what perfectly way to get started is with the new arrivals of Lawn Fawn Purrfectly Wicked, Lawn Fawn Purrfectly Wicked Add On and  Lawn Fawn Furry and Bright stamp sets.  I will have some very fun Christmas cards made with these adorable stamps this holiday season and excited to share them with you soon. These Lawn Fawn new arrivals will put a spell on you to get your hands on them and create magically cards but better get your order in while supplies last at The Rubber Buggy because these stamps are too cute to pass up.  

I cut out the Lawn Fawn Scalloped Slimline With Hearts die but just used the outside frame.  I love how this fits so well in a regular envelope for easy mailing.  I sponged on the Distress inks such as Black Soot around the edges, Chipped Sapphire Blue and Shabby Shutters in the center.  I found an ole Tim Holtz Halloween web stamp for the sides and also many doggie bones with bows from the Lawn Fawn Christmas Dreams stamp set. Also, I used a pumpkin for the dog from the Lawn Fawn Pick of the Patch stamp set.   I always use Memento Tuxedo Black ink to stamp and color my stamps since I struggle with the other black inks bleeding black into into my Copic Markers colors and use Altnew Crispy Black ink for these tiny sentiments. 

For stamping tips, I always use my Misti My Sweet Petunia Stamp Platform tool.  If you don't have a stamp platform, get it since it is on the top of any stamper's tools and I use mine every time. You will treasure this forever and all of my friends got one after seeing mine to eliminate the frustration of stamping which can be huge. There are many tutorials online to help you get started as well as tips and other techniques. 

I use additional technique for some of the stamping using this platform for this specific stamp set.  Lay the card or image down behind a clear sheet of plastic acetate using the magnetics in the stamp tool. Much easier to stamp and color the images before stamping these tiny words on the books and jars in this stamp set to prevent any black ink bleeding with the Copic Markers coloring before cutting it out.   I stick the stamp where I think I want it stamped in the stamp tool.  I apply the ink lightly on the stamp and then stamp onto the plastic with the card visible.  If it isn't where I exactly want it, I move the stamp or you can sometimes move the card around to try to get the right locations of the stamp.  Try this technique again until you get it where you want.  Then take the plastic off and stamp onto the card.  If you don't have any plastic acetate around, just use the plastic that comes with the stamps. 

I will promote the Lawn Fawn dies that coordinate with the Lawn Fawn stamps but I know many of you would love to create cards using Lawn Fawn stamps but can't due to our aging eye sight as well as our fine motor and hand coordination that prevent us to play with the coordinating dies.  So don't get discouraged and what I have been using works for me perfectly.   I have been using my Brother's Scan and Cut machine for cutting out these tiny stamps; otherwise, I wouldn't have been able to use these very tiny dies for the Lawn Fawn stamps. My grandson who is 5 years old has been using this Brother's Scan and Cut for the past two years all by himself to cut out his Lawn Fawn stamps when he is here with me crafting away! I stamp all of the images a couple of times on 100lb heavy weight Neenah paper, color with Copic Markers, copy it off the printer using 80lb Neenah smooth cardstock and save the original to copy again and the cut with the Brother's Scan and Cut machine.  Within 5 minutes, the whole page has been cut out.  Look how these very tiny candy corns came out.  Sometimes, I adjust the outside cutting width in the machine for very fine lines before cutting these out.

So get busy making your little spooks and goblins some adorable and purrfectly wicked Halloween cards and projects this Halloween.  

My cards and projects are always posted on Saturday.  Keep watching and thank you so much for those wonderful comments as well as suggestions. 

Enjoy and Happy Crafting!


Saturday, October 16, 2021

Graphic 45 Midnight Tales Treat Boxes

Welcome back and Nancy, here to share a very fun project to give to adults, children and even toddlers made with the Graphic 45 Midnight Tales collection to slip over a bottle neck or a door hanger. This same treat box could be used for Christmas to hang on your Christmas tree, gift bottle or even on a Christmas present with a gift card and treat.   I was inspired by Christina Fischer who posted her treat box project on Splitcoast Stamper and I made my own tutorial for you,  the different measurements to use with the Graphic 45 Midnight Tales Ephemera and Journal cards along with the Graphic 45 Midnight Tales framed pictures in the paper pad or sold separately all available at The Rubber Buggy.com.


After you try out your first project with this tutorial, you may want to use different measurements on the length to fit your bottle or length of your journal card.  Also, I have added additional length by cutting out another rectangle to glue on top to make one treat box longer.  To make it simple, I just use the same measurements and then cut off the length on either sides for smaller pockets or smaller tops to fit the journal cards, bottle or treats.  

Supplies Available at The Rubber Buggy.com:  

Graphic 45 Midnight Tales Ephemera and Journal Cards

3/8" or 1/2"wide Scor-Tape and Craft Glue

Measurements:  Start with a 8 1/2 x 11 cardstock and cut at 5 1/2" x 11.  Score across at 4" and 4 1/2" which will be the bottom of the pocket of the card and score at 1/2" and 1" length wise and use your bone tool to press against the score line for a nice fold to make this pocket.   I only used a dark pen on the cardstock on the score lines so you can see this better.  Cut a slit on both sides the bottom of the pocket score lines to become a tab as shown on the photo.
On the left and right of the score line on the length side where you scored 1", cut to the bottom of the first score line of the pocket as shown above.  Glue or tape on the 1/2" first score line of your pocket side and adhere to the frame to form the pocket.  After making my first one, I decided it was easier to add the journal card first for a firmer adhering and then glue the sides to form the pocket.


 Punch a circle on the top to be slipped over a bottle or door knob.  Use a circle that will fit like a 1 3/8" to 1 1/2" but if it is a door knob, you will need a larger circle.  I had an ole scallop circle punch and I used a 1 3/8" punch on the solid cardstock and then centered the scalloped punch on the punched out 1 3/8" circle to cut out this scalloped frame.  I used the same 1 3/8" circle punch to punch out a circle on top of the project.  

Now the fun begin of embellishing and adding the Graphic 45 Midnight Tales Ephemera and Journal or the Graphic 45 Midnight Tales Abricadabra paper that is sold separately or in the paper pad .  


The pocket size measures 4" width  x 4" height and the top exposed at 4 1/2" to fit the smaller journal card.  I used 1/2" Scor-Tape to adhere the ribbon to the pocket.


The pocket size measure 4" width and 5" height and top exposed at 3 1/2" for this journal card.  To the taller top, I had to cut out a 4" x 3" cardstock and glue to frame for the additional height. I used 1/2" wide Scor-Tape to adhere the ribbon to the pocket. I adhere a 10mm Wild Orchid Craft rose and leaf from the Heartfelt Creation Classic Rose Vine die set. 


The pocket size measures 4" width and 5" height and top exposed at 3".  I cut out strips from the collection to go across the pocket.  Made a flower from the Heartfelt Creation Classic Rose die and Heartfelt Creations Classic Rose Vine die set.  I used 3/8" wide Scor-Tape to adhere the ribbon to the pocket.

The pocket size measures 4" x 5" and top 3" x 4".  I used the smaller  Graphic 45 Midnight Tales ephemera cards on the top and front of this box and cut out the pumpkin below and added a Heartfelt Creation Classic Rose Vine die from dark green cardstock.  I made a handmade bow and added another Heartfelt Creation leaf die and glued the Wild Orchid Craft 15mm rose.  I used 3/8" wide Scor-Tape to adhere the ribbon to the pocket.

So treat your special spooks and goblins or adult friends and family this year with a special Halloween Treat box filled with a treats, money or gifts that fits to a bottle or door knob.

My cards and projects are always posted on Saturday.  Keep watching and thank you so much for those wonderful comments as well as suggestions. 

Enjoy and Happy Crafting!


Saturday, October 9, 2021

Lawn Fawn Purrfectly Wicked


Welcome back and Nancy, here. Trick or Treat so treat yourself with the new arrivals of Lawn Fawn Purrfectly Wicked and Lawn Fawn Purrfectly Wicked Add On.   These adorable kitties will put a spell on you to get your hands on them and go purrfectly crazy to create magically Halloween cards now.   I even added the most adorable Lawn Fawn I plan to use these stamps set for my Christmas cards as well so better get your order in while supplies last because these are too cute to pass up.  

I created my Lawn Fawn Furry and Bright stamp set for a special smile for this card.
The card measures 5 x 7.  I used heavy white cardstock and sponged on the Distress Fossilized Amber, Distress Ground Espresso and Distress Carved Pumpkin.  I used Copic Markers to color the critters and used Beacon Advanced 3-n-1 Advanced glue to adhere the card.  I added the Lawn Fawn Scalloped rectangle that was cut out with black cardstock and then layers behind it the orange and then black cardstock.  I found an older Happy Halloween die but Lawn Fawn's new Giant Happy Halloween die set coordinates so well with their new Halloween stamps.

So get busy making your little spooks and goblins some adorable and purrfectly wicked Halloween cards and projects this Halloween.  Better yet, add a pocket for the inside of your card for their treats.

I am entering my card in the following challenges:

My cards and projects are always posted on Saturday.  Keep watching and thank you so much for those wonderful comments as well as suggestions. 

Enjoy and Happy Crafting!


Halloween Gift Card with Graphic 45 Midnight Tales

Welcome back and Nancy, here, to share another Graphic 45 Midnight Tales Halloween card with a pocket inside for treats, money, etc. for your special spook or goblin.  This was a very fun card made additionally with the Prima Marketing Nocturnal mold of moons and stars.


This card measures 5 1/2" x 7".  The pocket inside measures 2/14" x 6 1/4" with 1/2" edges wide.  Also, I made earlier the moon and stars using epoxy resin in the  Prima Marketing mould-Nocturnal Elements and colored it with Prima Marketing Redesign Brass wax.  

Now the fun begins of the layers and embellishments.  I am using the Graphic 45 Midnight Tales Ephemera and Journal cards for most of the card along the listed below Graphic 45 Midnight Tales cardstocks.  I found some metallic brass and black cardstock to frame the journal cards and front of the card.  

For the front of the card, I used the Dress My Craft Pink Celebration Sequins and 28 Lilac Lane Shaker Mix - Safari Sunrise  along with the gorgeous glass looking Stamperia Glamour Green Sparkles around the cut out Trick or Treat banner cut out from the collection and glued it with Beacon 3-in-1 Advanced glue.  I fussy cut a pumpkin from a journal card and used my fingers behind the pumpkin to form a 3D and just glued behind the edges of the pumpkin to the card to emphasize the pumpkin.

I added the Tim Holtz Idea-Ology Creepy Eyes embellishment to the handmade bow next to the Wild Orchid Craft 15mm orange rose.  I add some beautiful NUVO Crystal Clear White Blizzard glitter drops around the works, flowers, and on the banner to make it glimmer and shine.  

I have an ole Martha Stewart spider web punch that I punched out the spider webs and glued across the pocket that was made with orange cardstock and then strips from the Graphic 45 Abracadabra


Supplies being Showcased:

Midnight Tales – Journaling Cards

32 individual journaling & ephemera cards 

2 each of 16 designs – (16) 4 x 6-inch & (16) 3×4-Inch


Graphic 45 Abracadabra

So treat your special spooks and goblins this year with a special card with a treat inside.  

My cards and projects are always posted on Saturday.  Keep watching and thank you so much for those wonderful comments as well as suggestions. 

Enjoy and Happy Crafting!


Saturday, October 2, 2021

Too cute to Spook Lawn Fawn Dog House Treat Box


 Do you need a treat box for a little one or even for those who have pets!  Can you imagine when your special person open this treat box and it has doggie bone treats inside or that little special little too cute to spook with Halloween candy.  Welcome and Nancy, here.  I will be posting two blogs often until after the holidays since I will be busy creating cards and projects for adults, children and even for their pets.  I made this treat box using the Lawn Fawn dies and stamps listed below but just love this Lawn Fawn Dog add on die set for this treat box and used 1/4" Scor-Tape to adhere the box. 

 I had another treat box which resembles the Lawn Fawn Scalloped Treat box and cut out using some patterned paper.  I cut out the dog with light brown cardstock and colored his eyes and parts of his body with a medium brown Copic Marker.  I cut out the door and added a rectangle red cardstock to add behind the black door.  I cut out an ole ghost die and glued to the black door and trimmed off the rest of the ghost.  I cut out the candy corn from the Lawn Fawn Bat add on die and colored it with Copic Markers of orange and yellow.  I cut out the Lawn Fawn Do add on bone and stamped it with the Lawn Fawn Pick Of the Patch stamp as well as the pumpkin.  I found an ole witches hat die and used it for the dog but Lawn Fawn Tiny Gift Box Add On is almost the same thing as well as the witches hats included in a few of their stamp sets.


Lawn Fawn Scalloped Treat Box Dog House Add-On die


So treat your special spooks and goblins this year with a special card with a treat inside.  

My cards and projects are always posted on Saturday.  Keep watching and thank you so much for those wonderful comments as well as suggestions. 

Enjoy and Happy Crafting!


Halloween Treat Card Magic in the Air


Welcome back and Nancy, here, to share another Graphic 45 Midnight Tales card with a pocket inside for treats, gift card or such things like tea bags or chocolate mix.  This collection is so beautiful and fun to create Halloween projects and cards. I am loving these adorable fairies to add to the card with their happy or funny expressions.


Card measures 6 1/2" x 6 1/2".  I created the inside with a tunnel section in the center.  I have written a thorough step-by-step tutorial on creating a tunnel card with photos and exact measurements to also help make the instruction clear.  Just click on HERE for this website of this tutorial.

The pocket on the inside measures 3 1/2" x 4".  I used one of the journal cards and fussy cut one of the cats from a journal card to add to the pocket. 

I fussy cut many of the images from the Graphic 45 Midnight Tales cardstock as well as in the 
Graphic 45 Midnight Tales Ephemera and Journal cards.  If you get a close up on your computer, you will see some of the small fussy cuts of images to make this card even more 'Halloweenish'!

Additionally, I added the Tim Holtz Idea-Ology Creepy Eyes to the front of this card.  You will want to use this package of eyeballs for your next year Halloween projects and cards as well as this year.  These embellishments just adds an additional interest to the Halloween theme.  

I have an ole Martha Stewart spider web punch that I punched out the spider webs and glued around the oval.   

Supplies being Showcased:

Midnight Tales – Journaling Cards

32 individual journaling & ephemera cards 

2 each of 16 designs – (16) 4 x 6-inch & (16) 3×4-Inch


Graphic 45 Abracadabra

So treat your special spooks and goblins this year with a special card with a treat inside.  

My cards and projects are always posted on Saturday.  Keep watching and thank you so much for those wonderful comments as well as suggestions. 

Enjoy and Happy Crafting!