Translate

Saturday, December 25, 2021

We Whisk You a Merry Christmas


Merry Christmas from all of us from The Rubber Buggy and design team to you!  Hope Santa was good to you this year.  Instead of presents, I wish Santa would lend me an elf for a year. I’m pretty sure I could find enough things for him to fix, build, or clean for an entire year!

 Are you busy whisking up a sweet Christmas dessert for your big Christmas meal right now!  I created this Christmas tags made with the adorable Lawn Fawn Creature Was Stirring stamp set and  Lawn Fawn Let It Shine  paper collection.  After stamping the Lawn Fawn Giant Holiday Wishes 

with few reinking using Lawn Fawn Black ink on the My Petunia Misti stamp tool to get the desired black ink on the paper, I centered the message on the Lawn Fawn Giant Holiday die set and die cut it out.  I used Copic Marker to color the mice and cookies along with parts of the message.

Lawn Fawn Let It Shine

Lawn Fawn Giant Holiday die set

Lawn Fawn Giant Holiday Wishes 

Merry Christmas and have a fabulous Christmas Day!!

 The Rubber Buggy has the crafting supplies for your next project. So have fun crafting this weekend with these products.   My cards and projects are always posted on Saturday.  Keep watching and thank you so much for those wonderful comments as well as suggestions. 

Enjoy and Happy Crafting!


Friday, December 24, 2021

Fairy Christmas Tags


 Welcome back and Warm Winter Wishes to you and your family and friends.  I am showcasing the new arrival of  Lawn Fawn Giant Holiday Wishes stamp set along with the Lawn Fawn Giant Holiday die set.  So easy to use and makes for a gorgeous stamp set for your last minute Christmas cards and tags. 

First Tag:  I love the Lawn Fawn Frosted Fairy Friends to this tag since it reminds me of our Christmas angels.  The gorgeous snowflake paper is from the new Lawn Fawn Let It Shine Snowflake  paper collection which is gorgeous with shining metallic snowflakes on one side with the non metallic snowflakes on the other side which was used for both tags.  First I stamped the message with bluish green ink using My Petunia Misti stamp tool (Highly Recommend this stamp tool) a few times on white card stock.  Then I die cut over the message the snowflake background with the Lawn Fawn Stitched Snowflake Backdrop/background.  With this die cut still in my die cutting machine, I center the message with the Lawn Fawn Giant Holiday oval die and die cut this out to make the scalloped oval frame.  I added Flower Soft snowflakes with glue to the snow and the fairy house.  I used some trees from other Lawn Fawn winter die set and snowman to the scene.  

Second tag:  I added the Lawn Fawn Penguin Party stamp set and added the NUVO White Blizzard glitter drops to the igloo. I used the other side of the snowflake paper collection to this tag.

Lawn Fawn Let It Shine Snowflake Paper

Lawn Fawn Giant Holiday die set

Lawn Fawn Giant Holiday Wishes 


Lawn Fawn Penguin Party

Lawn Fawn Stitched Snowflake Backdrop/background

Lawn Fawn Frosted Fairy Friends

I am entering these in the Lawn Fawn #115 New Years Inspiration challenge

So get crafting and have a fabulous  day and thanks for visiting.

 The Rubber Buggy has the crafting supplies for your next project. So have fun crafting this weekend with these products.   My cards and projects are always posted on Saturday.  Keep watching and thank you so much for those wonderful comments as well as suggestions. 

Enjoy and Happy Crafting!


Thursday, December 23, 2021

Lawn Fawn Snow Globe Christmas Tag

Welcome back and Nancy here to share my Christmas tag that is a shaker with sequins.  I cut out about 5 Lawn Fawn Magic Iris snow globes and glued four together.  I glued the Lawn Fawn Snow Globe Scene stamp set behind the snow globe colored with Copic Markers and then added the sequins and then glued the acetate on top and lastly another snow globe cut out with the Lawn Fawn Let It Shine Snowflake paper.  I stamped the Ready, Set Snow using a white pigment ink and then a clear embossing powder from the Lawn Fawn Ready, Set Snow stamp set and hand cut it out.  I took the last two die from the snow globe die set and cut out part of the snow globe with silver metallic cardstock.  Since I have a Brother's Scan and Cut machine, I was able to scan the snow globe on this machine and enlarge it to 1/4 inch and ran red cardstock to cut through the machine to get the red frame behind the snow globe.
 
Lawn Fawn Magic Iris Snowglobe Add On


Lawn Fawn Snow Globe Scene stamp set 

So get crafting and have a fabulous  day and thanks for visiting.

 The Rubber Buggy has the crafting supplies for your next project. So have fun crafting this weekend with these products.   My cards and projects are always posted on Saturday.  Keep watching and thank you so much for those wonderful comments as well as suggestions. 

Enjoy and Happy Crafting!


Wednesday, December 22, 2021

We Wish You a Merry Christmas


Happy ho-ho-holiday and Merry Christmas from all of us from The Rubber Buggy and design team to you!  Welcome back and Nancy, here.  I had so much fun making these Christmas tags with the adorable Lawn Fawn Ho Ho Holidays Stamp and die set.  It just brings out the Christmas feeling while making these tags and the excitement of giving presents with the toppings of these tags on Christmas Day. With Santa, Mrs. Claus, and a flying reindeer, this set is perfect for classic Christmas cards and tags!
Supplies:
Lawn Fawn Ho Ho Holidays Stamp
Graphic 45 Regular Kraft Tags or Graphic 45 Staples Clock and Tag Die set
Flower Soft White Snowflakes
Handmade plaid bow
Ho Ho Button

I die cut the tag with the Graphic 45 Staples Clock and Tag die set with the Lawn Fawn Let It Shine Snowflake paper.  I used the Misti stamp tool with the Lawn Fawn Black ink to stamped the Lawn Fawn Giant Holiday Message and had to reink and stamp about 4 times to get the depth color of black on this particular paper since it was metallic.   I added the white get pen around the roof and added white Flower Soft flakes for the snow.   I used the NUVO White Blizzard Glitter Drops around chimney and used the white gel pen on the bricks of  the chimney to appear as snow.     

I handmade the plaid bow and use a hot glue gun to adhere it to the tab.  I found an ole Ho Ho button and used a hot glue gun to adhere it to the bow.

So get crafting and have a fabulous  day and thanks for visiting.

 The Rubber Buggy has the crafting supplies for your next project. So have fun crafting this weekend with these products.   My cards and projects are always posted on Saturday.  Keep watching and thank you so much for those wonderful comments as well as suggestions. 

Enjoy and Happy Crafting!


Tuesday, December 21, 2021

Yeti or Not It's Christmas


 Yeti or Not!  Only 5 days until Christmas.  Nancy, here, to share a fun Christmas tag made with the adorable Lawn Fawn Yeti or Not stamps set along with other fun Lawn Fawn dies to go with it.  These cute yetis make for this Christmas tag and would be perfect for someone who loves to snowboard.  

Instuctions:

I ran the cardstock through my Sizzix using the Lawn Fawn Stitched Snowflake background die.

I used the Graphic 45 Staples Clock and Tag set die to cut out the cardstock with the background. The tag die cut out of  Graphic 45 Staples Kraft Tag package of 6 tags is also available at The Rubber Buggy.   Since I have a Brothers Scan and Cut, I copied my tag on printer paper and ran it through the Scan and Cut and programed to add an 1/2" extra to cut out a tag  and then added brown cardstock to the mat and cut the brown frame.  

I used adhesive spray, Aleene Tacky Spray, on cardstock and poured white glitter and let dry.  Then I cut out the mountain tops with the Lawn Fawn Stitched Mountain border die set and the Lawn Fawn Forest Border die.

I stamped and colored the yetis and trees with Copic Markers and used a Ranger White gel pen to dot the scarf and places around the yeti.  After gluing the yetis on the tag, I used the NUVO White Blizzard Glitter Drops to add to the snow under the snowboard and throughout the tag.  I use this glitter drop every snow scene each year.  

I stamped the sentiment with white pigment ink on the red banner cut out by another older die and then added a clear embossing powder to bring out the sentiment.  

I found an ole button Think Snow in my stash so I cut out the back of the button and added it to the tag.  

So get crafting and have a fabulous  day and thanks for visiting.

 The Rubber Buggy has the crafting supplies for your next project. So have fun crafting this weekend with these products.   My cards and projects are always posted on Saturday.  Keep watching and thank you so much for those wonderful comments as well as suggestions. 

Enjoy and Happy Crafting!


Monday, December 20, 2021

Graphic 45 Let It Snow Shadow Box Tag


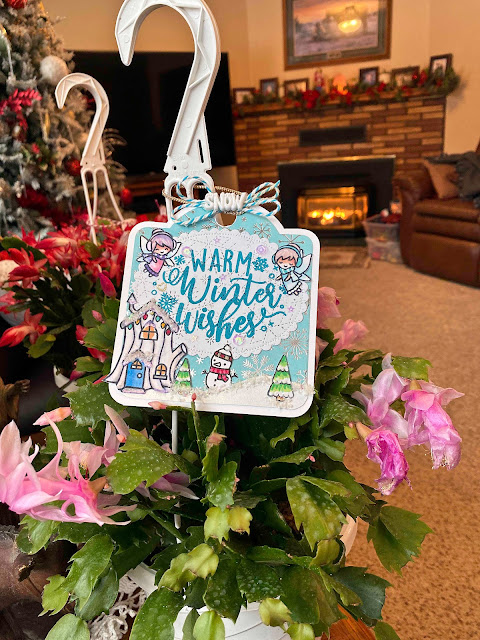
 Welcome back and Nancy, here, to share another Christmas tag as part of the 8 Days of Tags Before Christmas.  Do you love to create something a little bit different when you are crafting? This shadow box tag could be used afterwards as a Christmas ornament but also you could add sequins inside to make this a shaker box tag as well.  After making one shadow box for tags or pictures, you will love creating these for other projects on your bucket list for this year.  

Supplies:
My new score and cutting board:  Tonic Studios Craft Super Trimmer that also scores
80 wt. cardstock or Graphic 45 Let It Snow Patterned and Solid paper pad
Graphic 45 Let It Snow Journal cards or Graphic 45 Let It Snow paper pad
Lace or a strip of cardstock for both the top and side of the card
Acetate for top and adhered with a hot glue gun but other adhesives might work for this
Embellishments for the shadow box
Jute or decorative string for the top for hanging on a gift

To make this Shadow Box Paper Art project like this tag, you’ll need 80lbs. white or light-colored paper or Graphic 45 Let It Snow collection packets and paper pads . We will first create small scenes in our shadow box. I made this shadow box using a scene from the Graphic 45 Journal card which also can be cut out from the Graphic 45 Let It Snow paper collection.  

I used a pencil to trace and will be scored around the journal card.  Then I used a ruler to trace an 1" (cut) and 1/2" (scored) line.  Cut the 1" cutting line and cut on the solid line 1/2"  next to each corner on the score line shown on the photo below and fold each tab.  Once the box frame is cut, fold and create along the score or perforated lines. When you assemble your box, these 1/2 cut tabs will be glued or taped to the box for form the corners. 

Glue the journal card inside the box.  I had to do a light trimming around the journal card for a perfect fit.  ☝I tried gluing the journal card first before measuring the box but when I later scored, the sides of the journal card just wouldn't fit well so I added the journal card after assembling the shadow box first.

If using the acetate as an option to the top of the window on your frame, run the Scor-Tape or hot glue gun along the edges and adhere immediately. I even laid the top down immediately and applied some weight to get all of the edges to stick evenly.   This might have to be done twice since it is difficult to glue acetate to paper but also the ribbon or cardstock for the top and side will also adhere the acetate to the box.  I had to use tape and sometimes a hot glue gun to get the lace to adhere to the acetate and the hot glue gun worked well to adhere the remaining lace folded to the side of the box.

Decorating the outside of the shadow box tag, I added embellishments to help complement my scene by clipping off some pine branches and berries from an old wreath.  My friend gave me these tiny pine cones from her bushes and I used a hot glue gun to adhere these on top of the box along with a jute string for hanging.  I handmade this tiny poinsettia out of the solid paper in the Let It Snow collection and used a gold jewelry bead for the center of the flower.  

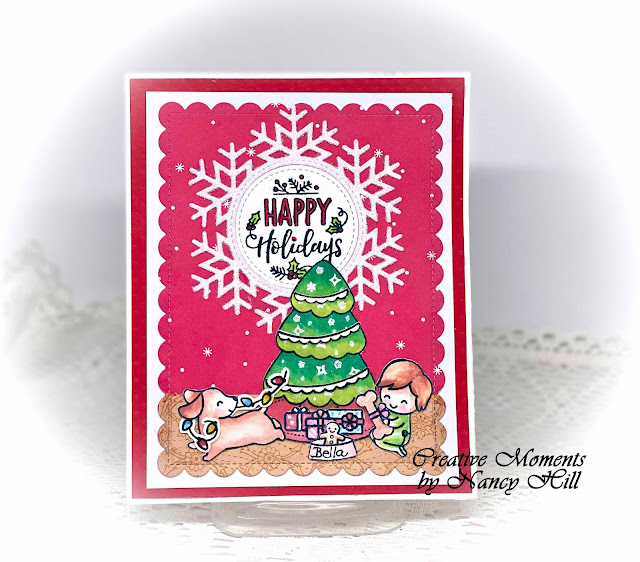
I used a punch to cut out a tag and stamped it.

So get crafting and have a fabulous  day and thanks for visiting.

 The Rubber Buggy has the crafting supplies for your next project. So have fun crafting this weekend with these products.   My cards and projects are always posted on Saturday.  Keep watching and thank you so much for those wonderful comments as well as suggestions. 

Enjoy and Happy Crafting!


Sunday, December 19, 2021

Stamping Bella Curvy Girl Holiday Christmas Tag


Welcome back and Nancy, here to share my Christmas tag with you made from the Stamping Bella Curvy Girl With Holiday Gifts stamp colored with Copic Markers.  The snowflakes were added from the Lawn Fawn Stencil Snowfake Background.  I set the stencil on the tag and sponged on some Ranger blue ink and keeping the stencil in place, I used my fingers to apply the Lawn Fawn Pearl Stencil paste before pulling the stencil away from the tag and then let dry.  The Lawn Fawn Stencil pastes come in many colors.  

I used the Graphic 45 Tag and Flower die which is also similar to the Graphic 45 Large Kraft Tag.  I added a gold ribbon and bells to the card.  I used clear glue for the sequins. 

So get crafting and have a fabulous  day and thanks for visiting.

 The Rubber Buggy has the crafting supplies for your next project. So have fun crafting this weekend with these products.   My cards and projects are always posted on Saturday.  Keep watching and thank you so much for those wonderful comments as well as suggestions. 

Enjoy and Happy Crafting!


Saturday, December 18, 2021

Graphic 45 Tag So Very Merry


 Close to Christmas and time for making my Christmas tags.  I made this one using the gorgeous Graphic 45 Let It Snow collection available at The Rubber Buggy.  I cut out the main frame using the Graphic 45 Tag and Clock die using the Graphic 45 Let It Snow Pattern and Solid paper.  Then I scan this tag in my Brother Scan and Cut machine and had another tag 1/4" larger cut out by this machine from white cardstock and adhered together before adding the embellishments.  I used spray adhesive on the back of the intricate clock die and adhered to the center.  I used a hot glue gun to adhere the large poinsettia, large bow and bells to the tag.

Supplies:  Graphic 45 Let It Snow Pattern and Solid Paper pad, Graphic 45 Let It Snow Die Cut Assortment Packet, I used the ole Graphic 45 Tag and Clock die set but The Rubber Buggy has available the Graphic 45 Ivory tag and there is a die cut clock in the Graphic 45 Let It Snow Assortment Die Cut packet.  Handmade poinsettias and bows, Candy cane and white cardstock.

So get crafting and have a fabulous  day and thanks for visiting.

 The Rubber Buggy has the crafting supplies for your next project. So have fun crafting this weekend with these products.   My cards and projects are always posted on Saturday.  Keep watching and thank you so much for those wonderful comments as well as suggestions. 

Enjoy and Happy Crafting!


Lawn Fawn Christmas Furry Friends

Welcome back and Nancy, here, to share some  cards to make using the new Lawn Fawn stamps and die sets available at The Rubber Buggy.com.   

The Lawn Fawn Snowflake Add-On die paired with the Lawn Fawn Magic Holiday Messages stamp set makes for creating your beautiful Christmas sentiment. I always use My Petunia Misti Stamp Tool for all of my stamping and Memento Black Tuxedo ink. There are some black inks that even after drying, will bleed into my Copic Markers but the Memento Black Tuxedo ink doesn't after a few minutes of drying.    

I am lovin the adorable puppies in the Lawn Fawn Furry and Bright stamp and the gorgeous Christmas tree and kiddos in the Lawn Fawn  Joy To All stamp set this year.  The beautiful red snowflake background is from the Lawn Fawn Let It Shine paper collection which as been my favorite for awhile.  So have fun with those adorable kiddos and furry puppies on your next Christmas cards.

Supplies: 

May card measures 5" x 7" and colored with Copic Markers.  The snowflake was cut out with white cardstock and sprayed with Aleene Adhesive glue and then sprinkled with white glitter.  I wrote Bella on the dog bowl since that was the name of our dog as well as my sister who will receive this card.

So get crafting and have a fabulous  day and thanks for visiting.

 The Rubber Buggy has the crafting supplies for your next project. So have fun crafting this weekend with these products.   My cards and projects are always posted on Saturday.  Keep watching and thank you so much for those wonderful comments as well as suggestions. 

Enjoy and Happy Crafting!


Sunday, December 12, 2021

Graphic 45 Joy To The World Tag

 Graphic 45 Joy To The World  Ephemera cards collections has gorgeous Christmas angels and bells that are ringing and designed for Christmas gift tags that would be an elegant touch to any of your gifts this Christmas season and throughout the year.   I used the Graphic 45 Staples Tags dies for the frame.  The other side of the tag, I designed a place for a gift card or check in the photo shown below.  The Graphic 45 Joy To The World Ephemera card package comes with 32 individual cards with 2 each of the 16 designs of 4x6 and 3x4 inches.  For my tags, I am using the 3x4 inch cards.  The Rubber Buggy carries the entire collection of The Graphic 45 Joy To the World.  I am entering these tags in the Graphic 45 Tag Challenge


So get crafting and have a fabulous  day and thanks for visiting.

 The Rubber Buggy has the crafting supplies for your next project. So have fun crafting this weekend with these products.   My cards and projects are always posted on Saturday.  Keep watching and thank you so much for those wonderful comments as well as suggestions. 

Enjoy and Happy Crafting!