Translate

Saturday, July 30, 2022

Stamperia You and Me and Mintay Yes I Do Wedding Card

 Welcome back and Nancy, here.  This week, I have been creating a wedding card with the  gorgeous Stamperia You and Me, Mintay, Yes I Do collection along with the Prima Marketing Baroque Fame mold available at The Rubber Buggy.  

These two beautiful paper collections are dedicated to weddings and ceremonies and are the perfect sets for adding elegant embellishments to your wedding projects or stunning wedding themed cards, scrapbooks, journals These sets contains designs including bridal dresses, wedding cake, flowers, tags and labels. 

Also, I am showcasing the gorgeous Prima Marketing Baroque Frame silicon mold which is perfect to make gorgeous frames with amazing intricate details that I used for the front and inside of this card.


I fussy cut this label out of the Stamperia You and Me paper collection and used Scrapbook Adhesive 3D adhesive foam behind it.
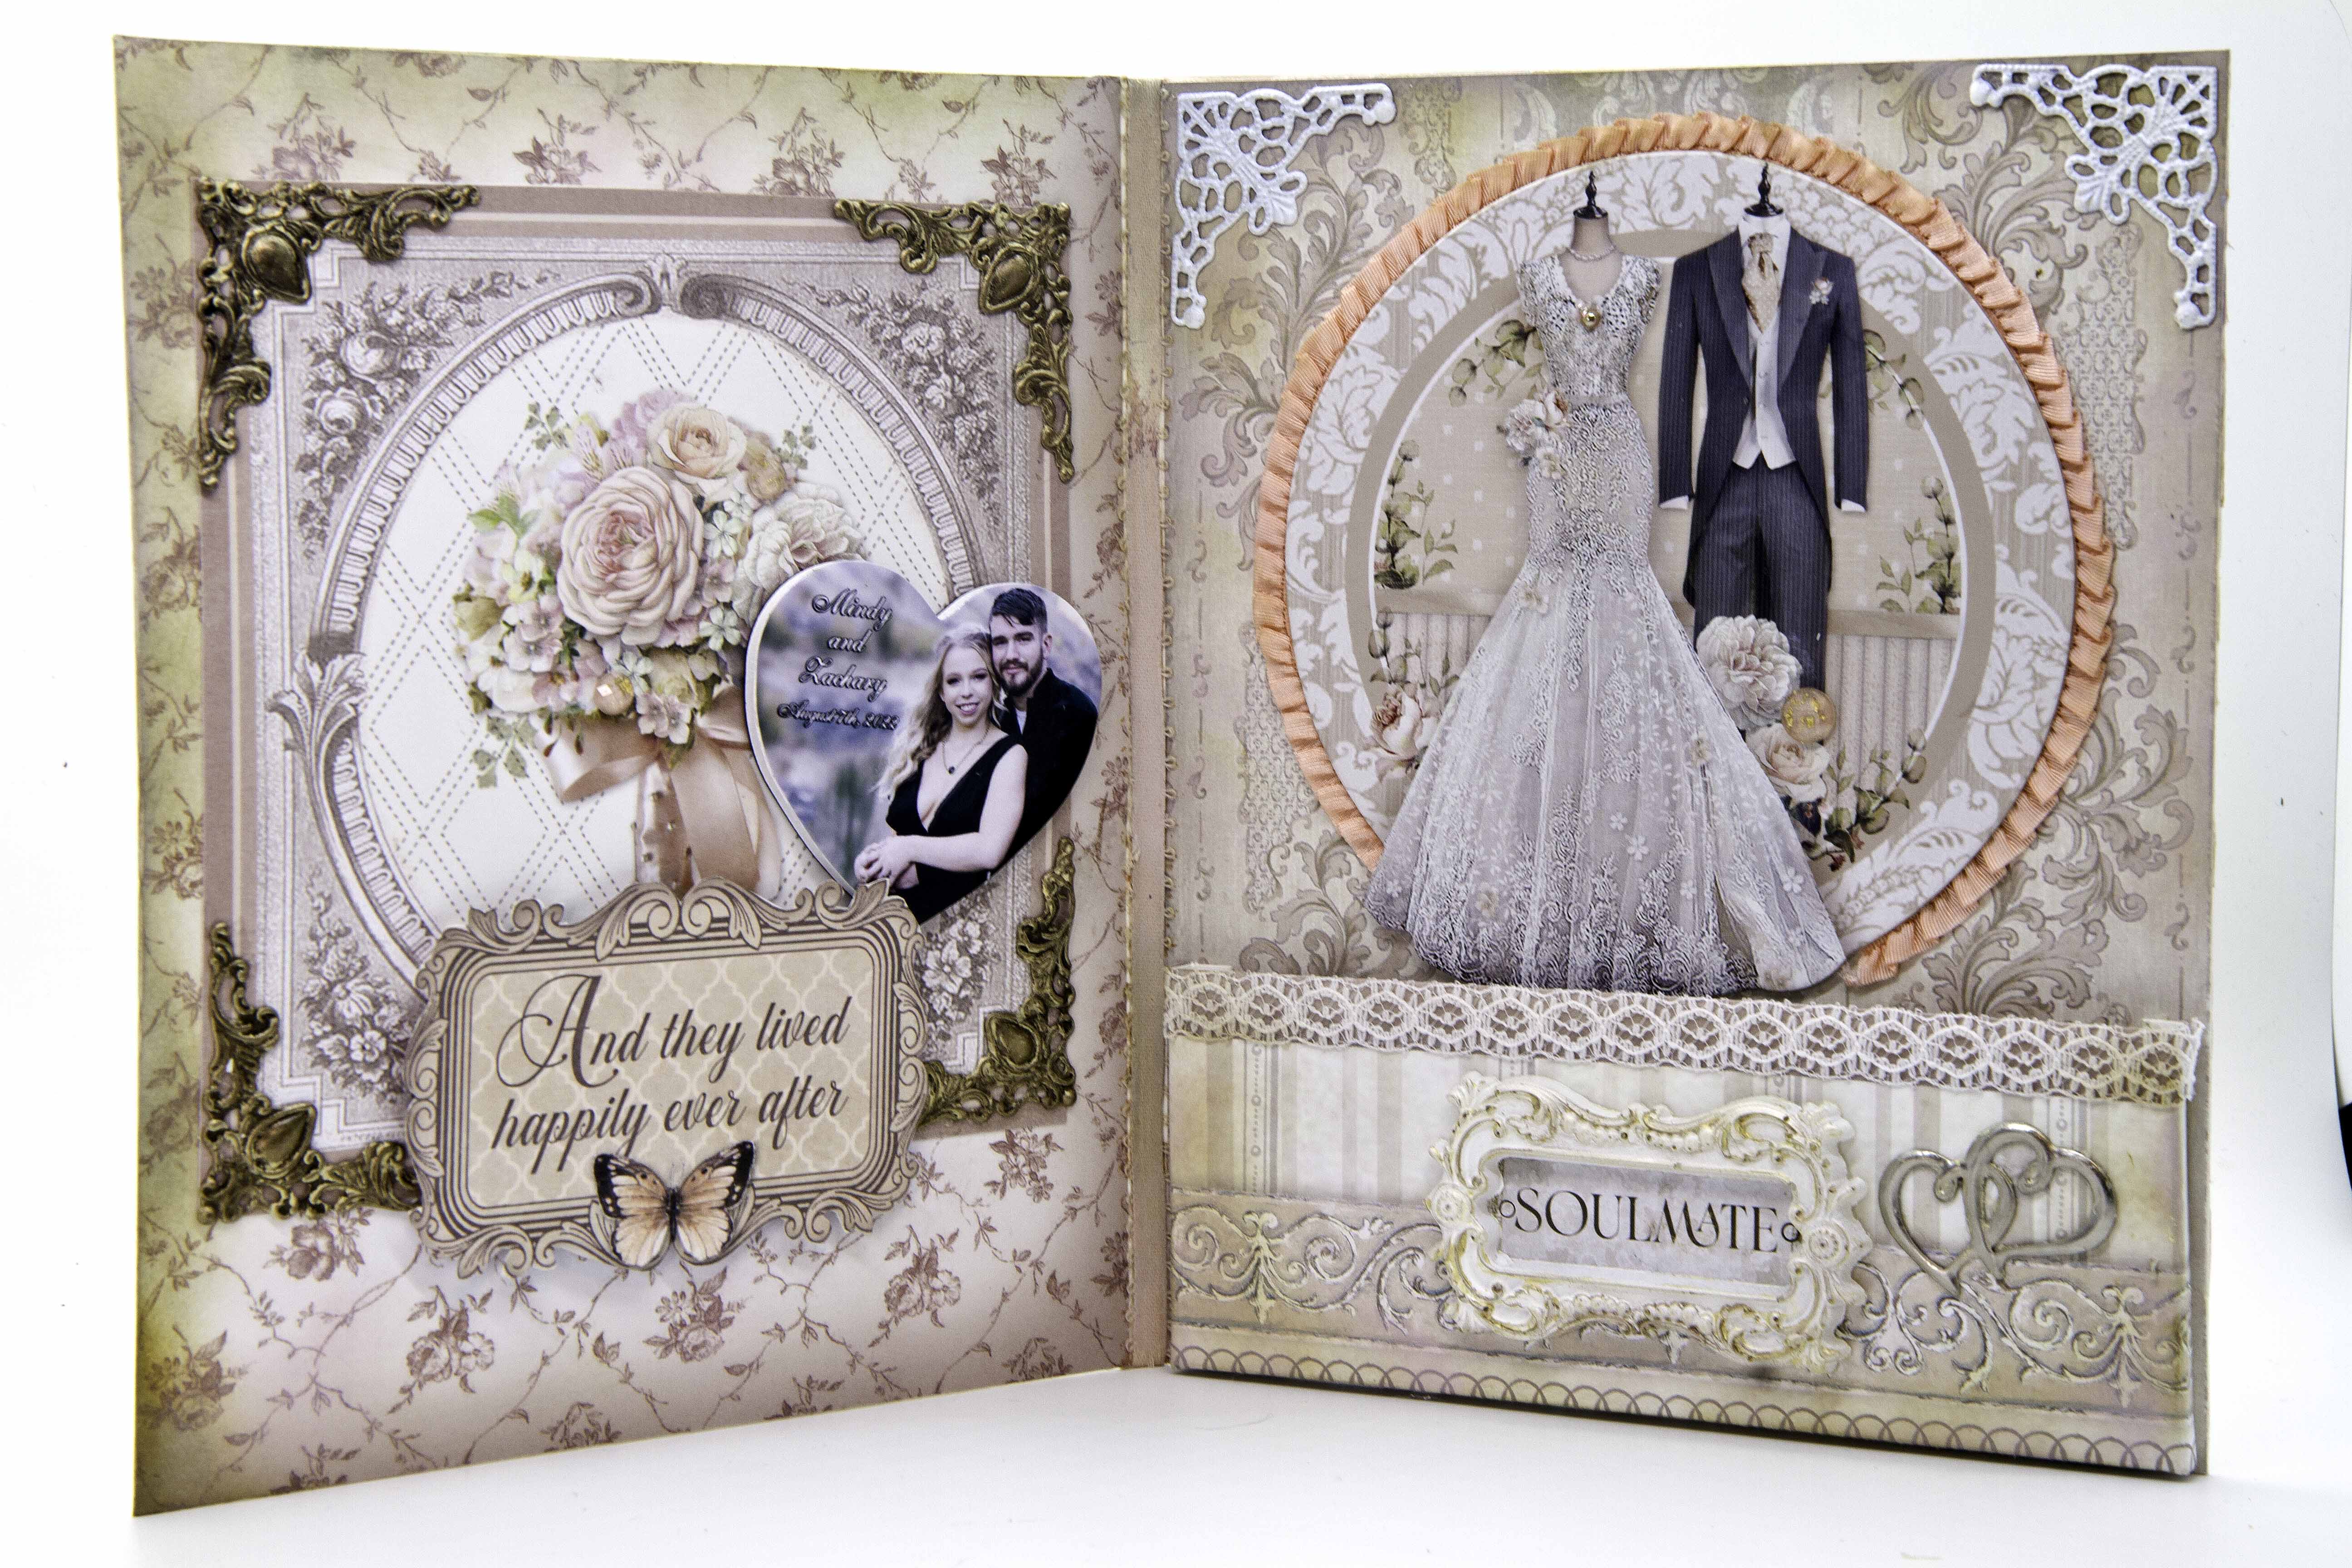
On the inside of the card, I created a pocket below the bride and groom for money or gift card. I glued on laced ribbon across the pocket.  I glued on Soulmate on the inside of the Prima Marketing baroque frame.
I used Art Resin Epoxy Resin for the mold and left over night to dry.  I sprayed the Rust-Oleum White Primer and let dry for about 30 minutes.  I brushed on the Prima Marketing White Pearl Acrylic paint and let dry for about 10 minutes and then used my fingers to tap on Prima Marketing Vintage Silk and Prima Marketing Rose Gold on parts of each mold detail.  I used a hot glue gun to adhere to card.
Since I didn't have a rustic brown ribbon, I used the Ranger Distress Vintage Photo ink and rubbed it across the ribbon and used glue to adhere to inside of card.
I sprayed each bronze metal corner with primer which is in the center and then rubbed on the Vintage Silk wax.  You can see the beautiful white gold on the bottom corners after applying the wax.

After the molds were sprayed with the primer, I painted each frame with Prima Marketing White Pearl paint and then rubbed on the Prima Marketing Vintage Silk wax.  I added the butterfly chipboard from the Stamperia You and Me along with the Prima Marketing glitter dots. For each corner on the frame, I used glue to adhere the Pink Fresh Champagne flat back pearls.


Supplies:
Venice Lace Ribbon
Additional lace, feathers, doily
Rustoleum Primer Spray - white

So get crafting and have a fabulous  day and thanks for visiting.

The Rubber Buggy has the crafting supplies for your next project.  So have fun crafting this weekend with these products.   My cards and projects are always posted on Saturday.  Keep watching and thank you so much for those wonderful comments as well as suggestions. 

Enjoy and Happy Crafting!


Saturday, July 23, 2022

Stamperia You and Me Wedding Card Box

Welcome back and Nancy, here.  For the next few weeks, I have been using making  wedding decors for my grand daughter's wedding and creating these with the gorgeous new products at The Rubber Buggy.  

I designed this wedding card box with the gorgeous Stamperia You and Me collection which is dedicated to weddings and ceremonies, though much can be used for any event.  The Stamperia You and Me collection include paper pads, stencils, stamps, molds, acrylic paints as well as rice paper. The You And Me Chipboard and Die Cut packages are the perfect sets for adding elegant embellishments to your wedding projects or stunning wedding themed cards, scrapbooks, journals or like my mixed media wedding card box. These sets contains designs including bridal dresses, wedding cake, flowers, tags and labels. 

Also, I am showcasing the gorgeous Prima Marketing Baroque Frame silicon mold which is perfect to make gorgeous frames with amazing intricate details that you will want in your mold collection and I used for the front and inside of this box.  


I covered the box with the Stamperia You and Me paper pad and glue. Also, I added the ribbon behind the paper on the inside so the inside of the top will not fall completely back to show off the photo.  I did that as well on the outside with the pink ribbon to be tied together to hold the box together since the magnets are too weak to hold the box closed.  

I prepared overnight the Zuri Design rose and Prima Marketing square frame and label molds with resin epoxy.  Note:  Make sure to fill the Prima Marketing Baroque Frame rectangle part mold to the top and dab a little extra around this rectangle frame mold while scraping the sides, otherwise, the center of the rectangle mold will not come out as a whole frame (Photo Above: You will see where I didn't get enough resin in the bottom of the rectangle frame which I had to do over).  It took me three attempts to get it where the frame comes out right.  I sprayed the molds with a primer and let dry for an hour before brushing on the Stamperia You and Me acrylic paint and let dry before using my fingers to dab the Prima Marketing Rose Gold wax. I used a hot glue gun to adhere to card. 

For the finishing touch, I used the Stickles Twinkle glitter drops to the flowers and around the box and glued on the Prima Marketing pearls for that special shabby chic vintage style box.


Supplies:
Venice Lace Ribbon
Additional lace, feathers, doily
9 1/2" x 9 1/2" x 2 1/2"  gift box that I got at a discount store
Rustoleum Primer Spray
Font die set

So get crafting and have a fabulous  day and thanks for visiting.

 The Rubber Buggy has the crafting supplies for your next project. So have fun crafting this weekend with these products.   My cards and projects are always posted on Saturday.  Keep watching and thank you so much for those wonderful comments as well as suggestions. 

Enjoy and Happy Crafting!


Saturday, July 16, 2022

Paper Crafting Wedding Announcements

Welcome back and Nancy, here, with lots of wedding crafting projects to share with you through this month just in case you want to try this out.  Wedding announcements are expensive but having a family gathering in one afternoon to assemble 150 of these was a load of fun.  Most of these announcements were given out but only $.70 to mail out to a few. 


 My grand daughter used a reasonable priced wedding announcement software to create the invitation around $4.00 and we used my Epson Eco Tank printer to print these out on gorgeous gold white shimmer paper. Check out the gorgeous colors of shimmer paper at The Rubber Buggy that is available to match the wedding colors.  Had plenty of ink left afterwards in my printer.   I had an online photo company to print out the 4 x 6 engagement photo.  

Using our paper cutter, we took the 12" x 12" My Colors black heavy weight cardstock and cut the paper in half making 6" x 12".  Cut each 6" strip by 9 1/2" and using a scorer and bone tool, score in half.  Using the Beacon 3-n-1 Advanced glue, glue the two sides together to form a three sided invitation.  Cut out 3 1/4" x 4 3/4" invitation sections and glued to the front and inside.  Glued the photo in the inside center.  

Check out the variety or corner dies available at the Rubber Buggy to use for your pocket to hold the RSVP.  I had to order from The Rubber Buggy the Sizzix Chrome Precision Base Plate to cut out this ole die since it wasn't cutting all of the way through the heavy cardstock and what a saver for time, etc. since I didn't have any problems now.  I used an ole Spellbinder die cut for the corner and just glue the sides of the die cut to create a pocket for the RSVP.  

Note:  Let dry a couple hours first before storing or folding again since we had some sticking together after folding the invitation for storage.  Also noted, I am using the Sizzix Chrome Precision Base Plate from now on to save my Sizzix cutting pads from wearing out so fast since you lay the die down facing the base plate now than the Sizzix cutting pad.

I ordered the envelopes on-line since we didn't have stores in our area that carry 5 x7 or 4 1/2 x 6 1/2 sized envelopes.  Overall, we saved hundreds of dollars and had load of fun with family.  

Supplies:

My Colors black heavy weight cardstock
Beacon 3-n-1 Advanced glue
My Colors White Glimmer Paper (substitute)
 corner dies selection available at The Rubber Buggy
Scor Pal Score Board
Trimmers (We each had different trimmers and check out the new arrivals)
Ruler
EK Success Cutter Bee Scissors
Sizzix Die brush accessories to use on die cut
Sizzix Chrome Precision Base Plate (I used it from now one especially perfect for those old die that just did cut through.  

So get crafting and have a fabulous  day and thanks for visiting.

 The Rubber Buggy has the crafting supplies for your next project. So have fun crafting this weekend with these products.   My cards and projects are always posted on Saturday.  Keep watching and thank you so much for those wonderful comments as well as suggestions. 

Enjoy and Happy Crafting!


Stamperia Romantic Garden House Chipboard Wedding Table Craft Deco

Welcome back and Nancy, here.  I am having fun with crafting wedding decorations for my grand daughter with a variety of supplies available at The Rubber Buggy.  This wedding will be outdoors surrounded by pine trees and wildflowers.  For the next blogs, I will be updating you on the development of other wedding craft decorations that I made with craft products available now at The Rubber Buggy.

There is probably so much stuff around your house besides jars that you can use to created outdoor wedding table centers.  I created a simple tutorial for you to follow to make these easy peasy wedding decoration jars wrapped with twine and will be filled with silk plush pink roses and silk wild flowers.  I didn't handmade these roses this time since there are so many of these jars that will need to be made for so many tables.


During the winter, I kept over 15 empty peach jars to do these wedding table decorations.    Today, I heated up some water and poured in three jars and waited ten minutes before easily peeling the label off but leaving on the sticky glue left from the label on the jar which make it so wonderful to stick the twine on the jar.  I used my left over 2 ply twine for a few jars but found but I liked the 3 ply twine for decorating the remaining jars since I really like the rustic look of the twine for an outdoor wedding in the mountains.  I just wound the twine on the sticky label glue on the jar until I got to the bottom and cut the end with the scissors and tucked the edges under the wounded twine.  The sticky glue on the jar worked well keeping the tucked edges intact.  

I used 1" wide Scor-Tape around the jar and wrapped the ribbon on the tape and tied together.  The Stamperia Romantic Garden House Chipboard is very sticky on the back but I still used a hot glue gun to apply glue on the back of the chipboard to keep it on since these jars will be going through a lot of handling and transporting which might make these chipboards fall off.  Also, I used a hot glue gun on the top of the jar and stuck the flowers in to keep the flowers in place. I also glued some Wild Orchid Craft flowers on the chipboard for that extra elegance touch without over doing it.  After the wedding is over, I will use a hair dryer or my embossing gun around the top of the jar for a moment to remove the flowers for storage for the next wedding.  Also, I could use the hair dryer to remove the chipboard if I want to go with another theme or product.


Stamperia Romantic Garden House Chipboard

So get crafting and have a fabulous  day and thanks for visiting.

 The Rubber Buggy has the crafting supplies for your next project. So have fun crafting this weekend with these products.   My cards and projects are always posted on Saturday.  Keep watching and thank you so much for those wonderful comments as well as suggestions. 

Enjoy and Happy Crafting!


Saturday, July 9, 2022

Lawn Fawn Doggie House


The Lawn Fawn Scalloped Treat Box Dog House add on is so adorable for a gift box filled with dog treats or other cute goodies for your favorite animal lover or pet or treats for a birthday gift your kiddos or grandkiddos. This set also includes a cute bone-shaped gift tag.


I took the adorable little puppy and cut it out with white cardstock and used a Copic Marker to color in the brown. I also added red ink along the stitched lines in the white base ball.    I cut out black cardstock and stuck it behind the puppy's face to create the black eyes and nose.  I had an ole treat box die and used it for the Lawn Fawn dog house and trimmed off excess paper.  

I cut out the Lawn Fawn Grassy border and glued it around the dog house. 

Supplies:

So get crafting and have a fabulous day and thanks for visiting.

 The Rubber Buggy has the crafting supplies for your next project. So have fun crafting this weekend with these products.   My cards and projects are always posted on Saturday.  Keep watching and thank you so much for those wonderful comments as well as suggestions. 

Enjoy and Happy Crafting!


Saturday, July 2, 2022

Stamping Bella Odd Ball Doctor Get Well Cards


  Welcome back and Nancy, here, to share some fun Get Well cards made with the adorable Stamping Bella Odd Nurse and Stamping Bella Odd Ball Doctor stamp sets.  Aren't these adorable and fun to give to someone that needs a smile on their face to go through any concerns about their medical issues.  There is so many possibilities with these stamp sets to to make it personal for your friend or family member to know that you are thinking about them.

Supplies:
Stamping Bella Odd Ball Doctor
Stamping Bella Odd Ball Nurse
Lawn Fawn All The Dots paper collection
Copic Markers
Get Well Sentiment from ole stamp set

I stamped with Lawn Fawn Black ink and colored with Copic Markers.  I used my Scan & Cut to cut out the images.  Cut out the Lawn Fawn Stitched Heart background with white glimmer paper and adhere to Lawn Fawn Fancy Rectangle die. Cut out Lawn Fan All The Dots paper and adhere the layers together to the front of the base.  Adhere glue to images on the card.  One card, I made a handmade blow and added Wild Orchid Craft Flower to center and adhere with a hot glue gun.  I stamped the sentiment and used a scallop punch to cut it out.  I added 5mm flat back pearls to the card.

Stamping Bella Odd Ball Doctor

Lawn Fawn All The Dots

So get crafting and have a fabulous  day and thanks for visiting.

 The Rubber Buggy has the crafting supplies for your next project. So have fun crafting this weekend with these products.   My cards and projects are always posted on Saturday.  Keep watching and thank you so much for those wonderful comments as well as suggestions. 

Enjoy and Happy Crafting!