Translate

Saturday, February 23, 2019

Happy Birthday Easel Card

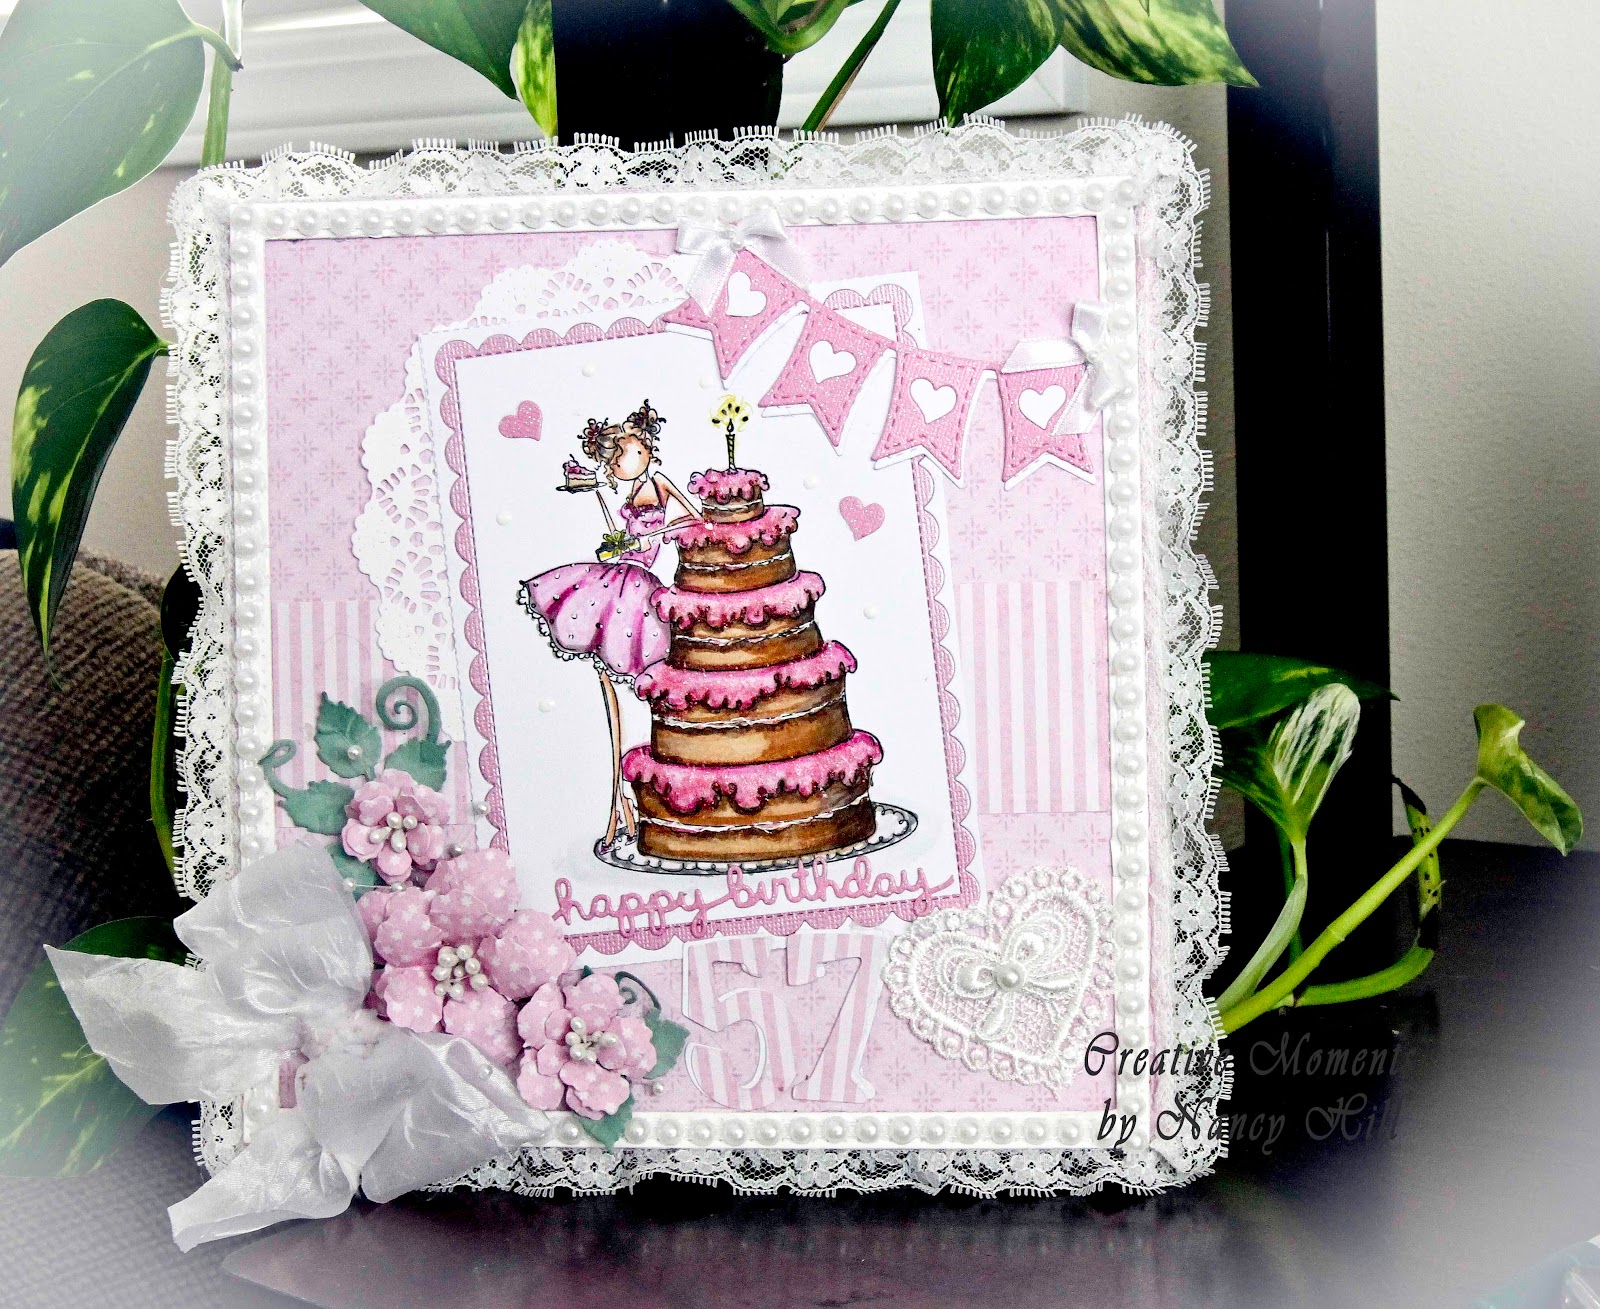
 Welcome back and Nancy, here, excited to share my easel card made with the adorable Stamping Bella Eva Loves to Celebrate and Lawn Fawn Stitched Scalloped Rectangle Stackable Frame with the beautiful Lemon Craft Sweet Secret patterned paper from The Rubber Buggy on-line store.  
Lawn Fawn Stitched Scalloped Rectangle Stackable Frame
Lemon Craft Sweet Secret 

Stamping Bella Eva Loves to Celebrate

I created a tutorial on how I make my easel card boxes at:  https://hillfarmcards.blogspot.com/2017/10/tutorial-on-easel-card-with-drawer.html.  This easel card will be folded down for mailing and storage.

I always do a little modification using less or heavier weight cardstock for the main frame of the box since it will be covered with the patterned paper since.  I want my box and easel card to stand firm and not have any warps so I like my main frame  using 110 lb or heavier card stock for my boxes to prevent warping.

I used the smallest of the  Lawn Fawn Stitched Scalloped Rectangle Stackable Frame and cut out six white cardstock and three with acrylic clear sheet.  I used another smaller rectangle die and centered it three of the scalloped rectangle for the window and glued the acrylic clear cut out behind it with the Beacon 3 in 1 glue.  I cut out the Lawn Fawn Be My Valentines and adhered each of the words to the other three white cardstocks.  I added the white sequins and adhered the windows with the other cut out with the wording with 3D to form the three shadow boxes and glued it onto the card.  

I colored and fussy cut the Stamping Bella Eva Loves to Celebrate and glued it onto the card. I adhered a scallop border die cut behind the card.   I used a hot glue gun to adhere the 5mm string of pearls around the front of the card before gluing it on the easel. Again, to see the details of how to do an easel card, visit my tutorial at https://hillfarmcards.blogspot.com/2017/10/tutorial-on-easel-card-with-drawer.html.


I cut out four pink cardstock frames and adhere around the sides of the boxes.  I cut out 6 Heartfelt Creations Fleur Border dies with another paper in the Lemon Craft Sweet Secret collection and used a spray adhesive to the back to adhere around the box.  I love this die set since the corners are gorgeous on many projects and I love the size of this border with the gorgeous Venice lace appearance for my boxes and projects.
Heartfelt Creations Fleur Border dies


I painted white acrylic paint on the Prima Marketing - Memory Hardware - Chambery Antique Knobs and used my finger to smear on Prima Marketing - Art Alchemy - Metallique Wax - Vintage Gold to the knob.  I used a hot glue gun to adhere to the front of the box.


Using the largest of the Lawn Fawn Stitched Scalloped Rectangle Stackable Frame, I cut out a frame using the pink cardstock and used my cutting board around the outside stitched frame for a border for the inside of my card.  I an ole Spellbinder heart die to the stamped sentiment and used 3D foam on the back of the heart to adhere to the inside of the card.  The main purpose of using 3D foam is to add height so that the front of the card will lay behind the heart.  I added a gorgeous Wild Orchid Craft 15mm rose to the center of my handmade seam binding bow.  I adhere this bow with a hot glue gun this time. 

Entering this easel card in the following challenges:
Double D Challenge: Pink and White
Scrapyland Challenge #108 - Anything Goes using a die (Lawn Fawn Stitched Scalloped Rectangle Stackable Frame, Cheery Lynn Doily Die, Spellbinder Heart die, Cheery Lynn Scallop Border die, Lawn Fawn Happy Birthday border die)

I hope I have inspired you try out these products available at The Rubber Buggy on-line store.  My cards and projects are always posted on Saturday.  Keep watching and thank you so much for those wonderful comments as well as suggestions. 
Enjoy and Happy Crafting!

Saturday, February 16, 2019

Eva Loves Her Cake Birthday Box


I altered this box with Lemon Craft Basic Sweet Secret paper collection.  I love this two-sided paper with one side being pink patterned quality paper and the other side has the rich color of a light soft brown or beige.  I used the Beacon 3 n 1 Advance  glue along with Scor-Tape and a hot glue gun to adhere the layers and papers.  
I just love the Stamping Bella Uptown Girl stamps like the Stamping Bella Uptown Girl Bianca Loves Her Big Cake.  I colored this with Copic Markers and added white dots using the Uni-Ball Medium Gel White Pen on her dress along with the NUVO Crystal White Blizzard Drops on the icing of the cake.  In the past, I had to throw away many white gel pens since the ink would dry up so fast or not come out of the pen.  This Uni-Ball White Pen is still flowing out of the pen well each time after two years of opening it up.

I cut out the roses using the Lemon Craft Sweet Secret paper using the Heartfelt Creations Classic Rose die set.  I use this rose die set for all of my small paper craft roses and assemble the roses with a flower shaping tool set along with Beacon 3 n 1 Advance glue or a hot glue gun.

I framed the stamped image with the Lawn Fawn Outside In Stitched Scalloped Rectangle Stackable dies with pink and white cardstock and added the Lawn Fawn Happy Border die sentiment cut out with pink cardstock and adhered to the card. I found an ole font Sizzix die and cut out 57 using the Lemon Craft Sweet Secret paper and white cardstock behind the number.  I added a handmade bow using Scor-Tape and a white crochet heart to the card.  I adhered the 6mm flat-back string pearls around the card using a hot glue gun along with the pink lace behind the pearls.

I measured the sides of the box and cut out the sides using the light brown patterned paper in the Lemon Craft Sweet Secret paper.  Isn't this color of this patterned to the other side of the pink pattern so gorgeous.  I just love this rose metal embellishment from Prima Marketing.  I added the Prima Marketing White Gesso and let dry.  I added some Prima Marketing Art Alchemy Metallique Vintage Gold wax using  my fingers to apply the wax on the metal and adhered with a hot glue gun to the front of the box.
On two sides of the box, I cut four borders with white shimmer cardstock using the Heartfelt Creations Fleur Border and Pocket die set.  I trimmed off about 1/4" on the sides to glue the borders together in the middle of the sides.


Lawn Fawn Happy Birthday Border die

Heartfelt Creations Classic Rose die         Lemon Craft Basic Sweet Secret
Lawn Fawn Outside In Stitched Scalloped Rectangle Stackable 
Heartfelt Creations Fleur Border and Pocket
Stamping Bella Uptown Girl Bianca Loves Her Big Cake

Scrapyland Challenge #107 - Anything Goes
 My cards and projects are always posted on Saturday.  Keep watching and thank you so much for those wonderful comments as well as suggestions. 
Enjoy and Happy Crafting!


Saturday, February 9, 2019

Tilda Holding Heart

Welcome back and Nancy, here, excited to share my Valentine's card made with the adorable Magnolia Stamps Tilda With Spring Heart along with the beautiful Lawn Fawn Be My Valentine border and Lawn Fawn Stitched Scalloped Rectangle Stackable Frame.
I colored her with Copic Markers and added some glitter to the heart and to the bows in her hair and socks.  I added the NUVO White Gloss around the heart.  After the glossed dried, I added another dot of white gloss to some of the dots that weren't perfect due to an air bubble that dried in the first round of adding these drops.  I adhered the Tutti Design Heart Flourish die behind the flower on the corner of the main card with spray adhesive glue and used the Beacon 3 n 1 Advanced glue to add the Wild Orchid Craft flowers with a small handmade gold bow behind the flowers.  I adhered a white doily behind the main image that had the Lawn Fawn Stitched Scalloped Rectangle Stackable Frame that was cut out using my favorite  Lemon Craft Sweet Secrets paper collection.  The doily heart was also cut out using this Lemon Craft Sweet Secrets paper collection as well as the gorgeous patterned paper behind the main frame.  I cut out the Lawn Fawn Be My Valentine's border with pink shimmer paper and used spray adhesive to adhere to the card.  I added 3 white pearls to the left top corner of the card.


 Lemon Craft Sweet Secrets

Entering this card in the following challenges:  
Scrapyland Challenge #107 - Anything Goes


I hope I have inspired you to make this card.   My cards and projects are always posted on Saturday.  Keep watching and thank you so much for those wonderful comments as well as suggestions. 
Enjoy and Happy Crafting!


Saturday, February 2, 2019

Magnolia Stamp With Kitty for Valentines


Welcome back and Valentine's is just around the corner - two weeks away.  I made my Valentines card using adorable Magnolia Stamps Tilda With Spring Heart with the adorable Magnolia Stamp Spring Fever Kitty Kit stamp set.  I colored the images with Copic Markers and added some glitter to the hearts.
Magnolia Stamps Tilda With Spring Heart                 Magnolia Stamp Spring Fever Kitty Kit          
I cut out the scallop frame with the Lawn Fawn Stitched Scallop Frame die along with the Lawn Fawn Be My Valentines border die.  
Lawn Fawn Stitched Scalloped Rectangle Stackable Frame
I added the NUVO White Crystal drops around the image. 

I adhered Magnolia stamps  to the beautiful Lemon Craft Sweet Secrets paper.  Isn't this a gorgeous paper collection.  Make sure you check out the other gorgeous Lemon Craft Sweet Secret collections from The Rubber Buggy along with the papers for the embellishments that coordinate with the Sweet Secret collection.

 Lemon Craft Sweet Secrets
I finished the card with a pink bow with a heart embellishment tied into the bow.  I cut out a white stitched rectangle frame using one rectangle frame inside the other to get that white border around the card.  

I hope I have inspired you try out these products available at The Rubber Buggy on-line store.  My cards and projects are always posted on Saturday.  Keep watching and thank you so much for those wonderful comments as well as suggestions. 
Enjoy and Happy Crafting!