Translate

Saturday, April 2, 2022

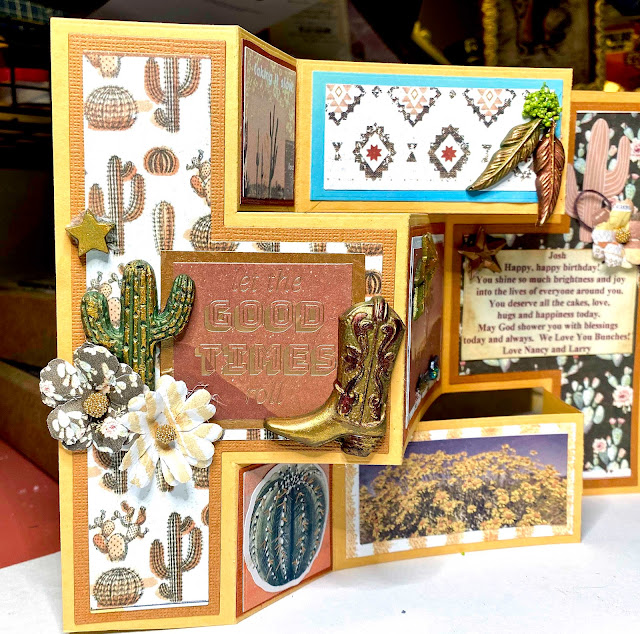
Southwestern Birthday Card Prima Marketing Golden Desert


Welcome back and Nancy, here, to share a tri-fold shutter card made with the beautiful Prima Marketing Golden Desert collection and Prima Marketing Desert Mold with acrylic paints and waxes available at The Rubber Buggy.

 I grew up in the Southwest and loved my desert adventures through the gorgeous flowering cactus, red rocks, and desert flowers.  I think of the colors of turquoise, coral and rich reddish brown, golden yellow colors so the Prima Marketing Golden Desert collection inspired me to make this tri-fold shutter card.  The Prima Marketing Golden Desert mold has the adorable desert cactus with the stars and beautiful cowboy boot which made me want to use this for a Southwestern card. 

Supplies:
Prima Marketing-Redesign-Element Wax
Epoxy Resin (non-toxic)
Tim Holtz Metal Arrow Adornment


GATHER YOUR EQUIPMENT

Epoxy resin comes in two bottles.  Make sure you get the non-toxic epoxy resin, otherwise, the entire house will smell like this resin

  • Disposable latex or reusable rubber gloves
  • Clean mixing cups 
  • Clean mixing sticks
  • Small plastic (measuring cup)
Ensure you are always starting with clean cups and brushes to avoid any dirt or debris from falling into the resin mixture. Next, dispense the resin and hardener into a clean plastic cup. An accurate ratio is essential for epoxy to fully cure and develop its physical properties. 

Wear rubber gloves and I like the reusable surgical or hospital gloves.  The epoxy is sticky and hard to get off the hands after a few washes.  If I get some on my hands, I use a farmer's soap to clean my hands as much as possible and then put lotion on to get rid of the left over stickiness. 

  1. After the two parts are poured at the correct ratio, mix them together thoroughly for a full 2 - 3 minutes with a mixing stick. Mix longer for larger quantities.
  2. Be sure to scrape the sides, corners, and bottom of the container several times during mixing. This will ensure that all the hardener is thoroughly mixed with the epoxy and should prevent the resin from having an improper cure.
  3. Make sure to scrape both sides of the mixing cup also. If the mixture doesn't have a single consistency (streaks remain), continue mixing until fully blended
  4.  I mixed about a teaspoon of mica powder in the resin and stir.  If you get bubbles in the resin while stirring, just tap the bottom of the cup before pouring and you can also use the scalping tool to pop the bubbles.
  5.  I lay my mold on a flat surface but I have an ole tile covered with a plastic store bag to throw away the next day if I get too much resin on it.  Try not to pour over the mold castings but this is when I get the expire credit card, or Mod Podge scrapper to get all of the excess resin on top of the mold.  Let dry over night but for larger deep mold, I let dry up to 18 hours.
  6. With a silicone mold, it is easy to pop out each mold/casting.  I still do it gently on moldings with fine detail.  Occasionally, you will have extra resin on the edges of the moldings.  I use scissors to cut the extra away.
The fun part begins by using your fingers or a Prima Marketing brush to apply the Prima Marketing waxes or acrylic paint to the resin.  I use a hot glue gun to adhere the castings on any card or project.

So get crafting and have a fabulous  day and thanks for visiting.

 The Rubber Buggy has the crafting supplies for your next project. So have fun crafting this weekend with these products.   My cards and projects are always posted on Saturday.  Keep watching and thank you so much for those wonderful comments as well as suggestions. 

Enjoy and Happy Crafting!


Saturday, March 26, 2022

It a Really Bug Deal To Get Well

Have a fast recovery with these adorable bugs. Welcome and Nancy, here, to share a Get Well card for my sis.  The Lawn Fawn It's A Bug Deal stamp set along with other Lawn Fawn stamps and die sets are perfect for wishing someone a speedy recovery or for simply offering some “feel better” support when times are tough for them.


I created a U-Tube on how I did my clouds with the beautiful Ranger Distress Ink pads and Lawn Fawn Puffy Cloud Border die which could be substituted for the Lawn Fawn Cloud Stencil or just use the stencil for the same effect. I use cheap makeup brushes for sponging now and the ink washes out after every use.  

I added the Lawn Fawn Pivot Popup Die Set for the inside of the card.  This set includes everything you need to create a four-panel pop-up scene that twists open inside your card! Use the included hills, trees, and clouds to decorate your scene with the panels as a starting point to create your own pop-up masterpiece!  This panel can be used on a portrait or landscape side of the card.  You will need to watch the video on assembling the pivot before you begin.  Lawn Fawn made a video that goes through the steps.  Click on Here to take you to this video.   I adhered the card using the Beacon 3-in-1 Advanced glue.


Supplies:
Lawn Fawn Spiffy Speckles Paper for Inside
Copic Markers

Instructions:

The front of the card has four layers that include the Lawn Fawn Leafy Tree Landscape Portrait frame.
The folded card measures 6 1/4" long x 5 1/2" wide. 
  • Cut out card base 5 1/2" x 12" with heavy weight cardstock.  Score in the center.
  • Cut out one white cardstocks at 5 1/2" x 6 1/4" for the front of the frame of the card and (3) another white cardstock at 4 1/2" x 5 1/2" for the images and sponging the clouds
  • Stamp with black ink the bugs and flowers and die cut, fussy cut or use a scan and cut machine to cut it out.
  • Color with markers
  • As per instructions above with the cloudy die or Lawn Fawn cloudy stencil, use the blue inks to brush or sponge for the clouds on the white cardstock.
  • Cut out the Lawn Fawn tree with brown cardstock and glue on the front of cloudy cardstock.
  • Die cut out two Lawn Fawn grassy hill borders with green cardstock and glue to front.  Trim off excess grass.
  • Glue clouds, lease, bugs and flowers to card.
  • Add a frame that was die cut out with Spellbinder rectangles set with a light brown cardstock and glue to front

Inside:
  • Glue the Lawn Fawn Speckled paper to the inside of the card and cut out excess around the frame rather than measure and then glue (a lot easier). 
  • Cut out Lawn Fawn Pivot die set.  Follow the Lawn Fawn video HERE also provided above to cut out and assemble the pivot to the card and then add the frame with the bugs.  Apply the same technique for stenciling the clouds with the Tim Holtz Tumbled Glass ink pad.  Die cut two grassy border and glue to pivot front.  Cut out excess grassy borders on the edges.  Glue the bugs, flowers, etc. to the front.  
  • Type and print your sentiment and cut out using the Lawn Fawn Fancy Scallop Frame with white cardstock.  Sponge on Tim Holtz 
I hope I have inspired you try out these products available at The Rubber Buggy on-line store.  My cards and projects are always posted on Saturday.  Keep watching and thank you so much for those wonderful comments as well as suggestions. 

Enjoy and Happy Crafting!


Saturday, March 19, 2022

Cottage Life Graphic 45

 Welcome back and Nancy, here, to share a very gorgeous new collection of Graphic 45 Cottage Life with scenes of beautiful old English countryside gardens of flowers of blue forget-me-nots and pastel pink roses against stunning charming old cottages. You don't want to miss having this in your craft paper collection for this spring and summer. 


TIP:  I made this easel card with this gorgeous paper and I always have trouble getting the easel part of the card to stay in place so this time, I used two small magnets on the end of the easel to the base of the card.  I took a picture with instructions to explain this to help you do this.  Also, I used the E6000 glue that sticks to the magnets onto the cardstock.  Just regular craft glues won't stick to the magnets and E6000 glue will stick.  Now when the card is open, the two magnets snap together to hold the easel card in place.

Card measures:  4 3/4" x 6 3/4"

Supplies:
Graphic 45 Cottage Life Collection with Stickers
4mm Pearl String
Bottle Cap Vintage Magnets  (Optional to keep easel card in place)

Instructions:
1.  Cut base at 4 3/4" x 9 3/4"
2.  Score at 2 3/4", 5" and fold with scoring tool
3.  Front of card, cut white cardstock at 4 3/4" x 6 3/4"
4.  Cut Graphic 45 paper at 4 1/2" x 6 1/2" and glue on white cardstock.
5.  Cut Graphic 45 paper with cottage scene at 4" x 6" and glue on pattern paper.  Take the border sticker from the collection and stick to bottom of the front and cut out excess strip of border.  Optional: Add a silver metallic cardstock around the sticker and using scissors cut out a metallic silver frame.  Add coral colored brads. Stamp a Happy Birthday to sticker.  Adhere to front of card with 3D Pop Up Adhesive Dots. 
6.  Adhere with a hot glue gun or craft glue the 4mm pearl string to front of card.
7.  Glue front of the card to easel frame
8.  Cut Graphic 45 paper at 4 3/4" x 6 3/4" and glue on inside easel frame
9.  See photographic and instructions above to add the magnets to the easel card to keep the easel card in place rather than having the front slide upwards.
10.  Fussy cut the flowers from the collection.  Tip:  Using your fingers or a scoring flower tool, on the back of the flower, press in the center and around the edges to get a 3D appearance.  Use 3D Pop Up dots in the center and craft glue on the edges of the cut out flowers and adhere to card.  
11.  Using a hot glue gun to apply the handmade coral colored bow and Wild Orchid Craft flowers to card.  
12.  Type up a sentiment and copy on paper.  Cut it out with your die and adhere to card.  Add some stickers from the collection for additional embellishments.  
13.  Enjoy your wonderful creation!

So get crafting and have a fabulous  day and thanks for visiting.

 The Rubber Buggy has the crafting supplies for your next project. So have fun crafting this weekend with these products.   My cards and projects are always posted on Saturday.  Keep watching and thank you so much for those wonderful comments as well as suggestions. 

Enjoy and Happy Crafting!


Saturday, March 12, 2022

Graphic 45 Farm House Birthday Card with Mould #G45BACall2022


Welcome back and Nancy, here, to share a fun multi-panel popup card using the Graphic 45 Farm House collection.  I created a detailed written and video to explain the instructions and assembling this card that will be special for your family or friend.  

I created my U-Tube video using The Rubber Buggy products of Graphic 45 Farmhouse Deluxe collection for the instructions in this card. 

Supplies:
Tools: Scor-Pal Score Board or Tonic Studio Score and Cutting Board
Papers:  Graphic 45 Farmhouse Deluxe Collection with Stickers, 
Additional Supplies:  Prima Marketing Redesign Farm Animal Mold, Art Resin, Prima Marketing Art Alchemy Metallique Wax  

I created a written tutorial as well as a short video to show an easy way to assemble the panels to follow since I won't be able to do a lengthy video due to our limited internet service in our area.  I created a guide using the colored letters in each box below to match the panels with cutting and score measurements for you to follow.   If the U-Tube doesn't display, click HERE.  


Tip #1:  Use the scoring tool to score and fold the paper. After scoring,  I like using the straight side of the score bone tool or edge of a ruler by dragging the long edge of the bone or ruler slowly down the fold of the paper for a crisps professional folded look. 

Tip #2:  Decorating each panel:  All panels are decorated with the pattern paper with 1/4" less of the measurement of the front of the panel.  Just measure the side or top of the panel and subtract 1/4".
Example for Panel B: 6" x 5" with measurements of 5 3/4" x 4 3/4" of decorative or solid cardstock centered on each panel. 

Tip #3:  I created the U-Tube for visually showing assembling each panel since it is difficult to create well written instructions on this.  When assembling the panels like for Panel B, glue both edges and fold down to the center score line of the card.  Fold the card and press.  When you open the card, the panel will open up to the 3D.  Do this for the other panel. Otherwise see my short U-Tube for visual instructions will explain this in more detail.

So get crafting and have a fabulous  day and thanks for visiting.

 The Rubber Buggy has the crafting supplies for your next project. So have fun crafting this weekend with these products.   My cards and projects are always posted on Saturday.  Keep watching and thank you so much for those wonderful comments as well as suggestions. 

Enjoy and Happy Crafting!


Saturday, March 5, 2022

Time to Celebrate


Welcome back and Nancy, here, to share a fun birthday card made with the adorable Stamping Bella Curvy Girl Eva Loves to Celebrate stamp set along with the Lawn Fawn Giant Birthday Message stamp set cut out with the new Lawn Fawn Giant Holiday Message scalloped die.  

I found an ole embossing folder and embossed the shimmer white paper.  I cut out a pink frame and red frame for the background.  

I stamped the Girl and Lawn Fawn Giant Birthday Message stamp with the Lawn Fawn Jet Black Licorice ink pad and colored with Copic Markers.  I cut out the girl using my Brother's Scan and Cut machine rather than fussy cut it out.  

I used the 5/8" wide Scor-Tape to adhere the ribbon on the card and added a 15mm pink Wild Orchid rose to the center of the ribbon with a hot glue gun.  

Lawn Fawn Giant Birthday Message

Lawn Fawn Giant Holiday Message

So get crafting and have a fabulous  day and thanks for visiting.

 The Rubber Buggy has the crafting supplies for your next project. So have fun crafting this weekend with these products.   My cards and projects are always posted on Saturday.  Keep watching and thank you so much for those wonderful comments as well as suggestions. 

Enjoy and Happy Crafting!


Saturday, February 26, 2022

Get Well From Stamping Bella Oddball Nurse

 Welcome back and Nancy, here, to share a Get Well card made with the adorable Stamping Bella Oddball Nurse stamp set.  Isn't she adorable and fun to give to someone that needs a smile on their face to go through any concerns about their medical issues or injuries.  There is so many possibilities with this stamp set to embellish it to make it personal for you friend or family member to know that you are thinking about them.

Card Measurement:  4 1/2" x 6"

Supplies:

Stamps:  Stamping Bella Oddball Nurse
Additional:  1/4" wide purple ribbon

Instructions:
  • Cut 9" and 12" white cardstock and score in center
  • Die cut LF (Lawn Fawn) Fancy Large Scalloped Rectangle with purple cardstock and glue to frame.
  • Cut 3 1/2" x 5" white cardstock, using 1/8" wide Scor-Tape, adhere purple ribbon on the card and glue to LF Fancy Scalloped rectangle.
  • Stamp using Lawn Fawn Black Ink or Memento Black ink the Stamping Oddball Nurse and color with markers.  
  • Stamp the sentiment with Lawn Fawn Black ink to the card.
So get crafting and have a fabulous  day and thanks for visiting.

 The Rubber Buggy has the crafting supplies for your next project. So have fun crafting this weekend with these products.   My cards and projects are always posted on Saturday.  Keep watching and thank you so much for those wonderful comments as well as suggestions. 

Enjoy and Happy Crafting!


Saturday, February 19, 2022

Multi-Panel Pop Up Sewing Birthday Card Tutorial

I watch a video from MixedUpCraft on how to create a multi-panel popup card and used her measurements to create mine.  She created a thorough U-Tube video on how to score and assemble the panels onto the card and I created my U-Tube video using The Rubber Buggy products of Stamperia Romantic Threads for the instructions in this card. 

Supplies:
Tools:  Misti My Petunia Stamp Tool, Scor-Pal Score Board or Tonic Studio Score and Cutting Board
Additional Supplies:  Coral Rose Handmade bow, 5mm pearl string, coral thread, 28 Lilac Lane Desert coral colored buttons, Venice lace, Wild Orchid Craft flowers, sewing pins and beads, Type the sentiment and cut with banner die similar of Lawn Fawn Banner die. Sponge on Ranger Distress Vintage Photo  ink on side of banner. Rick Rack ribbon.

I created a written tutorial as well as a short video to show an easy way to assemble the panels to follow since I won't be able to do a lengthy video due to our limited internet service in our area.  I created a guide using the colored letters in each box below to match the panels with cutting and score measurements for you to follow.   If the U-Tube doesn't display, click HERE.    


Tip #1:  Use the scoring tool to score and fold the paper. After scoring,  I like using the straight side of the score bone tool or edge of a ruler by dragging the long edge of the bone or ruler slowly down the fold of the paper for a crisps professional folded look. 

Tip #2:  Decorating each panel:  All panels are decorated with the pattern paper with 1/4" less of the measurement of the front of the panel.  Just measure the side or top of the panel and subtract 1/4".
Example for Panel B: 6" x 5" with measurements of 5 3/4" x 4 3/4" of decorative or solid cardstock centered on each panel. 

Tip #3:  I created the U-Tube for visually showing assembling each panel since it is difficult to create well written instructions on this.  When assembling the panels like for Panel B, glue both edges and fold down to the center score line of the card.  Fold the card and press.  When you open the card, the panel will open up to the 3D.  Do this for the other panel. Otherwise see my short U-Tube for visual instructions will explain this in more detail.

So get crafting and have a fabulous  day and thanks for visiting.

 The Rubber Buggy has the crafting supplies for your next project. So have fun crafting this weekend with these products.   My cards and projects are always posted on Saturday.  Keep watching and thank you so much for those wonderful comments as well as suggestions. 

Enjoy and Happy Crafting!


Saturday, February 12, 2022

Lawn Fawn Reveal Wheel Scent With Love Valentine's Card


 Welcome back and Nancy, here, to share a very fun interactive Valentine's card made with the Lawn Fawn Reveal Wheel along with the new arrivals this winter of the Lawn Fawn Scent With Love stamp set and this so adorable Lawn Fawn Valentine's Heart Border die that coordinates so well with the Lawn Fawn Quilted Heart Backdrop.  I just love the new heart backdrop with these gorgeous stitches and tiny hearts.  

I you aren't familiar with the Lawn Fawn Reveal Wheel assembling, Lawn Fawn has made a nice tutorial on instructions for the reveal wheel and if you haven't done this before, I would highly recommend you watching it.  I colored the skunks in Copic markers

Supplies:

Instructions:
  • Cut pink solid cardstock at 4 1/2" x 5 1/2" and score in center
  • Die cut LF (Lawn Fawn) Fancy Large Scalloped Rectangle and glue to solid pink cardstock
  • Die Cut LF Quilted Heart Backdrop in white and pink cardstock and then glue to LF Fancy Scalloped rectangle.
  • Using both die cut in the set, cut out Valentine Heart Border white and the other pink.  On the white hearts, stamp every other heart with the Lawn Fawn I Could Have Texted stamp sentiments on each heart.  Glue together the heart border and cut out the length at 4" and glue on the card
  • Stamp the skunks, balloon, flower bouquet and heart banner with the Lawn Fawn Black ink and color.  Glue to card.
  • Add a small white bow to the center of the banners.
So get crafting and have a fabulous  day and thanks for visiting.

 The Rubber Buggy has the crafting supplies for your next project. So have fun crafting this weekend with these products.   My cards and projects are always posted on Saturday.  Keep watching and thank you so much for those wonderful comments as well as suggestions. 

Enjoy and Happy Crafting!


Saturday, February 5, 2022

Stamping Bella Curvy Girl with Holiday Gifts Celebrate Card

I am just loving the Stamping Bella Curvy Girl With Holiday Gifts stamp. This adorable stamp set features an adorable girlie with holly in her hair and her arms full of presents which is perfect for this time of year including for a birthday card or for any occasion during this holiday and winter season!  Nancy, here to share this stamp set along with other supplies available at The Rubber Buggy.


I used the adorable Stamping Bella Curvy Girl With Holiday Gifts stamp colored with Copic Markers. I layered the card with solid green cardstock, then Lawn Fawn Let It Shine green strip cardstock, white cardstock and embossed with a embossing folder.  I added a strip of washi tape with the stars and cut out shimmer silver cardstock strip to put behind her.  I added a Tutti Design Celebrate die that was die cut using Lawn Fawn Silver Metallic cardstock.  
 
I colored this girlie with Copic Markers and used the Ranger White Opaque pen to do the white dots and strip on her dress.  For this tag, I used the Graphic 45 Staple Regular Tag and Gear Die set similar to the Graphic 45 Regular Tags Kraft package using the tag die to cut out the tag. I used an ole embossing folder to the tag.   I die cut the Lawn Fawn Fa La La border die with metallic gold cardstock.  I used my Brother's Scan and Cut machine to enlarge the tag to program to cut it additional around the edges of 1/4" with Lawn Fawn Let It Shine pink dotted cardstock.  I added some Wild Orchid Craft flowers to the ribbon.  I used an ole tree die and cut it out with white cardstock.  I sprayed some adhesive glue to the tree and added white glitter to it.  Let dry and I sponged on Ranger green ink to the glitter.  


So get crafting and have a fabulous  day and thanks for visiting.

 The Rubber Buggy has the crafting supplies for your next project. So have fun crafting this weekend with these products.   My cards and projects are always posted on Saturday.  Keep watching and thank you so much for those wonderful comments as well as suggestions. 

Enjoy and Happy Crafting!