Translate

Saturday, January 28, 2023

Sizzix Tree Rings 3D Embossing Folder Valentine's Cards


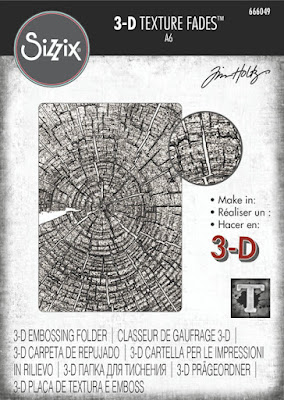
Welcome back and Nancy, here.  If you love nature like our family and friends, then you'll love the Sizzix Tree Rings 3D Texture Fades Embossing Folder by Tim Holtz with this bold tree-inspired embossing folder. This embossing folder has incredible depth of detail, making it perfect for creating rustic looking cards throughout the year. I cannot wait for you all to get your hands on these new Sizzix Tim Holtz 3D embossing folders like this one and The Rubber Buggy has all of these arrivals from Sizzix/Tim Holtz for creating your stunning card and projects.


The embossed area was trimmed to 4" x 6" before adding the background layers.

I am loving the Sizzix Tim Holtz Lucky Love Impresslit die that embosses and cuts at the same time a heart and a 4-leaf clover.  I stamped a piece of Tim Holtz Kraft Gold Metallic cardstock in my stamp tool and applied embossing powder to keep the ink from smearing on the metallic paper and then centered it in the heart in the Sizzix Lucky Love Impresslit die through the Sizzix Big Shot.  I sponged on Ranger Ground Espresso and Gathered Twigs before embossing  with the Tree Ring embossing folder.  Just a reminder, I sponged the black ink inside the embossing folder, lightly sprayed the cardstock with a mist of water and ran the embossing folder 3 times in the Big Shot.  I love this technique since it brings out the wood grain so well.  I used a hot glue gun to adhere the Tim Holtz key to the card.  I found an ole sticker to add to the card.  
I just love the shimmer of this rustic red card.  For the center of the card using silver metallic cardstock, I used an ole Sizzix Tim Holtz embossing folder and sponged the inside of the embossing folder with black ink, layed a piece of Tim Holtz Kraft Silver Metallic cardstock and ran it through the Sizzix Big Shot about 3 times.  I used an heart die and cut the center of the tree ring and glued the embossed silver piece behind the embossed tree ring.  I found a Tim Holtz sentiment chipboard and used Beacon 3-n-1 glue to adhere it and used a hot glue gun to adhere the metal gears to the card.  Found an ole metal button and added it to the center of the gear.

 These are my samples I experimented  with different colors of Ranger inks and  cardstock paper as well as tried out using the back embossed piece of cardstock which was an interesting look.  I prefer using heavy weight cardstock.  My favorite was the copper brown shimmer cardstock as well as the cream cardstock that was sponged with Distress warm inks before embossing. The patterned cardstock that was embossed definitely was an interesting look.  When embossing, you only need 1 Cutting Pad since these folders are so thick. Mist your cutout cardstock, especially if it is a heavy weight cardstock, with water on both sides prior to placing the material inside of your embossing folder and running it through your machine three times to achieve full embossing.  

Supplies:

Tim Holtz Chipboard Set

That’s it for me today!  I’m still trying to get back on track after the New Year!  Now it is crafting our Valentine's cards and other occasions to keep up busy.

The Rubber Buggy has the crafting supplies for your next project. So have fun crafting this weekend with these products.   My cards and projects are always posted on Saturday.  Keep watching and thank you so much for those wonderful comments as well as suggestions. 


Saturday, January 21, 2023

Valentine's Cards with Sizzix

Welcome back and Nancy, here.  Hope you are having a wonderful crafty week!  I am excited to share with you two Valentine's cards using the Sizzix 3-D Texture Fades Embossing Folder by Tim Holtz - Entangled and Sizzix 3-D Lucky Love Impresslits.  The Sizzix 3-D embossing folders create amazing engraved backgrounds with depth and intricate details that give you cards that WOW!  

I definitely want to share some of my tips of achieving the deepest embossing as well as coloring both the embossing folder and impresslit heart die/embossing plate.

I spent some time viewing Tim Holtz videos and trying out my own way of coloring the embossing folder.  They recommend using a light spray on the cardstock to get the deepest impression before running it through the Sizzix machine three times and let dry before applying color.  I just love how the metallic cardstock came out.  

Also, others recommend using  a brayer to color the inside of the embossing plate or top of the embossed cardstock but I found that taking my Distress ink pad and go over the embossing plate on the inside to get the different coloring for the inside of the embossed cardstock worked the best for me.  When I didn't achieve the color the first time, I reinked the inside of the embossing plate and put the embossing cardstock back into the plate and ran it through my Sizzix Big Shot again. 

Secondly, to color just the top of the embossed cardstock, after embossing a plain white cardstock, just take a brayer but I liked using the ink pad and lightly go over the top.  Some people sponge on colors on the cardstock, emboss, sand the top and then apply the ink for a different look.

Thirdly, you can get a different look by using the back of the embossed cardstock.  Since you will have edges that weren't embossed, cut this off and apply a lot of glue to the back of the embossed cardstock to adhere to the base or frame of the card.  

I always loved the Sizzix Impresslits which emboss and cut at the same time.  I have done a few differently to show ways of getting different looks. 

To prevent cracks, best to spray the card stock lightly before going through the Sizzix machine.  For the two tone hearts,  I ran the Sizzix Lucky Love twice with white cardstock.  I took one white heart and colored the edges with Prima Marketing wax, tried with a brush to apply Perfect Pearl (my favorite), or cut out another one with metallic cardstock.  I cut out the center of the heart and glued to the other heart.  If I wanted a better impression after I glued the center and base together, I put the heart back into the Impresslit and ran it through the Sizzix again to make it fit better..  

For the one card, I printed the names and then cut out the printed paper to fit around the die cut on the inside of the Impresslit folder and centered on the Impresslit, taped it in place around the inside of the folder to prevent it from moving and ran through the Sizzix about two times.  The impresslit is clear on the one side so it provides a window so that you can see where you centered the name.   I cut out the center of the heart and glued to another heart impresslit from metallic cardstock and glued the two together.  

I added a little ribbon and a few Wild Orchid Craft flowers and my two Valentine cards are complete.  There are so many possibilites and fun you will have with these Sizzix embossing and Impresslit folders.

I embossed vellum and cut out a strip and used Scor-Tape to adhere to the pink card.  

Supplies:


That’s it for me today!  I’m still trying to get back on track after the New Year!  Now it is crafting our Valentine's cards and other occasions to keep up busy.

The Rubber Buggy has the crafting supplies for your next project. So have fun crafting this weekend with these products.   My cards and projects are always posted on Saturday.  Keep watching and thank you so much for those wonderful comments as well as suggestions. 


Saturday, January 14, 2023

Sizzix/Tim Holtz 3D Pine Branch Embossing Folder Occasional Cards

Welcome back and Nancy, here.  Hope you had a wonderful week of crafting.  I am sharing two cards that were embossed with Sizzix Tim Holtz 3D embossing folders - Pine Branch and Lumber.  I am really lovin these 3D embossing folders with the define texture and gives the deepest and boldest dimensional embossing that makes ordinary cardstock, metallic foil or vellum into an embossed, textured masterpiece using any of the die cut machines such as Sizzix Big Shot, etc. 


I stamped both of the images first before using the embossing folder.  I placed the stamped cardstock and aligned where I want the pine branches to be near the image and then put the embossing folder in my Sizzix Big Shot about three times to get the embossing 3D texture that I was looking for. 
 
NOTE:  I had to clean the embossing folder with wipes after putting my stamp image in the embossing folder since the ink still rubbed off  inside the embossing folder each time even after having the ink dry first.  

I used a blending brush with Distress Oxide Ink Peeled Paint and Pine Needle and brushed on the raised pine branches to bring out the texture. I decided that the pine branches might look good with a little shimmer so I lightly added the top card in various areas the NUVO White BLizzard glitter drops  to bring out the snowy shine.

trimmed the panel to 4 x 6 and sponged around the edges with the same colored Distress Inks as the needles for each card. I colored in the stamped images with Distress Watercolor pencils. I cut out a card base of 5 x 7" and score in the center and added the frames before adhereing the panel to the card.

I used an ole Spellbinder nestabilities rectangle die to cut out the frame and embossed it with Sizzix Tim Holtz Lumber embossing folder.  I brush the top of the wooden embossing with Distress Oxide Ground Espresso ink.  

I added a pine branch with cone using the Tim Holtz Botanical packet on the top card.  Second card, I added the fish chipboard from the with the Stamperia Forest Chipboard Die Cuts Embellishment packet and used 3D foam to adhere the fish to the card.  I used Beacon 3-n-1 Advanced glue to adhere the jute to the fish as well as to the rest of the card.  

All of the supplies used in todays blog are listed below. Click the products to make a purchase. Have fun when your order arrives from The Rubber Buggy and I'll be back next Saturday to share more projects with the new arrivals.  Thank you so much for joining me today! 

Supplies:

Sizzix Tim Holtz Texture Fade Lumber Embossing Folder

Ranger Peeled Paint Distress Oxide


That’s it for me today!  I’m still trying to get back on track after the New Year!  Now it is crafting our wintery cards for birthday and other occasions and soon Valentine's cards.

The Rubber Buggy has the crafting supplies for your next project. So have fun crafting this weekend with these products.   My cards and projects are always posted on Saturday.  Keep watching and thank you so much for those wonderful comments as well as suggestions. 


Saturday, January 7, 2023

Ciao Bella Christmas Winter Card

Welcome back and Nancy, here.   I’m popping in today to share ta winter birthday card with you made with the Ciao Bella Christmas Vibes 12 x 12 collection. Sometimes we can go through what I call the “post-holiday crafting slump” after the Christmas rush.  Our crafty motivation drops down and we need some fun and inspirational ideas to get us back into the creative swing of things.  Well, I designed this vibrant winter card with that in mind and let’s take a closer look at the fun project instruction and supply list available at The Rubber Buggy on-line store.


         Instructions:

  • First, score a 6" x 12″ of heavy white cardstock in half at 6″ with  My Colors White Cardstock
  • Next, trim a red cardstock of 6" x 6" for the card front from the paper.
  • Then cut a 5 3/4" x 5 3/4" of wooden pattern paper from the Ciao Bella Christmas Vibes 12 x 12 collection as well as 5 1/2" x 5 1/2" of the image, center and adhere to the front of the card with Beacon 3-n-1 Advanced Glue.
  • I am using a 4" doily and cut out the circle image in the collection and glue in the center of the doily
  • Now fussy cut the ribbon and lace from the Ciao Bella A4 Collection Pad and wrap the ends of the lace and the tape behind the panel.  This leaves a neat clean edge on your card.  This paper stitched ribbon really helps pull this composition together.  That pop of color helps to keep the eye focused on the card.  
  • Finish by fussy cutting the rest of the images from the packet and glue to the card
  • I added a Tim Holtz Idea-ology Confections Candy Canes using glue for more of a fun card..


 That’s it for me today!  I’m still trying to get back on track after the Christmas festivities!  I hope each one of you had a wonderful holiday with family and friends.  It’s so much fun to get together, isn’t it?  Now it is crafting our wintery cards for birthday and other occasions and soon Valentine's cards.

The Rubber Buggy has the crafting supplies for your next project. So have fun crafting this weekend with these products.   My cards and projects are always posted on Saturday.  Keep watching and thank you so much for those wonderful comments as well as suggestions.