Translate

Wednesday, February 22, 2017

Heartfelt Creations Cards


I made these cards with Heartfelt Creations collections this past year for other companies and now added a blog to help you see more of my Heartfelt Creations cards for the 2017 Heartfelt Creations Semi-finalist for Nancy Hill.    Instructions on how I made these cards are on my blog.


http://hillfarmcards.blogspot.com/2017/02/tri-fold-card-tutorial-and-heartfelt.html

Heartfelt Creations Woodsy Wonderland Collection Frame

I wanted to create a shadow box using the Heartfelt Creations Woodsy Wonderland Collection.  I had so much fun making this project.  I bought a wooden frame and began thinking how to create a project that would also create a feeling of being out in the woods.


Heartfelt Creations Woodsy Wonderland Supplies:
Assessories:
Tree bark and a 3" branch, adhesive, wooden frame measuring 7 ½” x 9 ½”


Instructions: 

Cut the image of the deer 5” x 7”.  Insert the image in the wooden frame.  Cut the animals and birds in the Woodsy Wonderland paper using the Woodsy Critter die set and cut out the trees in this paper collection.  Using the Treescape stamp and die set, and stamp with green ink and card stock and die cut.   Use Flower Shaping kit to shape aspens, woodland animals, leaves and log.  Use glue to attach everything onto frame as pictures.  Tear the bark to the size and length of each side of the wooden frame and glue the bark to the frame.  Adhere the wooden stick to the frame.  Adhere the rest of the leaves and animals to the bark. 

Now it is your turn to try these products out from 
The Rubber Buggy and see what you create! 
Remember to visit The Rubber Buggy store to shop for those gorgeous dies, stamp supplies and other supplies for all of your projects, scrap booking and card making.  
The Rubber Buggy Design Team has something new to share here.   Pop in often and see for yourself what is being shared by this talented group of inspiring designers!!
Have a fabulous crafting day!
I'll be back again next Saturday with a new card or project.
In the meantime, here are all The Rubber Buggy quick links you will need:
Thank you again for stopping by 
Nancy Hill
Designer for The Rubber Buggy

Wishing Great Recovery

I thought of making this card for someone who is suffering from cancer and will have this card with gorgeous hand made flowers next to her bed.  Also, this card would be used for a sympathy card. 

Heartfelt Creations Products:
Heartfelt Creations Cross and Lilies Die HCD-719
Heartfelt Creations Cross and Lilies Cling Stamp HCPC- 3450
Heartfelt Creations Elegant Sentiments Stamp and Die Set HCSD1-2012
Heartfelt Creations Arianna Paper – HCDP1-244
Supplies:
Adhesive, Spellbinders S4-356 Nestabilities Decorative Elements Floral Ovals Die,
Spellbinder Nestabilities Classic Oval, Ribbon, Lace, Rhinestone and Pearl brad, Gold metallic card stock, White/Gold shimmer card stock, NUVO Crystal Drops – Dandelion, Copic Marker – BG23, Memento – Black Ink, Bazzill Blue and Yellow card stock, Self Adhesive Border Stickers, 3D Foam Tape, Adhesive
Instructions:
I made this book card template, click HERE and enlarged the template using a word document software measuring 6” x 9 ½”.  Enlarge each template by ¼” and print.   If you don’t have a printer large enough, any print store will do it for you.  Trace the smallest template on the Heartfelt Creations Arianna Blooms paper.  Trace and cut the other two templates on Bazzill yellow and blue card stocks.   Adhere each page on top of each other.  
Using the Cross and Lilies die set, stamp and color the cross with Copic Markers, G11, E13 and YG13.  Cut the background cross with gold metallic card stock and cut the cross out with scissor and adhere together.  Using 3-D foam tape, tape the cross to the decorative oval.
Shape the lilies and Arianna flower with the Heartfelt Creations shaping kit.  For in depth instructions see the video, click HERE.  Adhere the lilies on the cross and apply NUVO Crystal Drops – Dandelion Yellow in the center of each lily. 
Color the Heartfelt Creations roses with Copic Marker B12 and adhere to the card.  Adhere the Arianna Bloom flower on the center of the rose buds. Cut out the Regal Border and adhere to the card.  Stamp the sentiment on white/gold shimmer card stock and cut using the oval die.  Adhere to the Raindrop on Roses die cut and adhere to card. 
Adhere the lace to the center of the card and cut 5 ½” white/silver ribbon and adhere to lace.  Adhere the rhinestone pearl to the lace.  Stick the self-adhesive border strips to the top and bottom of the first two book pages.
Inside Instructions:

Cut 7 ½” x 12 ½” and score in the center and adhere this to the back of the book.  In the Heartfelt Creations Arianna Bloom paper, cut 5” x 7” paper and adhere to the inside of the card.  Stamp the sentiment with black ink on rose-colored card stock and die cut.  Adhere this sentiment to the inside of the card.  

Peacock Paisley

I
Love making flowers and during these winter days, crafting with the Heartfelt Creations Peacock Paisley Collection brighten my days with the gorgeous daisies and peacocks.
Heartfelt Creation Products:
Supplies:
Adhesive, Spray Adhesive,  NUVO Crystal Drops-Dandelion, NUVO Crystal Drops Copper Glitter, Diamond Dust Glitter, White Feather, Bazzill Green, Cream and Yellow cardstock, White/Gold Glimmer card stock, 3D Foam Tape, 5mm flat back pearl, Pink and Yellow ink, White Embossing Powder, Copic Markers Y13,

Instructions:

From the Heartfelt Creations Peacock Paisley paper, cut 4 ¾” x 6 /4”.  Cut yellow card stock 5” x 7”.  Cut green paper 5 ¼” x 7 ¼”.  Cut cream paper 5 ¾” x 7 ¾”.  Adhere using the 3D Foam Tape the Peacock Paisley page to the yellow paper and adhere the rest of the layers as shown on the photo of the card.

Videos for Heartfelt Creations Flower Shaping Kit:  https://www.youtube.com/watch?v=rdsIOVMXjIQ

Stamp the Arianna Bloom flowers with pink ink and color the center with
Copic Marker Y13. Cut the Arianna Bloom flowers and small stamen.   Use the Flower Shaping Kit to shape the two flowers and apply adhesive to form the flower layers.  Apply NUVO Crystal Drops (Dandelion) on the tip of each stamen and apply NUVO Crystal Drops Copper glitter in the center.  Adhere the stamen to the flower.  Stamp the Classic Rose with yellow ink and cut it out.  Use the Flower Shaping Kit to shape the flower and apply adhesive to form the flower layers.  Adhere the flat back pearl to the center of the flower. Stamp the Delightful Daisy with white embossing powder and heat with the embossing gun.  Apply NUVO Crystal Drops (Dandelion) in the center of each daisy. 

Spray a small amount of adhesive spray to each flower and sprinkle diamond dust glitter around the flowers.  Cut two white feather about 2” and adhere to flowers on the peacock.  Adhere daisies on top of the feathers. Stamp two Classic Rose leaves on green card stock and use the Flower Shaping Kit to shape the leaves.  Cut out two Arianna Lace dies.  Adhere the Arianna Bloom flower on the leaves and then adhere it on the Arianna Lace.  Adhere this to the top right corner of the card.  Adhere the other Arianna Bloom and Classic Rose flower to the leaves and adhere it on the Arianna Lace.  Adhere this to the bottom left corner with a Birthday Wishes tab from the Peacock Paisley paper. 

On Your Special Day

Frantic Stamper Precision Die
 Lace Geometric Flower Doily FRA-Die-10114

Isn't the Frantic Stamper Lace Geometric Flower Doily a gorgeous die.  Visit Frantic Stamper.com and see all of the 2017 February released dies.  

Supplies:
Adhesive
Lavender Bow with rhinestone and pearl ribbon slider buckle
Blue Fern Studio Courtship East Plaza paper
White card stock
Zutter Bow It All V2

Instructions:
Cut 6" x 6" patterned paper.  Stick the border stickers around the paper.  Cut the Frantic Stamper doily and adhere to the paper.  Stamp or cut out a butterfly and adhere to the card.  
 Make the lavender bow and adhere to the corner of the paper.  Cut out four Cheery Lynn Anastasia Lace borders measuring 7" and mold each one and cut each edge at a 
45 degree angle and adhere to the back of the paper. Adhere
Sue Wilson "Special Day".  Ad the NUVO Crystal Drops - Ivory Seashell, to the Geometric Flower doily. 

 I hope that I inspired you to make your next cards using the Frantic Stamper Lace Geometric Flower Doily die. Also, make sure to stop by to see what Frantic Stamper creative and talented design team made for you:


Tuesday, February 21, 2017

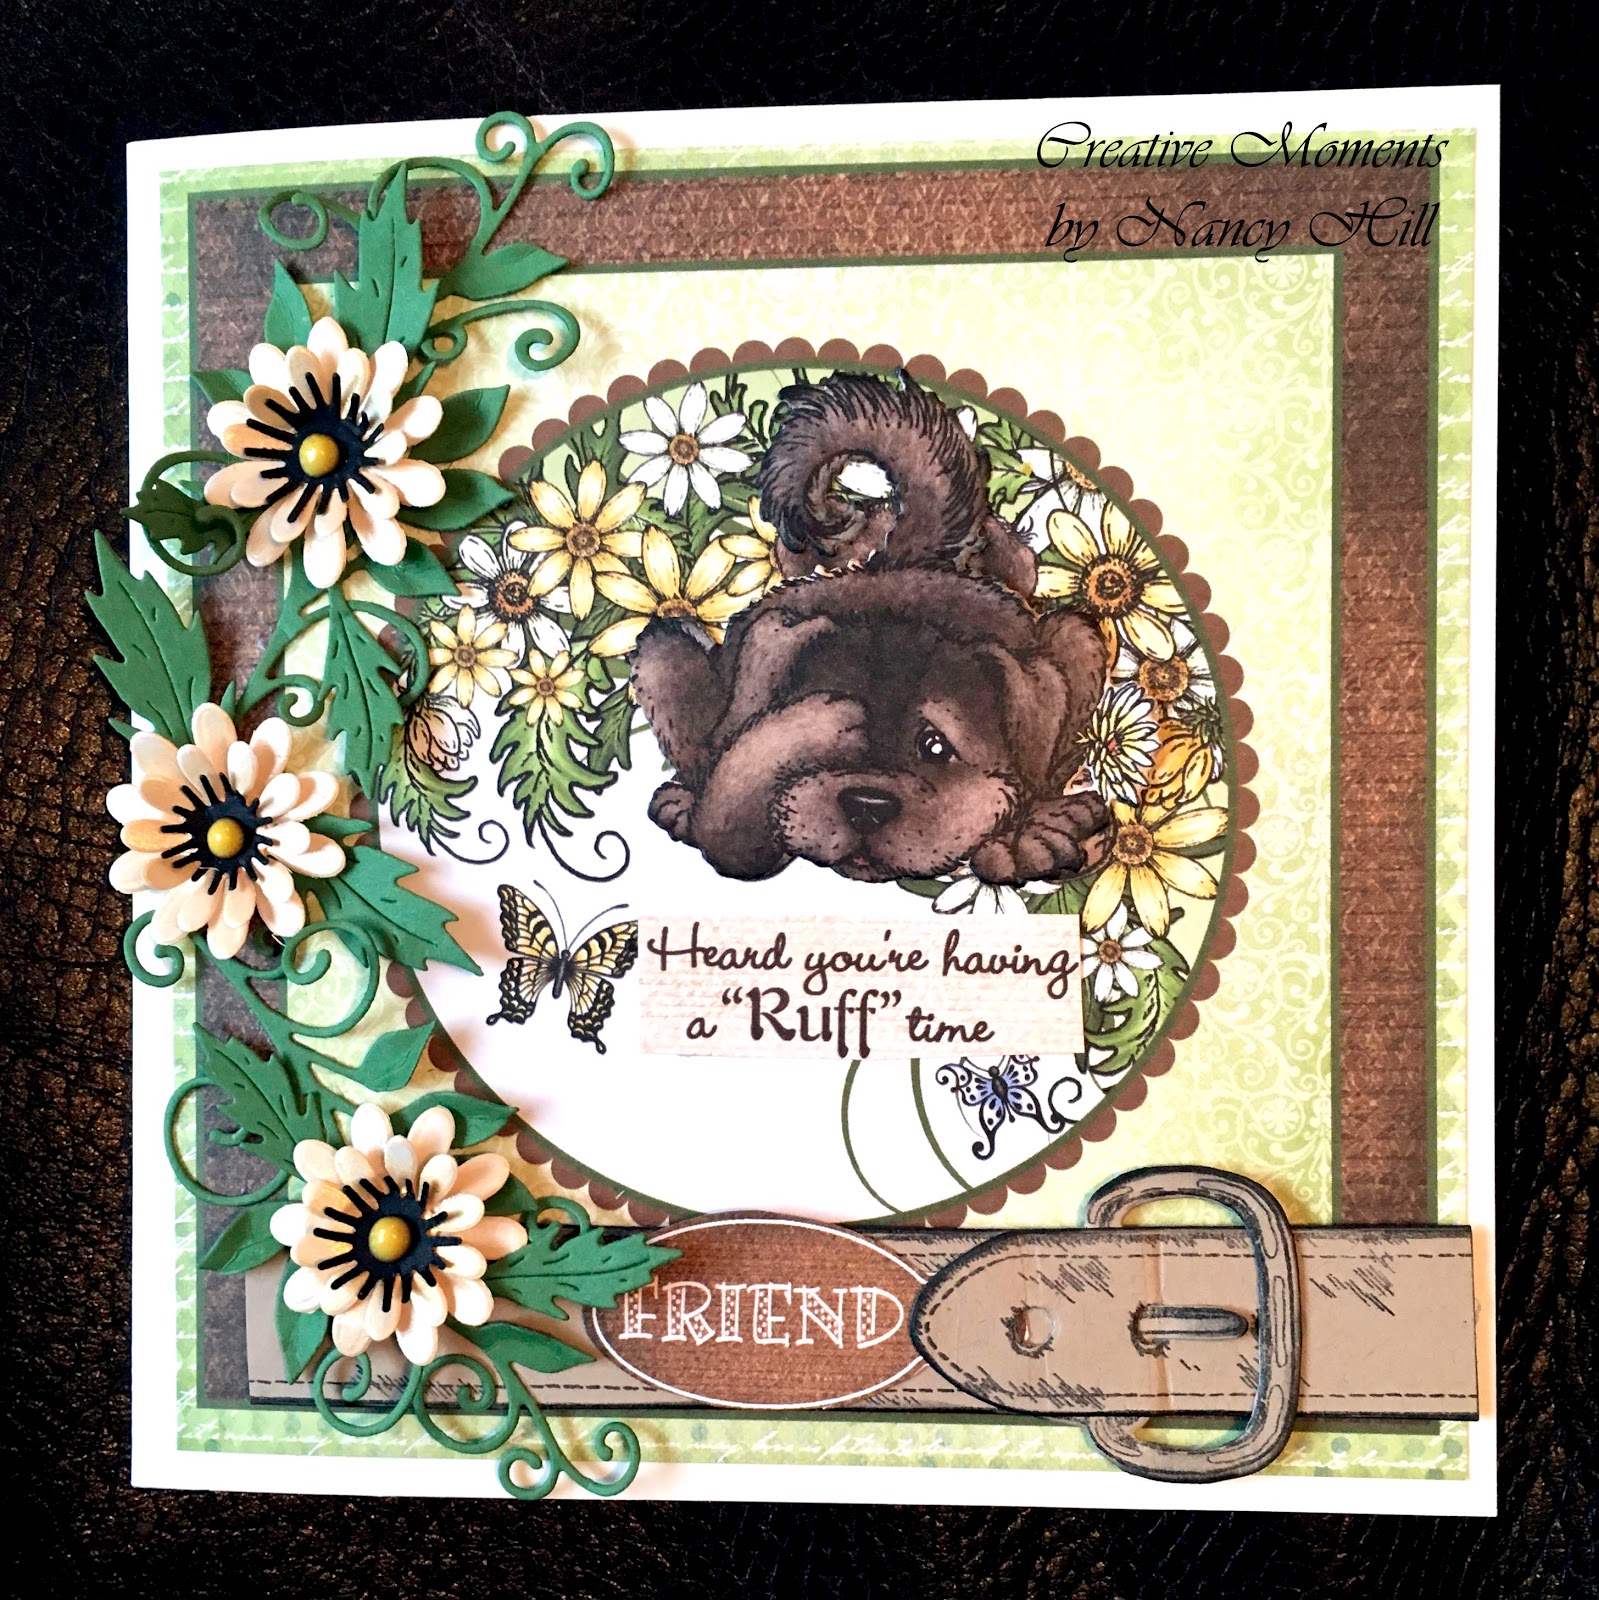
Heartfelt Creations Pampered Pooch Sick Card for a Friend

Welcome back to my blog site, Nancy Hill, design team for The Rubber Buggy on-line store.  I have a friend that has been sick with this cold that has been going around and I made her this card using the following supplies from The Rubber Buggy on-line store:

Would have loved to have the Heartfelt Creations Delightful Daisy die and stamp set for this card to coordinate with the paper but used older punches and a die set at this time.  


Instructions for front of card:  Cut out the frame with the picture of the dog and bone (Lower right corner) and it should almost measure  a 5 1/2" square.
Since I am making a 6 x 6 card, I love using this Ghostline Poster Board that you can buy almost any where that they sell poster board.  It is heavier weight and I use this for my main foundation of each of my cards since it holds up very well and won't warp.  Cut a 6" x 12" of this poster board and score 6" in the center. Fold the poster board and center the Heartfelt Creation picture of the dog with the bone onto the poster board and glue it.


Using the Heartfelt Creations Pampered Pooch Pal die set, cut out the dog in the first column, second row. Using a molding ball for flowers, I used a medium size molding ball for the back of this dog to give it a 3D shape and make it stand out.  Glue only the edges of the dog and stick it to the top of the dog with the bone.

Using the Heartfelt Creations Pampered Pooch Pal die and Heartfelt Creations Pampered Pooch Stamp set, stamp and cut out the collar.  I used the black ink pad and rubbed it on the edges of the collar to cover up card stock edges and give it some dimension appearance.  I used the Scrapbook Adhesive 3D Foam Tape on the back of the collar and peel the strip off and stuck it to the card.

Inside the Heartfelt Creations Pampered Pooch paper are beautiful tags, labels and sentiments.  With scissors, I cut out the Friend label and glued it on the collar.


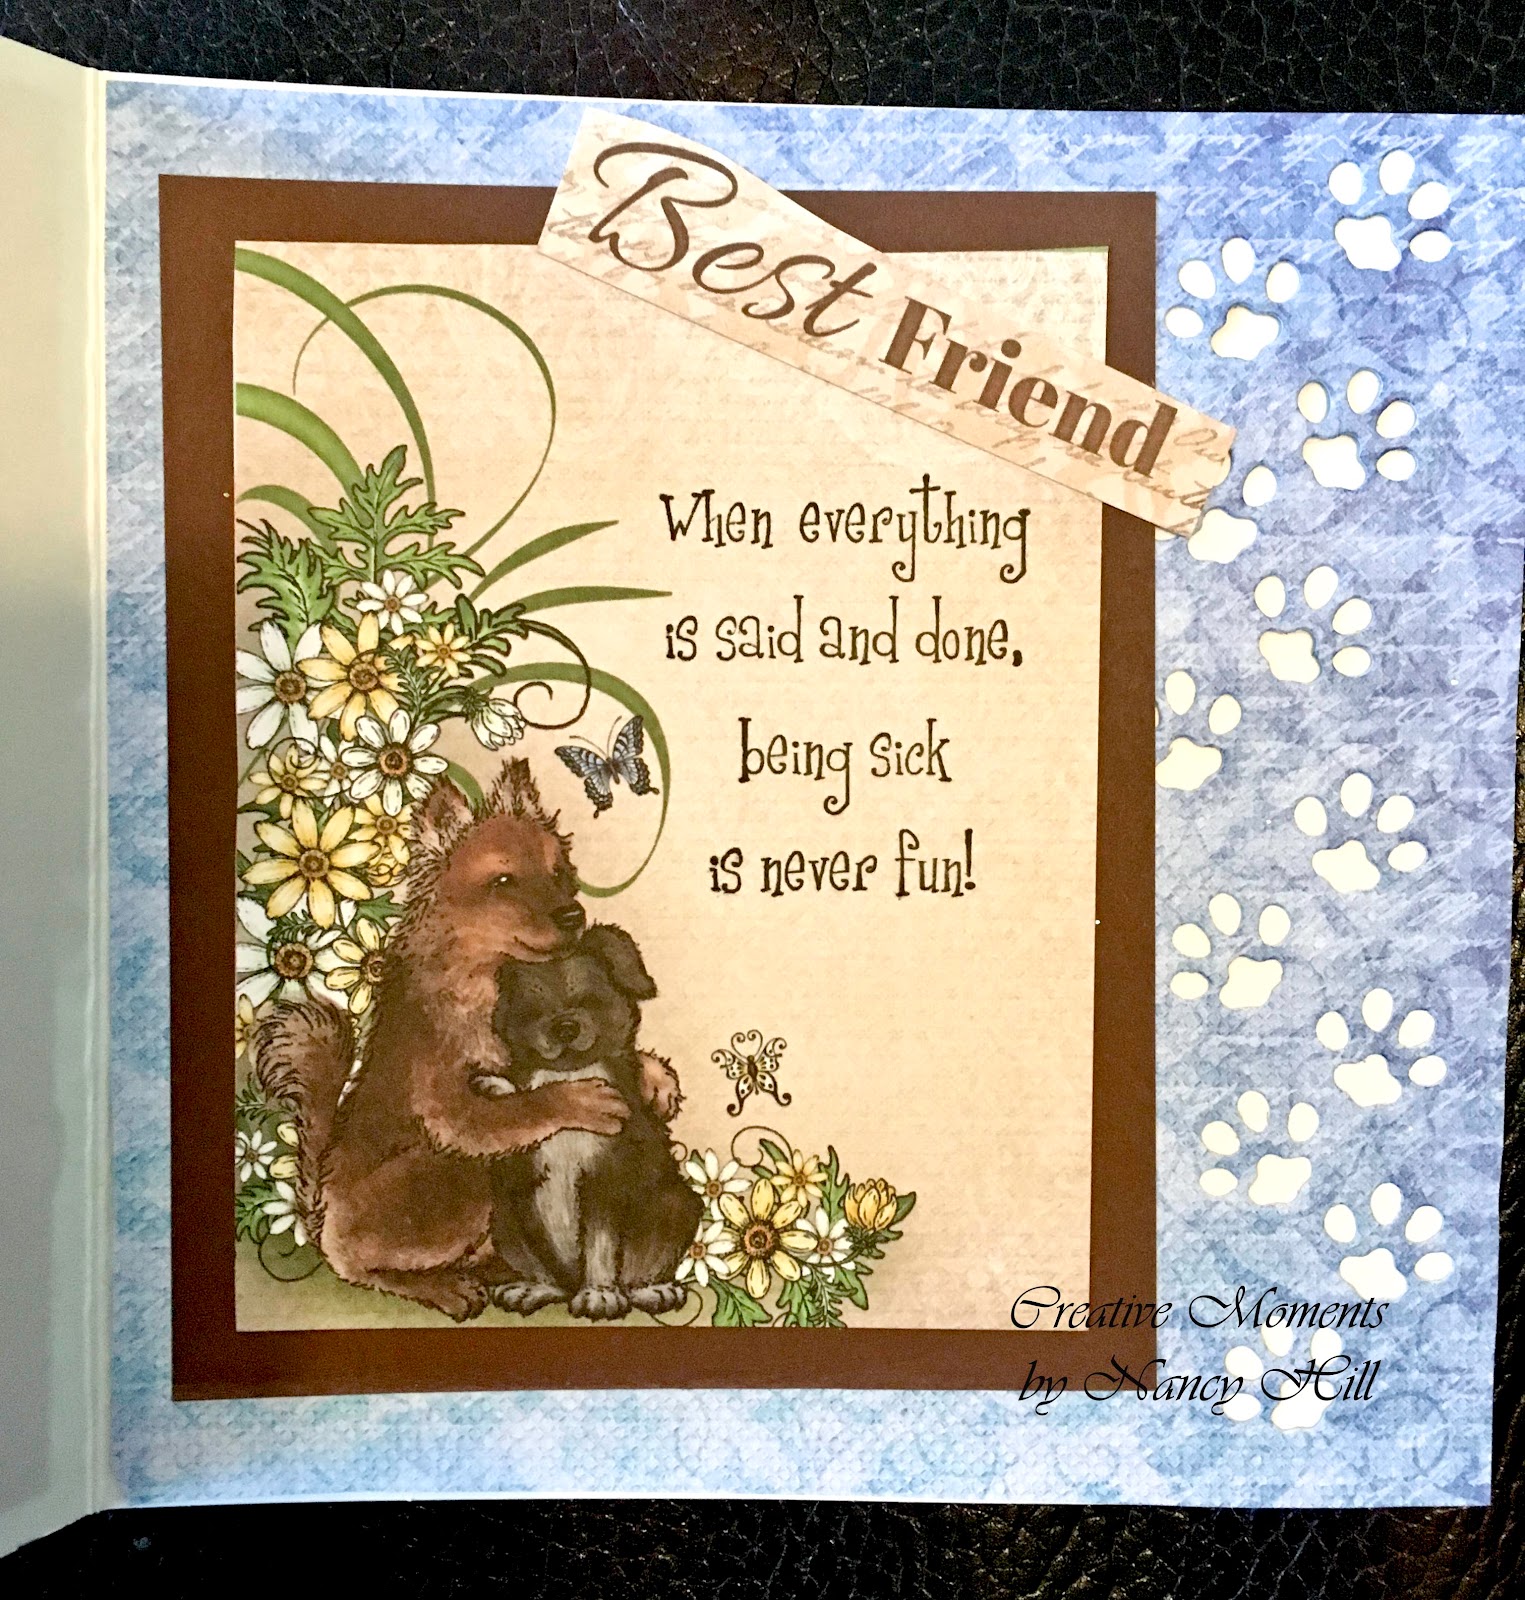
This is the inside of the card and you can find this picture in the Heartfelt Creations Pampered Pooch paper along with Best Friend and the blue paper.  Cut the blue paper 6" x 6" using the Heartfelt Creations Pampered Pooch paper and cut the paw prints with the Heartfelt Creations Pooch Pal die set.  
The brown paper is  4 1/4" x 5" and the measurement of the picture of the dogs is 3 3/4" x 4 3/4".  The sentiment "Best Friend" is in the Heartfelt Creations Pampered Pooch paper and I cut this 3/4" x 2".  
I made this flowers with another die but would have preferred the Heartfelt Creations Delightful Daisy die and stamp set.  What I wanted to show you were these beautiful beaded yellow pearls made with the NUVO Crystal Drops-Gloss-Dandelion.
 I just love how easy the NUVO Crystal Drops are about making gorgeous flat-back pearls in the center of my flowers or on the cards.  The NUVO Crystal Drops come in many colors and textures.  


Now it is your turn to try these products out from 
The Rubber Buggy and see what you create! 

Remember to visit The Rubber Buggy store to shop for those gorgeous dies, stamp supplies and other supplies for all of your projects, scrap booking and card making.  

The Rubber Buggy Design Team has something new to share here.   Pop in often and see for yourself what is being shared by this talented group of inspiring designers!!

I'll be back again next Saturday with a new card or project.

In the meantime, here are all The Rubber Buggy quick links you will need:
Thank you again for stopping by 

Nancy Hill

Designer for The Rubber Buggy


Monday, February 20, 2017

Praying Hands


Welcome back to my Tuesday's postings for Tutti Designs.  Hi, I am Nancy Hill and excited to share with you the very gorgeous Tutti Designs die called Praying Hands Egg.

I used the Recollection Mercury Glass card stock for the Praying Hands Egg die cut and adhered it to the card using Aleene Fast Grab Tacky adhesive spray after I had embossed the white shimmer paper using the Craft Concepts Embossing Folder Sun Rays.  


I used the same card stock for the outside frame and used the adhesive spray on the back of the shimmer paper to adhere to the card.  

I used the adhesive spray for the Tutti Designs Word Set Believe large die to the card (Each of the Tutti Designs Word sets have two sizes).  

Afterwards, I always add flowers to my cards. 


Supplies:
Tutti Designs Praying Hands Egg die
Tutti Designs Word Believe die set
Craft Concepts Embossing Folder A2 Sun Rays
Wild Orchid Craft flowers
Aleene Fast Grab Tacky Adhesive Spray
Tattered Lace Ivy Die
Recollection Mercury Glass card stock
Centura White/Gold shimmer card stock
Black card stock

Now it is your turn to try this gorgeous Tutti Designs die and see what you create! Click HERE to see the  Tutti Designs dies.
Reminder to visit the Tutti Designs Blog to see what our other designers have created for you.  Explore more ways of using this die as well as other Tutti Designs dies, visit our Tutti Designs designers on the Tutti Designs Pinterest or Tutti Designs Facebook .


Happy Crafting!

Nancy Hill, Design Team 


Praying For You


I thought of making this card for someone who is suffering from cancer and will have this card with gorgeous hand made flowers next to her bed.  Also, this card would be used for a sympathy card. 

Heartfelt Creations Products:

Heartfelt Creations Blushing Rose Stem Set – HCPC-3755
Heartfelt Creations Deluxe Flower Shaping Kit,  HCST1-401
Heartfelt Creations Regal Border and Pocket Die, HCD1-779
Heartfelt Creations Raindrop on Roses Die, HCD1-743
Heartfelt Creations Blushing Rose Paper – HCDP1-271
Heartfelt Creations Arianna Paper – HCDP1-244
Heartfelt Creations Deluxe Flower Shaping Kit,  HCST1-401
Tattered Lace Essentials Book Die-ETL 23
Spellbinders  Nestabilities Decorative Elements Floral Ovals Die
Heartfelt Creations Cross and Lilies Die HCD-719
Heartfelt Creations Cross and Lilies Cling Stamp HCPC- 3450
Heartfelt Creations Elegant Sentiments Stamp and Die Set HCSD1-2012

Heartfelt Creations Arianna Blooms Stamp set HCPC-3608
Heartfelt Creations Elegant Sentiments Stamp and Die Set HCSD1-2012

Supplies:
Adhesive, Ribbon, Lace, Rhinestone and Pearl brad, Gold metallic card stock, White/Gold shimmer card stock, NUVO Crystal Drops – Dandelion, Copic Marker – BG23, Memento – Tuxedo Black Ink, Bazzill Blue and Yellow card stock, Self Adhesive Border Stickers, 3D Foam Tape, Adhesive

Instructions:

Using the Cross and Lilies die set, stamp and color the cross with Copic Markers, G11, E13 and YG13.  Cut the background cross with gold metallic card stock and cut the cross out with scissor and adhere together.  Using 3-D foam tape, tape the cross to the decorative oval.
Shape the lilies and Arianna flower with the Heartfelt Creations shaping kit.  For in depth instructions see the video, click HERE.  Adhere the lilies on the cross and apply NUVO Crystal Drops – Dandelion Yellow in the center of each lily. 

Color the Heartfelt Creations roses with Copic Marker B12 and adhere to the card.  Adhere the Arianna Bloom flower on the center of the rose buds. Cut out the Regal Border and adhere to the card.  Stamp the sentiment on white/gold shimmer card stock and cut using the oval die.  Adhere to the Raindrop on Roses die cut and adhere to card. 
Adhere the lace to the center of the card and cut 5 ½” white/silver ribbon and adhere to lace.  Adhere the rhinestone pearl to the lace.  Stick the self-adhesive border strips to the top and bottom of the first two book pages.
Inside Instructions:

Cut 7 ½” x 12 ½” and score in the center and adhere this to the back of the book.  In the Heartfelt Creations Arianna Bloom paper, cut 5” x 7” paper and adhere to the inside of the card.  Stamp the sentiment with black ink on rose-colored card stock and die cut.  Adhere this sentiment to the inside of the card.  

Sunday, February 19, 2017

Valentines Card for Let's Craft and Create

Welcome back to our new Let's Craft and Create Challenge #122-Love is In the Air.  Come join us and enter your card or project with us and share you information.  Also, you might become our next winner for a prize.


Since I am making a 6 x 6 card, I love using this Ghostline Poster Board that you can buy almost any where that they sell poster board.  It is heavier weight and I use this for my main foundation of each of my cards since it holds up very well and won't warp.  Cut a 6" x 12" of this poster board and score 6" in the center. 


First, I used Aleene Fast Grab Tacky Adhesive Spray to adhere the Maja Designs card stock on the poster board paper.  Using the adhesive spray, I adhered the heart on the card stock and glued the resin angel in the center of the heart.  Then, I made the pink frame by using the Sue Wilson Nobel Collection - Double Pierced Squares die set.  I cut four 1/2" white strips and glued it behind the frame leaving 1/4" showing.  I used Scrap Book Adhesive craft foam tape to stick the frame on the card to give it a shadow box appearance.

Supplies:
Cheery Lynn Love Word Phrase die Set
Cheery Heart To Heart die set
Sue Wilson Lace Edge Leave set
Sue Wilson Nobel Collection - Double Pierced Squares
1/2 " Rose Pink Seam Binding Ribbon
Aleene Fast Grab Tacky Adhesive Spray
Maja Designs Card Stock - Vintage Romance Engagement Collection

Borders Leaves Peel Off Stickers 

Pink Shimmer card stock
Scrap Book Adhesive Craft Foam Tape

Resin angel painted with

Prima Marketing - Art Alchemy - Acrylic Paint - Opal Magic Rose Gold


Hope our wonderful design team inspired you to make your projects and cards this year.  Stay tune for the next month for another wonderful challenge from Let's Craft and Create.  

Happy Crafting

Nancy Hill, Design Team