Translate

Saturday, November 18, 2017

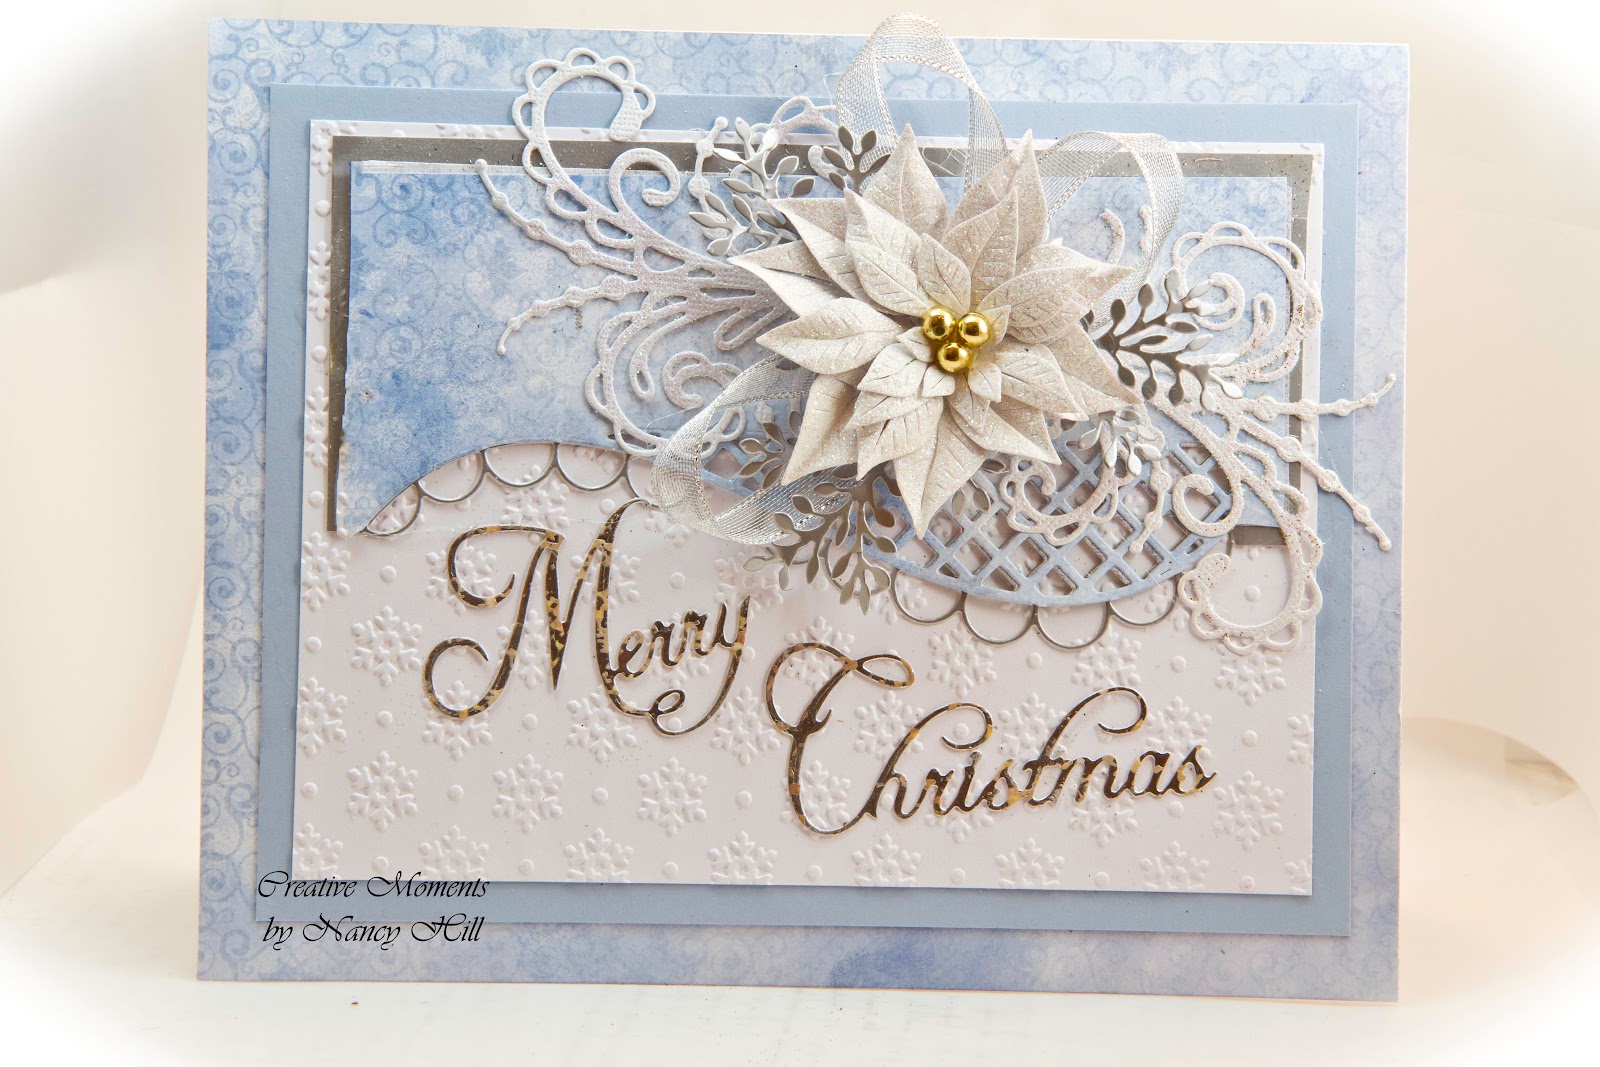
White Poinsettia

Nancy Hill for Frantic Stamper Design Team.  I wanted to share my Christmas card with you made with the gorgeous Frantic Stamper Poinsettia die set along with the beautiful Frantic Stamper Merry Christmas die set.  Behind the poinsettia, the scallop silver edges are from the Frantic Stamper Lattice Beauty Edger #10303.  I cut this die with silver metallic cardstock and the Heartfelt Creations Celebrate The Season blue paper.  I cut out the scallop from the blue paper and glued it on top of part of the silver card stock with only the silver metallic scallops showing.

I created a tutorial, click HERE, on how I made my poinsettias from the Frantic Stamper Poinsettia die set.  I glued three gold beads in the center of this poinsettia and added Sue Wilson Beaded Swirl Flourish and Sue Wilson Delicate Fronds dies set cut out with white shimmer cardstock.

Frantic Stamper Dies:
Frantic Stamper - Merry Christmas die set #09619
Frantic Stamper - Poinsettia die set #09283
Frantic Stamper Lattice Beauty Edger #10303

Now is your turn to use your imagination and creativity to design your own card using the Frantic Stamper 2017 November coordinating dies and stamps from Frantic Stamper on-line store.
Enjoy and Happy Crafting!

Entering in the challenge:  Scrapyland Challenge #78 - Anything Goes
Nancy Hill
 Frantic Stamper Design Team

Handmade Autumn Wreath


Welcome to my blog, Nancy Hill for The Rubber Buggy Design Team.  I made my 8" wreath with grape vines, Heartfelt Creations Classic Sunflower dies and stamps, Elizabeth Craft Crysanthemum die, an old maple leaf punch, Tattered Lace Floral Layer leaf die set, starfoam pumpkins and wheat from our field and pine cones from trees.  

After stamps and die cutting the Heartfelt Creations Classic Sunflowers, use flower shaping kit to mold the petals on the back.  Sponge with NUVO Embellishment Mousse fall colors listed below and sponge Lawn Fawn Sunflower ink on the center of each petal.  Adhere US Art Quest Express Yourself Prills to the center of each sunflower. 
NUVO Embellishment Mousse-Indian Gold
NUVO Embellishment Mousse-Persian Red
NUVO Embellishment Mousse - Coral Calypso
Cut out the Tattered Lace Floral Layer leaves and sponge some of the NUVO mousse fall colors on the tips.  

Cut out each Elizabeth Craft Crysanthemum flower with different fall colored cardstock.  Using a flower shaping kit, curl the petals upward and adhere the layers.  

Stamp and embossed with NUVO Gold Enchantment embossing powder the  Heartfelt Creations Banner with the sentiment and heat the powder with the hot embossing gun.  Cut out a 8" floral wire and bend in the center.  Using a hot glue gun, glue 3" of the double wire on the back of the banner.  The remaining wire will be used to attach and glue to the wreath at the end of the floral arrangement.

Cut enough 3" wire strips for each flower, leaf and pumpkins.  Curled one end of each wire enough to be able to use a hot glue gun to attach it to each flower.  I was able to use a long nose plier and curl about two small circles of wire that was enough to do a good attachment.  Using a hot glue gun, glue the curl end of the wire to each flower, pine cone and star foam pumpkin.  

Cut 3" floral wire and glue about 1" of the wire to the back of each leaf. This will make the leaves able to bend a little plus add sturdiness.  

Make a floral bow and use a hot glue gun to glue the bow to the wreath.  Arrange your autumn arrangement by poking the wire attached to the flowers, etc.  When you get the arrangement you want, use the hot glue gun and glue each wire attached to a flower or leaf  to the wreath.  If any wire is sticking out of the wreath, just attach it to the wreath or cut it off.  I was able to curl the wire attached to the banner to give it a wave appearance.  Using the hot glue gun, glue around the wires inside the wreath to make it stay there permanently.    


I can't wait to see the possibilities that you will create making a wreath.  You can purchase these dies and supplies from The Rubber Buggy on-line store.

Enjoy and Happy Crafting!


Nancy Hill
The Rubber Buggy Design Team


Thursday, November 16, 2017

Rose Panel

Welcome and Nancy Hill for the Frantic Stamper Design Team. I am excited to share with you these gorgeous dies from the new November 2017 releases of Frantic Stamper. The gorgeous frame is the Frantic Stamper Spiral Rose Card Panel and I love the new Frantic Stamper Musical Heart that I cut out with black and gold cardstock. I cut out the black note and glued it on top of the gold musical heart. I highly recommend for you having the coordinating Frantic Stamper Coved Musical Label die set that coordinates with the Frantic Stamper Stitched Coved Labels die set. The sentiment is in the wonderful selection of Frantic Stamper Sing It stamp set that came out in November.

 Behind the Frantic Stamper Rose Panel is the Sue Wilson Rose embossing folder.

Frantic Stamper Precision Die - Spiral Rose Card Panel #10197
Frantic Stamper Precision Die - Coved Musical Labels coordinating with
Frantic Stamper Frantic Stamper Precision Die - Stitched Coved Labels #09641
Frantic Stamper Precision Die - Musical Heart #10354
Frantic Stamper Sing It stamp

Now is your turn to use your imagination and creativity to design your own card using the Frantic Stamper 2017 November coordinating dies and stamps from Frantic Stamper on-line store.
Enjoy and Happy Crafting!

I am entering the following challenge:  Scrapyland Challenge:  Anything Goes #78


Nancy Hill
 Frantic Stamper Design Team


Tuesday, November 14, 2017

Silent Night with Musical Notes

Nancy Hill for Frantic Stamper Design Team. I love the Frantic Stamper Music Ribbon #10294.  I die cut it out with gold metallic card stock and black cardstock.  I cut out the black music bar and glued it on top of the music bar on the Music Ribbon.

I cut out the center using the Frantic Stamper Stitched Round Rectangle #10231 large die on the shimmer paper and used 3D foam tape behind it for the Heartfelt Creations Celebrate The Season patterned paper with Silent Night.  The shimmer paper was embossed with Sue Wilson Snowflake embossing folder. 

This card measures 6" x 6".  The frames inside the card measures 5 3/4" square and 5 1/2" square. 

Now is your turn to use your imagination and creativity to design your own card using the Frantic Stamper 2017 November coordinating dies and stamps from Frantic Stamper on-line store.

Entering card for Path of Positivity Challenge #53-Music
because Silent Night is my favorite Christmas song for Christmas eve.  Dec. 3
All Sorts Challenge #443 - Inspired by A Christmas Carol or Winter Themed Song 


Enjoy and Happy Crafting!


Nancy Hill
 Frantic Stamper Design Team

Saturday, November 11, 2017

Frantic Stamper Poinsettia Tutorial


Frantic Stamper Poinsettia #09283
Step One:  Cut two sets of Frantic Stamper Poinsettias

Step Two:  Take the largest flower shaping ball tool and mold on the back of each of the largest petals.  If you use a smaller molding ball, it tears through the cracks of the die cut. 
 Step Three:  Turn the flower to the front and fold in the center of each petal and pitch each end of the petals.  Glue the center of the petal sets together to start forming the poinsettia. If you want to sponge parts of the flower, do this before gluing the layers.

Step Four:  Take the second to the largest petals with six sets and repeat the above instructions and still continue to use the largest flower shaping ball.  Turn the petal set to the front and fold in the center of each petal and pitch the ends of each petal.  
 Step Five:  Glue two sets together as seen below.  
 Step Six:  Glue these three sets to the center of the flower in a circular arrangement.

 Step Seven:  If you want a fuller poinsettia, use the rest of the smaller petals starting with the third largest down to the smallest and glue to the flower.   You will still want to mold the petals and pitch the ends of each petal.
 Step Eight:  Glue the center with beads or anything you want.  
Step Nine:  Cut out two sets of the Frantic Stamper Poinsettia die with green cardstock.  Shape the leaves just like the poinsettia.  
 Step Ten:  Pinch each leaf off of the sets and glue slightly beyond the center behind the poinsettia so that the leaves can be seen.  See two photos below
 Note: Leaves are showing behind the poinsettia.  Glue beads or floral stamens in the center of the flowers.  The Frantic Stamper die set also comes with a stamen that could be used for this flower.  

Sample of poinsettias made with the Frantic Stamper Poinsettia die


Note the above photo the different sizes and centers for each poinsettia.  The pink poinsettias were sponged with dark pink ink.  I added glitter to some petals but didn't put poinsettia together with glittered petals.  


Now is your turn to use your imagination and creativity to design your own poinsettias with the Frantic Stamper Poinsettia die set from Frantic Stamper on-line store.


Enjoy and Happy Crafting!


Nancy Hill
 Frantic Stamper Design Team

Piano Easel Card with Drawers


Welcome to my blog, Nancy Hill, for the Frantic Stamper new 2017 November releases of dies and stamps.  I am so excited to share with you my easel card for my brother's birthday.  I created a tutorial on how to make the easel card with the drawer by clicking HERE.

The drawer under the easel card was made and new photos of my son's wedding were added inside the drawer for my brother's birthday gift.  I wrote the Happy Birthday song on the piano notes stamped inside the easel card.  I drew the piano top on plain paper and when I got the style and size that I wanted, I traced and cut it out on black cardstock paper and then a smaller version on Heartfelt Creations All Glammed Up paper and adhered the two together.  

On the bottom of the drawer, cut the Frantic Stamper Piano Keys Edger on 6" x 7" black cardstock.  Cut a 6" x 7"x white cardstock.  Trace the top of the piano key on the white cardstock and cut.  Adhere the black cardstock on top of the white cardstock and adhere to the drawer.  

I used the Heartfelt Creations Classic Rose Swirl stamp and die set for the front of the easel card and handmade flowers.  

Stamp the Frantic Stamper Bit of Music with white ink on 
5 3/4" x 5 3/4" black cardstock and write in the song.  Adhere to a 6" x 6" gold cardstock and adhere to the easel card. 

Stamp the sentiment with black ink on white cardstock and center one of the Frantic Stamper Stitched Coved Label in the center and die cut.  With the same set but larger die, die cut with black cardstock for the back.  Cut one Frantic Stamper Coved Musical Labels die with white cardstock to be adhered to the top of the black die cut.  Adhere the Frantic Stamper Sing It stamp sentiment with 3D foam adhesive tape and adhere to the label.  

Follow my tutorial, HERE,  for the measurements of the additional  paper around sides and on top of the drawer, I used Heartfelt Creations All Glammed Up paper along with gold metallic cardstock for the front of the drawer.  

The Frantic Stamper Dies and Stamps:
Frantic Stamper Precision Die Piano Keys EdgerFRA-DIE-10293
Frantic Stamper - 6x6 Background Rubber Stamp - A Bit of Music - FRA-CLG-B033
Frantic Stamper Clear Stamp Set - Sing It - FRA-CL-085
Frantic Stamper Precision Die - Stitched Coved Labels FRA-DIE-09641
Frantic Stamper Precision Die - Coved Musical Labels - FRA-DIE-10349


Additional Supplies and Tool Used:
Hot Glue Gun

Now is your turn to use your imagination and creativity to design your own piano easel card with the drawer using the Frantic Stamper 2017 November coordinating dies and stamps from Frantic Stamper on-line store.

I am entering this in 
Path of Positivity Challenge #53 - Music 12/3


Enjoy and Happy Crafting!


Nancy Hill
 Frantic Stamper Design Team


Lego Birthday Card

 Nancy Hill for The Rubber Buggy Design Team.  My nephew's son loves his Legos and having a Lego birthday party.  I made this card using the Tattered Lace Pop Up Box and Tutti Design Balloon Bouquet Craft dies which were all purchased from The Rubber Buggy on-line store.  

The Tattered Lace Pop Up Box die set has several sizes of square dies. 


 Using the 1 1/4" square in the set to do the lego blocks, cut out two squares of each color: blue, yellow, red, green, and orange .  I used a 1/2" circle punch or 1/2" circle in the set and punch or die cut eight circles for each lego block.  For the dots on the lego block, use 3D foam to stick one 
1/2" circle to another circle and glue four of these dots to each square.


To add these blocks inside the card, the Tattered Lace Pop Up Box die set has a 1/4" rectangle die.  Cut out 5 and then cut each strip in half.  You will use each strip to glue each block and glue it inside the pop up box.  Take the NUVO Crystal White Gloss and add it to the top of each dot on the squares.  Spray adhesive glue and sprinkle to the balloons.

I printed the Happy 7th Birthday on my computer and printed it out.  I took the scallop flower inside the Tattered Lace Pop Box die set, centered the die on the sentiment and die cut it.  I adhered it on the card.  I found the Lego Man on the computer and copied and printed it out.  The candle and number 7 is also in this set.  I cut it out and applied glitter to the candle.  


I can't wait to see the possibilities that you will create making a Pop Up Box made with the wonderful Tattered Lace Pop Up Box die set.  You can purchase these dies and supplies from The Rubber Buggy.

Enjoy and Happy Crafting!


Nancy Hill
The Rubber Buggy Design Team


Saturday, November 4, 2017

Paula's Birthday Card


Welcome back and Nancy Hill for The Rubber Buggy Design Team.  I love making easel cards attached to a drawer.  If you haven't seen my step-by-step visual and written instructions on how to make an easel card with a drawer, click HERE.  If you have additional questions, don't hesitate to contact me. 

The gorgeous coordinating Heartfelt Creations Botanical Orchid  paper pad, dies and stamps as well as the Heartfelt Creations Sunrise Lily flower dies and stamps are sold at The Rubber Buggy on-line store.   

To get you started on making the flowers, watch the videos Heartfelt Creations Orchid and Heartfelt Creations Sunrise Flower U-Tube video.   I made my flowers using shimmer cardstock and sponged with my fingers the NUVO Embellishment Mousse colors:  Lilac Lavender, Peony Pink, Pink Flambe before shaping each petal using a flower shaping tools and pad.  

The top sentiment is from the Heartfelt Creations Pampered Pooch Pawfect stamped set, "Life Is Better With You In It".  The inside sentiment is from the Heartfelt Creations Botanic Orchid Wishes.  I used colored pencils and Copic markers on the flowers, leaves and hummingbirds. I glued the oval on the Heartfelt Creations Eyelet Oval die.  The butterfly is from the Heartfelt Creations Butterfly Medley collection and colored with Copic markers.  

I used 1" Scor Pal-Scor Tape to adhere more of this together and advise using heavy weight cardstock for the drawer.  I used the Heartfelt Creations Fleur Border and Pocket die set cut out with white cardstock and adhered it around the drawer.  

I stamped a retired Heartfelt Creation sentiment inside the drawer and colored it with pencils.  When I gave this to her, I had chocolates and other fun gifts inside the drawer.  

I can't wait to see the possibilities that you will create making an easel card attached to a drawer using the Heartfelt Creations paper, dies and stamp sets. I really encourage you to purchase the entire coordinating Heartfelt Classic Sunflower collections from The Rubber Buggy.

Enjoy and Happy Crafting!

Nancy Hill
The Rubber Buggy Design Team


Friday, November 3, 2017

Autumn Card


I just love making autumn cards and projects.  I had to make another one of these cards for a special lady since she like the other one that was similar and already given away.   This easel card/drawer was made using many dies and stamps from Heartfelt Creations, Cheery Lynn and Tattered Lace. The sunflowers are from Heartfelt Creations and I added Espresso Prills in the center.  The paper is from Heartfelt Creations Classic Sunflower.  I love the colors of the autumn flowers such as the sunflowers and chrysathemums.  

The beautiful bow was made using wired burlap ribbon purchased from Really Reasonable Ribbon. 

I am entering this project/easel card with drawers in the following challenges:
Dies R Us Challenge #84 Anything Fall.
Scrapyland Challenge #77 - Anything Goes

Double D Challenge:  Feeling Fallish


Happy Crafting from Nancy Hill