Translate

Sunday, October 29, 2017

Christmas Tree with Cardinals


Welcome and Nancy Hill for the Frantic Stamper Design Team.  Visit the Frantic Stamper Layered Tree die set and below are other cards made by our wonderful Frantic Stamper Design Team

The Frantic Stamper Elemental Petal #19 - 10169 is behind the tree and is a gorgeous background die to add to this card.  I used the Heartfelt Creations Snow Kissed paper for the background behind the die.  I added a blue bow with a hat pin in the center.  

Now is your turn to use your imagination and creativity to design your own card using the Frantic Stamper Layered Tree die set using the coordinating dies and stamps from Frantic Stamper on-line store and have fun personalizing it before sending it to that special person.

Enjoy and Happy Crafting!


Nancy Hill
 Frantic Stamper Design Team


Saturday, October 28, 2017

Birthday Card for Sis

Welcome and Nancy Hill for The Rubber Buggy Design Team.  I am excited to share my card with you made with the gorgeous coordinating papers, dies and stamps sets from Heartfelt Creations that is sold at The Rubber Buggy.com online store..  This collection is call the Heartfelt Creations Classic Sunflower set.


This card measures 5 3/4" x 8" on the outside.  I cut out the top left frame found in the Heartfelt Creations 12" x 12" paper pad.  Look at the many gorgeous frames just on this one page in this paper pad.
I added frames cut out with Bazzill Banana Split yellow, burnt orange and brown cardstock.  Orange frame measures 5 1/2" x 7 3/4".  Yellow frame measures 5 5/16"  x 7 1/4" and the brown frame is 5 3/4 x 8".

Stamp the Heartfelt Creations Classic Sunflower stamp with brown ink on cardstock.  You will need two sunflower sets.  Die cut and lightly sponge the center and tips of the petals with NUVO Embellishment Mousse Copper.   You will need to spray a little water often in the embellishment mousse after opening the jar to apply the cream with your fingers on the petals. 

NUVO Embellishment Mousse Copper


Use a flower shaping tool to shape each petal.  If you aren't familiar about shaping flowers, Heartfelt Creations has a tutorial on how to shape their sunflowers.  Click Here to see this tutorial. After gluing the layers of the sunflower together, I glued the US Artquest Espress Yourself Prills and Go-Man-Go Prills in the center of each sunflowers. 

I cut out one Heartfelt Creations Blushing Rose die shown on the bottom right for the swirls and leaves.  I use this Heartfelt Creations Blushing Rose die and the Heartfelt Creations Blushing Rose stamp set for various flowers and glue different flowers where the flowers are stamped.  The leaves and swirls are gorgeous with most flowers.


I used a hot glue gun to adhere the flowers and bow to the card. 


I can't wait to see the possibilities that you will create making an sunflower card using the Heartfelt Creations Classic Sunflower paper, dies and stamp sets. I really encourage you to purchase the entire coordinating Heartfelt Classic Sunflower collections from The Rubber Buggy.

Enjoy and Happy Crafting!

Nancy Hill
The Rubber Buggy Design Team


Thursday, October 26, 2017

Frantic Stamper Snowflake Christmas tree

Nancy Hill for Frantic Stamper Design Team.  I am really loving the Frantic Stamper 6" x 6" Snowflake stamp along with the Frantic Stamper Snowflake border die and Frantic Stamper Snowflake Christmas Tree die.  

The card measures 7" x 8" but can be smaller.  Use gold embossing powder for the Frantic Stamper Snowflake Stamp and Merry Christmas. Cut 1 1/2" x 7" green cardstock and die cut the Snowflake border with gold cardstock and adhere it to the green cardstock.  

Cut 1 1/4" x 5 1/4" green cardstock and adhere to the right side of the wide snowflake background.  

Use 3D foam to adhere the Christmas Tree frame to the card.  Stamp the Frantic Stamper Merry Christmas on a banner and adhere to front of card.  

 Cut 3 1/4" x 5 1/4" green cardstock for the inside frame.  Adhere the Christmas tree and some of snowflakes from the Christmas tree die around the tree. 


Now is your turn to use your imagination and creativity to design your own card using the Frantic Stamper Snowflake Christmas Tree die set using the coordinating dies and stamps from Frantic Stamper on-line store and have fun personalizing it before sending it to that special person.

Enjoy and Happy Crafting!


Nancy Hill
 Frantic Stamper Design Team


Sunday, October 22, 2017

Easel Card with Drawer Tutorial


Hi, Nancy Hill and excited to share my tutorial on how I make my Easel Cards with Drawers.  I have been putting photos, chocolates and other gifts inside these cards with drawers.  I highly recommend heavy card stock and if the pattern paper isn't heavy, just use heavy card stock for the frame and glue the pattern paper on it.  

I really love Heartfelt Creation coordinating papers, dies and stamps.  I used the Heartfelt Creations Classic Sunflower paper, dies and stamps for this card above and stamped a sentiment on the bottom of the drawer besides the Happy Birthday sentiment on top.  

Below is my measurements and I wrote my instructions as well as show you the visuals to help you through this process. Once you have done one of these cards/drawers, it will be easier to make the others.  

Instructions

Top and Bottom For Drawer

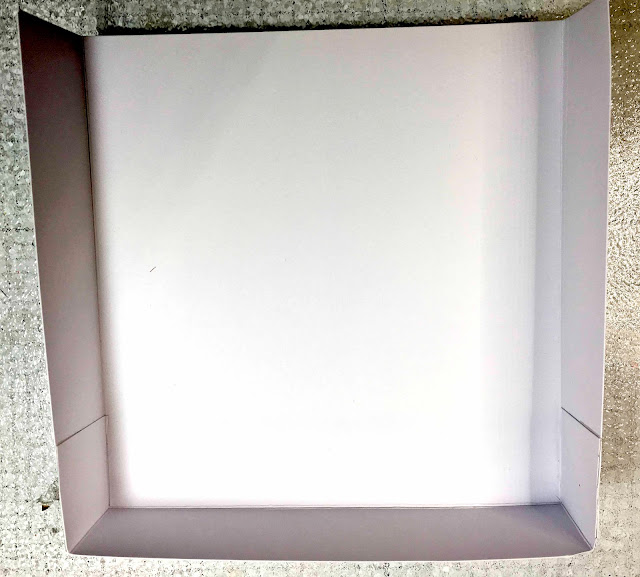
This is the bottom drawer and cut a 7 3/8" x 8 1/2 using heavy cardstock.  Score 1 1/4" on the three sides with one of the long sides not scored.  Fold the score lines.   As shown on the photo, cut along the score line of each side of the corners.  You will add double-sided self adhesive tape and tape the tabs to this box (see photo below).  I like using 1" Scor-Tape which is very adhesives and wonderful for heavy cardstock.  See below.  


Cut the top drawer at 7 5/16" x 8 7/16" and score 1 1/4" on the three sides with one of the long sides not scored.  Follow the same instruction above for the drawer.  Afterwards, add double-sided self adhesive tape on the outside of this drawer on three sides and adhere to the bottom drawer.


This is the bottom drawer and cut a 7 3/8" x 8 1/2 using heavy cardstock.  Score 1 1/4" on the three sides with one of the long sides not scored.  Fold the score lines.   As shown on the photo, cut along the score line of each side of the corners.  You will add double-sided self adhesive tape and tape the tabs to this box (see photo below).  I like using 1" Scor-Tape which is very adhesives and wonderful for heavy cardstock.  See below.


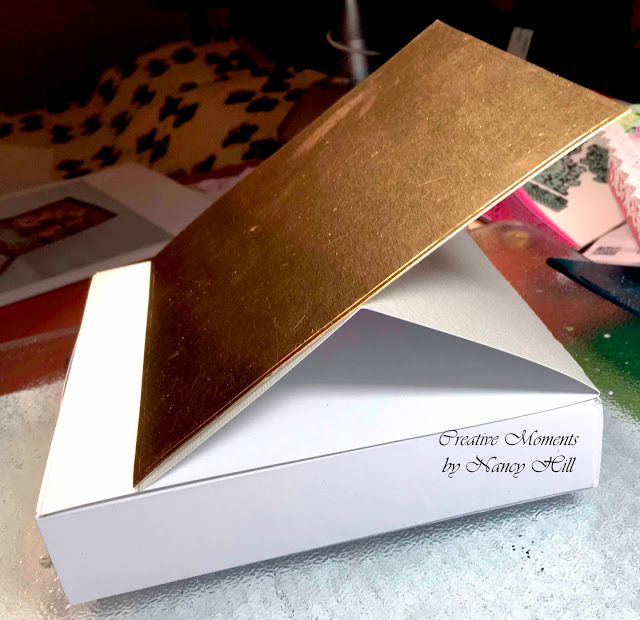
This is the drawer that will pull out.  Using heavy weight cardstock, cut 8 1/8" x 8 1/8" and score 1 1/8" on all four sides and fold.  Cut the top and bottom of each fold like in the corners as shown above.  Using double-sided self adhesive tape, tape the box.    


Saturday, October 21, 2017

SunFlower Card with Drawer


I created a tutorial for you on how to make my easel cards with a drawer.  Click HERE to view the tutorial.    For this easel card, I am using the Heartfelt Creations Classic Sunflower collection of coordinating paper, dies and stamps and other craft supplies from The Rubber Buggy on-line store.   I advise watching the Heartfelt Creation U-Tube video about making these sunflowers but I also added the additional petals in the center with the Prills.  I sponged on the Lawn Fawn Sunflower ink on the petals after stamping the sunflowers with a rust colored ink before die cutting the flowers.   I added the leaf cut from the Heartfelt Creations Classic Rose die set.  The patterned paper and butterfly was cut out from the Heartfelt Creations Classic Sunflower paper pad.  I glue the bow and large sunflowers on the card with a hot glue gun.  


US Artquest Mini Prills - Go Man Go Prills 3 oz


I can't wait to see the possibilities that you will create making an easel card with the drawer.  I really encourage you to purchase the entire coordinating Heartfelt Creations Pampered Pooch collections from The Rubber Buggy.

Enjoy and Happy Crafting!

Nancy Hill
The Rubber Buggy Design Team


Friday, October 20, 2017

Frantic Stamper Hot Cocoa Pocket Holders


I had so much fun making this pocket holder for hot chocolate.  The size is 5" x 5" and I used the gorgeous stamps and dies below.  The plaid paper was made using the
Frantic Stamper Plaid Maker #2 stamp set also with the Misti My Petunia stamp tool. If you don't have a stamp tool, I would high recommend having one and Misti My Petunia is what my friends and I use ALL THE TIME! I adhere the front to the back and popped in a cocoa bag.

I used one stamp at a time and embossed it on gold metallic cardstock.  I cut out the snowflakes from the Frantic Stamper Snowflake Border and adhere a 3 mm rhinestone in the center of each snowflake.  I cut out 1" x 5" red cardstock and adhered it to the front of the pocket and stamped the hot chocolate sentiment with the Frantic Stamper Hot Cocoa stamp set.

I just love this Frantic Stamper Cup Of Cocoa die set with the cup, snowflake, whip cream and
 marshmellows in this die set.  I colored some of the whip cream and marshmellows with a light brown Copic maker pen.

I adhere the front to the back and popped in a cocoa bag and used double-sided tape for ribbon for the front and back of the pocket.

Now, I can hang these on my Christmas tree to hand out for visitors or Christmas eve guests that come to our house.


Frantic Stamper Cup of Cocoa die set, FRA-DIE-10321
Frantic Stamper Plaid Maker #2 - FRA-CLG-B032
Frantic Stamper Hot Cocoa Stamp Set FRA-CL-084

Frantic Stamper Snowflake Border 10335
Now is your turn to use your imagination and creativity to design your own pocket holder using the coordinating dies and stamps from Frantic Stamper on-line store and have fun personalizing it and putting some goodies in the mug for that special person. 


Enjoy and Happy Crafting!


Nancy Hill
 Frantic Stamper Design Team


Wednesday, October 18, 2017

Tutorial on Easel Card with Drawer


Hi, Nancy Hill and excited to share my tutorial on how I make my fun Easel Cards with Drawers.  I used other tutorials but modified the measurements and instructions to work for me.

I put photos, chocolates and other gifts inside the drawers besides an additional stamped sentiment.  


I really love Heartfelt Creation coordinating papers, dies and stamps.  I used the Heartfelt Creations Classic Sunflower paper, dies and stamps for this card above and stamped a sentiment on the bottom of the drawer besides the Happy Birthday sentiment on top.  

I wrote my instructions in addition to the photos to make it more helpful.  Once you have made one of these cards/drawers, it will be easier and much more fun to make the others easel cards with drawers.  

Instructions

Top and Bottom For Drawer

I highly recommend heavy card stock and if the pattern paper isn't heavy, just use heavy card stock for the frame and glue the pattern paper on it.  

This is the bottom for drawer.  Cut a 7 3/8" x 8 1/2 using heavy cardstock.  Score 1 1/4" on the three sides with one of the long sides not scored.  Fold the score lines.   As shown on the photo below, cut along the score line of the corners.  You will add double-sided self adhesive tape and tape the tabs to this box (see photo below).  I like using 1" Scor-Tape which is very adhesives and wonderful for heavy cardstock.  See below.  


Cut the top for drawer at 7 5/16" x 8 7/16" and score 1 1/4" on the three sides with one of the long sides not scored.  Follow the same instruction above for the drawer.  Afterwards, add double-sided self adhesive tape on the outside of this drawer on three sides and adhere to the bottom drawer.


Drawer
This is the drawer that will pull out.  Using heavy weight cardstock, cut 8 1/8" x 8 1/8" and score 1 1/8" on all four sides and fold.  Cut the top and bottom of each fold like in the corners as shown above.  Using double-sided self adhesive tape, tape the box.    

Easel Card to Attach to Drawer

Make sure to use heavy cardstock or one solid cardstock and at patterned paper adhere to the cardstock.  I found that if you don't do this and add flowers, the easel part of the card will droop due to the weight.  


Cut a 6" x 12" cardstock and score at 3" and 6" and fold the score lines.  This is what it may look like gluing or using 1" double-sided adhesive tape of the easel card to the drawer. 


I liked adding my flowers and finishing the easel card  before adhering this to the drawer.  Cut a 6" x 6" square and add your flower, etc. and adhere from the 3" fold to the bottom.  


Cut another 6" x 6" square for the inside of the easel card and adhere. Add your sentiment on a decorative frame and use 3D foam tape or dots to give the height that the part of the easel card with slide on when the easel card is opened.  
Options are to add embellishments or a bow as a handle to pull out the drawer. I have even used a circle punch and cut out a half circle to the drawer for fingers to pull the drawer out.  (See photo below for drawer). 

Other option is to add additional stamped sentiment on the inside of the drawer.  (See Photo Below)


I hope you enjoyed my tutorial and had fun making an easel card with a drawer.  If any questions or you want to share a photo of your easel card with me, please don't hesitate to e-mail me at lehill@mtida.net.  

Happy Crafting