Translate

Showing posts with label Graphic 45. Show all posts

Saturday, July 7, 2018

Planner with Grapic 45

Welcome back Rubber Buggy bloggers.  Hi, Nancy Hill with the Rubber Buggy Design Team.  The Rubber Buggy on-line store has new products and supplies coming in each week. Due to the popular demand for these gorgeous supplies and products, these will sell quickly.  Make sure to check these out often and get your order in quickly before these are sold out.

I bought a planner and applied the gorgeous coordinating Graphic 45 papers, dies, chipboard and cardstock to the cover of this planner as well as throughout parts of the planner to personalize this for my daughter-in-law.  The shabby chic style would not be complete without flowers that were handmade using the LeCrea foam flower sheets cut out from the Heartfelt Creations Classic Rose die set, Venise lace and Tim Holtz Idea-ology vintage metal trinkets.  
I just love the Graphic 45 coordinating papers and chipboard. I used the Prima Marketing 1" wide adhesive tape to adhere the Graphic 45 to the planner cover on the back and front.   I used a variety of my Graphic 45 papers and love the old Graphic 45 Ladies' Diary image in the center of the Graphic 45 Staples Square Tag and Clock Die  set that was cut out with metallic gold cardstock and used spray adhesive glue to apply it on the patterned Graphic 45 paper.  
I handmade the foam flowers from the LeCrea Flower Foam-Salmon with the Heartfelt Creations Classic Rose die set.  I used the medium and smaller size rose dies.  This time, I didn't use a hot iron for the foam since it wasn't shaping as well because this is a smaller flower.  Seems like the iron works well with large petals but not these small ones.  I used a dry baby wipe to rub the red color in the Prima Marketing Soft Pastel Oil on the edges of each petal on both sides.  Then I  rolled each petal and shaped it with my fingers.  I used a hot glue gun to glue the flower together.  I used the Heartfelt Creations Classic Rose die set to cut out the leaves from the LeCrea Foam Flower green sheet.  I used the same technique as the petals for coloring the leaves and used the Prima Marketing Soft Pastels Oils reds along with lighter greens along the edges of the leaves.   
I cut out the picture of my grandchildren and family and put it in the Tim Holtz Idea-logy Pocket Watch (Frame 2). I rubbed with my fingers the Prima Marketing Rich Copper wax on the watch, key hole and Tim Holtz metal word banner. 

No vintage or shabby chic style would not be complete without ribbon or lace.  I love the Venise Lace on my vintage/shabby chic projects.  I adhered the Venise Lace with Prima Marketing 1" wide adhesive tape.   I added ribbon to the binder along with the Graphic 45 chipboard.  

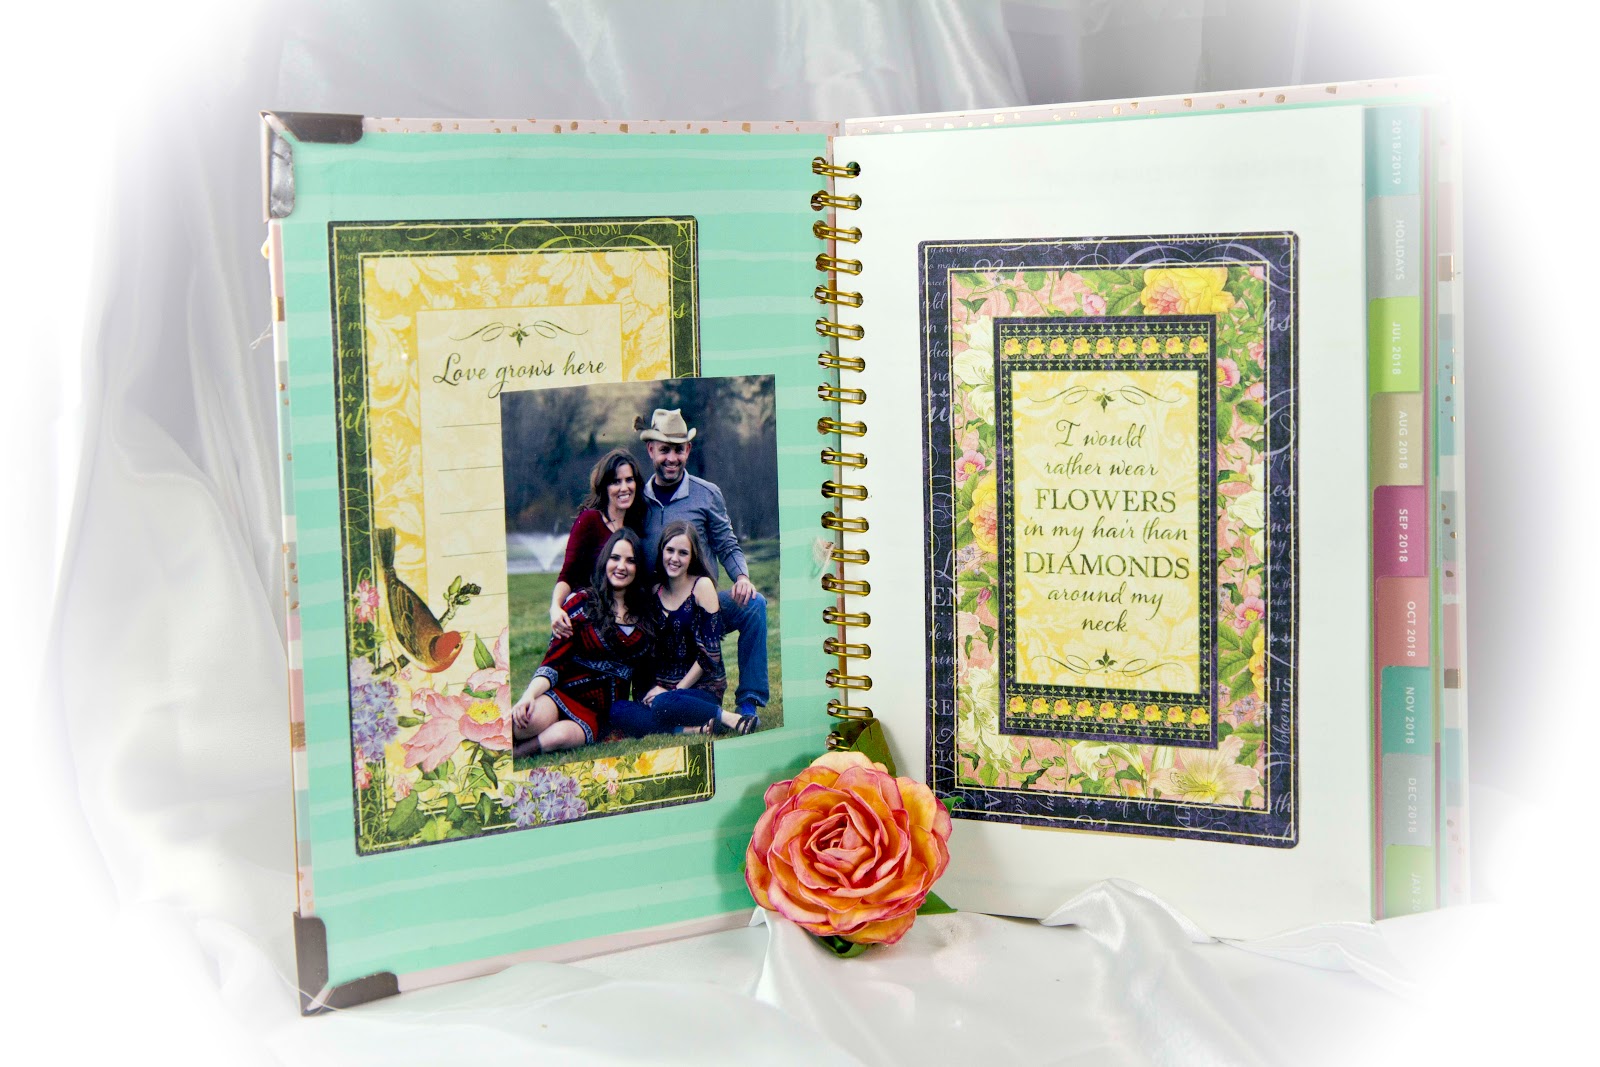
Throughout the planner, I added the Graphic 45 Floral Shoppe Journalizing/Ephemera cards and a personal pictures to personalize this for her.
Tim Holtz Idea-logy Pocket Watch (Frame 2)
LeCrea Flower Foam-Salmon
Heartfelt Creations Classic Rose die
Graphic 45 Floral Shoppe Journalizing/Ephemera
Graphic 45 Staples Square Tag and Clock Die 
Prima Marketing 1" wide adhesive tape
Prima Marketing Rich Copper wax
Prima Marketing Soft Pastel Oil
Venise Lace


I hope I have inspired you try out these products available at The Rubber Buggy on-line store.  My cards and projects are always posted on Saturday.  Keep watching and thank you so much for those wonderful comments as well as suggestions. 
Enjoy and Happy Crafting!

Nancy Hill
The Rubber Buggy Design Team


Monday, January 9, 2017

Love Tree

Welcome back and I am excited to share with you another gorgeous Tutti Designs die.  I hope to inspire you to make your next card using this gorgeous 
Tutti Designs Whimsical Love Tree die.   While visiting Tutti Designs.com to see this gorgeous new die, check out the other gorgeous November releases of Tutti Designs new Love and Heart dies by clicking HERE.


I couldn't wait to get started using this gorgeous die.  


Using the Tutti Designs - Whimsical Love Tree die and shimmer card stock, I cut out two die cuts using the smaller one for cutting out the butterfly. 

I added pink NUVO Crystal Glitter Drops to each heart and on the butterfly to give it more of a 3D effect and it brings out the hearts.  

I added Copic Markers BG31 that matches the blue green in the patterned paper.  I photograph this on navy blue paper to show more of the colors in this tree.  

When I add butterflies to my cards, I bend the center of the butterfly and curl the edges of the wings.  I only add glue to the center of the butterfly. 


I embossed the white frame, cut out four strips of pink card stock to add to the inside of the frame and used the same pink card stock to die cut the lacy trim on the outside edges of the frame.  Now, it is your turn to create a beautiful card or project using the Tutti Designs Whimsical Love Tree die.

You'll want to be sure to pop over to the Tutti Designs Store and check out all the new November beautiful dies and soon the December releasesYou can order these gorgeous dies from Tutti Designs on-line store or the wonderful stores and companies that carries Tutti Designs dies. 


Click HERE to see the new November and December Tutti Designs die releases
Reminder to visit the Tutti Designs Blog to see what our other designers have created for you.  Explore more ways of using this die as well as other Tutti Designs dies, visit our Tutti Designs designers on the Tutti Designs Pinterest or Tutti Designs Facebook .

Thank you again!

Nancy Hill, Design Team 


Saturday, September 24, 2016

Twas the Night Before Christmas


I made this Christmas card using the following supplies from The Rubber Buggy on-line store:  Tattered Lace-Shaped Shutter Card dies set with 50 dies, Poppy Stamp-Merry Christmas Banner, Heartfelt Creations-Gift Wrapped Present Stamp Set, and the gorgeous Graphic 45 - Twas the Night Before Christmas Long Winter Nap and Graphic 45 - Christmas Carol #1 - Good Cheers.

I have some instructions on my previous blogs on how I used the Tattered Lace-Shaped Shutter Card die set for my cards and there are some of these instructions of the back of the packet.  


Wouldn't this new released Poppy Stamp Merry Christmas banner  die be gorgeous on a lot of projects and Christmas cards.  I used the wonder Bazzill cardstock Peppermint for the red and gold metallic card stock for the banner.

I used the Ranger Ice Stickles - Diamond on the white parts of Santa's suite to give it glitter and dimension and Ranger Ice Stickles - Christmas Red on the berries and ornaments as well as the stockings (photo above)

These wonderful supplies were purchased at The Rubber Buggy on-line store.  Now it is your turn to try these products out from The Rubber Buggy and see what you create! 

Remember to visit The Rubber Buggy store to shop for those gorgeous dies, stamp supplies and other supplies for all of your projects, scrap booking and card making.  You will be excited to hop on over to  The Rubber Buggy Blog and The Rubber Buggy Facebook each day to see what the talented and creative designers have made with products from The Rubber Buggy store.  

Thank you again for visiting me today.  I will be sharing with you next Saturday another exciting project or card made using the wonderful Rubber Buggy supplies.  

Nancy Hill
Designer for The Rubber Buggy


Saturday, September 17, 2016

Book of Spells


 If you have been following my blogs, last Saturday I posted a card using the wonderful Tattered Lace Essential Shutter Card die set purchased from The Rubber Buggy.  I mentioned that I will be using this same die set each Saturday, Tattered Lace Essential Shutter Card for the next month making cards for other occasions.  

For anyone who has made a shutter card, there is a lot of time and mistakes in measuring and scoring. Just look at the many dies in this set and you can see why Tattered Lace created this fantastic die set to take the pain of measuring and scoring every square and rectangle, etc. for making a shutter card.  Now it is loads of fun to make shutter cards.  Look at the additional dies in this set to cut patterned paper and even more dies in this set to add the sentiment or image, making many layers if you want.  I would image now that you are seeing the possibilities that you have now making shutter cards for special people in your life.  

The Rubber Buggy sells a wide variety of colored Bazzill premium card stock. I love the weight and quality of the Bazzill card stock papers especially for frames.  I used the Bazzill Licorice Twist (Black) card stock to cut out the shutter card frame using the Tattered Lace Shutter Card die and glued each piece onto the shutter card frame.

The fun begins when adding the sentiments and pattern paper.  I have used the gorgeous varies of Halloween paper from Graphic 45:  Halloween in WonderlandRare Oddities Brews and Potions, and Steampunk Spells-Nevermore.  


Graphic 45 Rare Oddity Stamp Set
I used this gorgeous stamp set came from the Graphic 45 Rare Oddity One Stamp Set with the Misti Stamp tool to get the black ink to show up so well.  

Now it is your turn to try these products out from The Rubber Buggy and see what you create! 

Remember to visit The Rubber Buggy store to shop for those gorgeous dies, stamp supplies and other supplies for all of your projects, scrap booking and card making.  You will be excited to hop on over to  The Rubber Buggy Blog and The Rubber Buggy Facebook each day to see what the talented and creative designers have made with products from The Rubber Buggy store.  

Thank you again for visiting me today.  I will be sharing with you next Saturday another exciting project or card made using the wonderful Rubber Buggy supplies.  

Nancy Hill
Designer for The Rubber Buggy

Tuesday, August 9, 2016

Christmas Card with Diamond Satin Rust Ribbon

Welcome back bloggers and today is my day to share with you another gorgeous ribbon and supplies purchased from the Really Reasonable Ribbon Store which offers fantastic customer service and fast delivery for reasonably priced ribbons and supplies to give your card or project that "WOW" look.  

I used the Diamond Satin Rust ribbon for the bow from this assortment that can also be purchased separately from the Really Reasonable Ribbon Store.    I made the bow with the awesome Zutter Bow It All bow maker and attached with Scor-Tape.  


which goes well with many of my Graphic 45 papers with reds in this patter paper.

Other supplies:
Bazzill card stock
Graphic 45 A Christmas Carol
Tutti Designs die - Holiday Lamp Post
Sue Wilson Designs - Holly Sprays  

Also, on the Really Reasonable Ribbon Blog, a exciting challenge is going on right now with ribbon or trim besides see daily designers' cards and projects using Really Reasonable Ribbon variety of gorgeous ribbons for all of your projects and cards.    Come join the fun and post your card on the Really Reasonable Ribbon Challenge and you might become the next winner which is selected through a random drawing.   Also, come visit us on Really Reasonable Ribbon Facebook but definitely check out the Really Reasonable Ribbon Store to get those fall, Thanksgiving and Christmas projects and cards done ahead of time.

Nancy Hill
Really Reasonable Ribbon Design Team

Wednesday, April 20, 2016

Masculine Card

Welcome back to my blog for Really Reasonable Ribbon and I am excited to share with you this masculine card I made for my husband for his birthday but also could be used for Father's Day.  Really Reasonable Ribbon has the special masculine ribbon for your cards or projects.  


This is the gorgeous 3/8" Satin Diagonal Stripe Turftan/Tan ribbon and bow for this masculine card made with the Zutter Bow It All bow maker and attached to the card using the 3/8" Scor-Tape that was purchased at Really Reasonable Ribbon.   
3/8" Satin Diagonal Stripe Turftan/Tan
 The supplies that I used are the Graphic 45 Collections, Come Away With Me and Ladies Diary; Sue Wilson Designs-Scandinavian Collection-Corner and SW Double Pierced Square dies; Tattered Lace-Old Car; Cheery Lynn Design-Pierced Banner die and old buttons, keys, brads and clock from my  supplies.  

The challenge, Thing With Wings theme, is still going on and join the fun on the Really Reasonable Ribbon challenge.  We are always excited to see what you have made and information you have posted.  We learn so much and inspired by everyone.  

Thank you so much for visiting my blog and would love to hear from you.  Please leave a comment and any additional questions, don't hesitate to e-mail me at lehill@mtida.net.  

I am entering this card in this challenge:
Lets Craft and Create #112 - Card for a Man

Friday, April 15, 2016

Things With Wings-On Your Special Day

 What an exciting Really Reasonable Ribbon challenge theme, "Thing With Wings".  This is the gorgeous 3/8" Checkerboard Turquoise Satin Ribbon which is offered separately or from the Really Reasonable Ribbon April 2016 Ribbon Club.   If you really love ribbon and would like to have a wonderful assortment of ribbons sent to you automatically each month, just join the Really Reasonable Ribbon Club!  Monthly ribbon club assortments are selected and pre-packed to reflect a specific theme, color, or holiday season. The assortments vary from month to month, but an average assortment has 9 different ribbon styles and consists of 16-18 yards of ribbon.  The total price of each monthly assortment is $9.50 and includes the shipping/handling fee too!
I used a rhinestone heart ribbon buckle slider in this bow.  I made this bow with the slider using the Zutter Bow It All bow maker.   I attached the ribbon and bow with 3/8" wide Scor-Tape.  I love using Scor-Tape than glue since I can rearrange by bow and ribbon on this tape and the bow will still stick on the tape. 

Other supplies used: 
Sue Wilson Design dies:  Camellia Flowers, Laced Edge Leaves, On Your Special Day, Heart Corner, Gemini-Phoenix
Next Level-Wave-We R Memory Keepers
Ranger Liquid Pearl White
Graphic 45-Botanical Garden
Cheery Lynn Design- Anastasia Border
Bazzille cardstock

Again, please join us for this exciting Really Reasonable Ribbon challenge and we would love to see what you have created.  I learn so much from the people who post their cards as well as getting motivation and inspiration from others. 

Also, visit the Really Reasonable Ribbon store and start ordering those supplies and ribbons for your spring and summer cards and projects. 

If you have any questions, don't hesitate to e-mail me at lehill@mtida.net or leave a comment on my blog. 


Saturday, April 9, 2016

Your Special Day

Welcome back to my Really Reasonable Ribbon blog post today.  Really Reasonable Ribbon has a variety of ribbons to give your card that WOW look.  I am using the 5/8" Double-face Satin Light Silver ribbon with a rhinestone and pearl ribbon buckle slider.  I couldn't have tied this bow without the Zutter Bow It All bow maker.  Bonnie Garby has several U-Tube videos on how to make a variety of bows with the Zutter Bow It All.  I attached this bow using the 1" Scor-Tape.  I love using the Scor-Tape now since I can arrange the bow several times on the tape and it will stay there.   The Wild Orchid Craft (WOC) flowers are also sold by Really Reasonable Ribbon.   I am using the
15mm Wild Orchid Baby Pink Open Rose with the WOC rose buds. 


Other supplies are:
Next Level Embossing Folder -Wave by We R Memory Keeper
Sue Wilson Design Dies:   Lace Edge Leave, Your Special Day, Milford Adornment
Paper:  Graphic 45 and Pearl Shimmer Paper
Rhinestone and Pearl ribbon buckle slider
Ranger Liquid Pearl - White

Now is the time to buy the ribbon and supplies for your spring and summer cards.  Check out the variety of supplies Really Reasonable Ribbon sells for all of your cards and projects.  We would love to see your cards and projects on the Really Reasonable Ribbon blog challenges.  You might be the winner this time!

If you have more questions, don't hesitate to e-mail me at lehill@mtida.net or visit me at http://hillfarmcards.blogspot.com

I am entering this card in the following challenges:
Dies R Us Challenge #46 - Use Scallops


Friday, April 1, 2016

Secret Album Jewelry Box


Welcome back and we have an fun challenge with a theme "Flowers" at Really Reasonable Ribbon blog on this April Fool's Day.  Springtime is in the air and our designers have exciting cards and projects to share with you.  Shop at Really Reasonable Ribbon for the beautiful  variety of  ribbons, lace, flowers and other supplies that will go with any of your springtime project or card.

I found this old box at a thrift store and thought this would be an exciting project to add a variety of gorgeous lace and flowers made with satin and grosgrain ribbon from Really Reasonable Ribbon.   This is the front of the box using a combination of Graphic 45 "Secret Garden" and "Botanical Garden". 
The ivory lace near the flat back 5mm pearls is the Arianna Natural Crochet ribbon. 


 The green and white ribbon for the bow is the gorgeous Sheer Two-Tone Strip Olive and Celery ribbon made with the Zutter Bow-It-All bow maker.  If you don't have this yet, it is worth every penny plus more.    Also, I used this ribbon for the right edge with  the olive part on the front and the celery on the other side.


I make my own lady bugs.  If you are interested, please view my Lady Bug tutorial. 

 Check out How">http://snp.gd/hbtn2y">How to Make Mini Lady Bugs for Cards and Projects
by Nancy Hill on Snapguide.

 I tried making these flowers using florist ribbon and other variety of ribbon but the petals didn't curl well and also the petals had burnt areas.  I discovered that using a very good satin ribbon like the double-faced satin ribbon at Really Reasonable Ribbon had the best results.  The technique to make the leaves and flowers were the same as you will see on my Ribbon Flower tutorial below. 

Check out How">http://snp.gd/hbtmec">How to Make Ribbon Flowers
by Nancy Hill on Snapguide.

 The ivory flower was made using the 5/8" Satin Ivory.  The yellow flower was created using the 3/8" Lemon Yellow Grosgrain ribbon.  The two pink flowers on each corner were made using the 5/8" Double-Face Satin Coral Rose and the leaves were made using the  5/8" Double-Face Satin Flash Green

The daisies were made using a Cheery Lynn Design Shasta Daisy Strip die.  I cut out two butterflies and used foam tape to glue them together.  This gives the one butterfly (above photo) a 3-D look.  I did the same for the hummingbird to make them stand out. 

Since the book cover was leather, I used 1" wide Scor-Tape from Really Reasonable Ribbon to stick the Graphic 45 paper on the leather rather than glue since glue didn't stick to leather well.  Scor-Tapes of different sizes were also used to stick all of the laces and bow on this box  On the left and photo below is the gorgeous Arianna Natural Crochet lace and on the right is the Louise White Crochet lace that covered up the edges of  paper besides making it look better.  The black strips are Velcro to close this box.
The gorgeous and delicate lace ribbon (above) is the Louise White Crochet lace ribbon on the back of the box. 
The edges of the box are Graphic 45 "Secret Garden" card stock papers with the Sue Wilson Design-Scandinavian Border.  I attached the border with 1/2" wide Scor-Tape around the edges of the box  then added 1/2" strip of card stock from Graphic 45 "Secret Garden" using another 1/2" wide Scor-Tape.

 Always love to hear from you so please leave a comment.  Also if you want to see my next card and projects with ribbon and flowers, follow me on http://hillfarmcards.blogspot.com If you have any questions, don't hesitate to contact me at lehill@mtida.net.

We will be excited at Really Reasonable Ribbon to see what you have to share on our current challenge.  It is always fun to read your blog and learn from you.  Please visit Really Reasonable Ribbon on Facebook and on the Really Reasonable Ribbon blog to see what exciting projects and cards the designers have waiting for you. 

I am entering this card in the following challenges:
Cheery Lynn Design Challenge #226 - Back to Nature
Dies R Us Challenge #46 - Use Scallops

Tuesday, March 29, 2016

Easter Notebook


Welcome back Really Reasonable Ribbon bloggers.  I have a very fun project to share with you.  I am giving each of my grand children for Easter a decorative notebook, mini album or diary.  I am having so much fun with the Graphic 45 Classic Collections, Once Upon A Springtime, with fairies and bunnies along with the varieties of gorgeous laces, ribbons and supplies from Really Reasonable Ribbon to make my Easter projects.  Really Reasonable Ribbon has the variety of sizes and colors of ribbon to give your card or project that special WOW! 


My grand daughters are into fairies and this nana is also loving fairies now so the Graphic 45 Springtime collection was my choice to use for this Easter present.  The cover of the diary is leather.  Therefore, I used 1" Scor-Tape to stick the paper onto the leather. 
I created a tutorial for you on how to make a variety of lovely flowers out of ribbon using the quality of satin ribbon from Really Reasonable Ribbon.  I tried using florist and other ribbons but found that the variety of stain ribbon from RRR didn't burn and the petals curled very nicely using a candle in a jar.  This flower was made using the gorgeous 5/8" Double Faced Satin White ribbon and 5/8" Double-Face Satin Flash Green.  The bow also was made using the 5/8" Double Face Satin ribbon  with the beautiful Melon seam binding ribbon.  Both bows were made using the Zutter Bow It All bow maker and attached with  Scor-Tape from Really Reasonable Ribbon.  In the past, my bows were not as fancy as they are now using the Zutter Bow It All.  Making bows are so much fun now!!!  The green leaf is the Cheery Lynn Design Ivy strip and the white is Sue Wilson Designs-Lace Edged Leaves.   
 
 Check out How">http://snp.gd/hbtmec">How to Make Ribbon Flowers
by Nancy Hill on Snapguide.
 
 
The beautiful cream/ivory Arianna Natural Crochet lace is on the sides and I used 1/2" Scor-Tape to stick the lace on the paper.  This tape is much better than glue for lace and ribbon. 
 

 The back cover of the diary is the 5/8" Double Faced Satin White ribbon with a 3/8" strip of Graphic 45 paper down the center of the ribbon.   The owl, castle and knight are dies from Tattered Lace's new collection. 


This is the inside of the diary.  I cut out these flowers from the Graphic 45 Springtime collection and used foam tape and glue on the back to give the flowers some dimension.  Again, this knight is a die from the Tattered Lace new collection. 
 
 
This page is inside on the second paper of the diary.  This very cute dragon is Freddie from digital Wee Stamps by Sylvia Zet.  I loved Sylvia's digital stamps.   I colored Freddie using Copic markers and colored pencils.  I cut this out and used foam tape and glue on the back.  I cut out the flowers in the Graphic 45 Springtime Collection and also used some foam tape and glue to apply it on this page to give these flowers some dimension. 
 
This is a lot of information but I didn't want you to miss out of how I did this diary in case you are interested doing this.  Yes, it might take some time but I take more time thinking about my next step than doing it. 
 
I hope you enjoyed this and would love to read your comments.  I love reading your blogs and being inspired from your projects and cards as well as learning so much from you.    There is so many new social media friends and I really enjoy hearing from you so much.  Again, my e-mail is lehill@mtida.net or I answer the questions on my comments on the blog as well.
 
Now, join the fun and see what our very talented Really Reasonable Ribbon designers and challengers have to share with everyone on the Really Reasonable Ribbon blog as well as our Really Reasonable Ribbon Facebook
 
I am entering this card in the following challenges: